background image

3

 Way Auto-Off Feature 

(Models GCSTSP6202, GCSTSP6203, GCSTSP6204, GCSTSP6205, GCSTSP6206 & GCSTSP6212)

When the iron is plugged in, the Power Indicator will light steadily, indicating that there is 

power to the iron.

IF YOU LEAVE THE IRON:
• in a horizontal position without moving it, or accidentally tip the iron 

over, it will automatically stop heating after 30 seconds. The Indicator 

light will turn green, beep 6 times and then blink to let you know that  

the iron has stopped heating.

• in a vertical position (on its heel rest) without moving it, the iron will 

automatically turn off after 15 minutes. The Indicator light will turn 

green, beep 6 times and then blink to let you know that the iron has 

stopped heating.

Important: The Indicator light will continue to blink until the iron is unplugged or reset.

TO RESET THE IRON:
• Move the iron back and forth and allow it to reheat for 2 minutes. The indicator will stop 

blinking and the iron will start heating again.

Warning: The 3 Way Auto-Off is a safety feature, not a recommended means for turning 

your iron off.

Maintenance and Cleaning

Before cleaning the Iron, always make sure that it is disconnected from the electrical  


wall socket and is completely cool. 

SOLEPLATE

•  Residue on the Soleplate can be wiped off with a cloth soaked in a solution of water 

and vinegar.

•  Do not use scouring pads, abrasives or chemical cleaning solvents as they may 

damage the finish.

HOUSING

•  The housing can be cleaned with a moist cloth and then wiped dry. 
•  Other than the recommended cleaning, no further user maintenance should be 

necessary. If for any reason your Steam Iron should require repairs, do not try to fix it 

yourself. Send it to an Oster Authorized Service Center.

English-9

Summary of Contents for GCSTSP6201

Page 1: ...ICA LEA TODAS LAS INSTRUCCIONES ANTES DE USAR ESTE APARATO Instruction Manual STEAM IRON WITH ADVANCED STEAM TECHNOLOGY CERAMIC SOLEPLATE PLEASE READ ALL INSTRUCTIONS BEFORE USING THIS APPLIANCE MODELOS MODELS GCSTSP6201 GCSTSP6202 GCSTSP6203 GCSTSP6204 GCSTSP6205 GCSTSP6206 GCSTSP6212 ...

Page 2: ...de vapor enfríe completamente en la posición vertical antes de guardarla Enrosque el cordón eléctrico alrededor de la base de soporte antes de guardarla 9 Pueden ocurrir quemaduras al tocar partes calientes el agua caliente o el vapor Tenga cuidado cuando invierta la posición de una plancha a vapor pues puede haber todavía agua caliente en el tanque 10 No opere la plancha si el cordón está dañado ...

Page 3: ...esté posicionado de manera que no sea halado o cause tropiezos 22 Este artefacto eléctrico no está destinado para ser usado por personas incluyendo niños cuyas capacidades físicas sensoriales o mentales estén disminuidas o carezcan de experiencia y conocimiento a menos que una persona responsable por su seguridad les haya supervisado o instruido en el uso de este electrodoméstico Los niños deberán...

Page 4: ...e vapor 5 Disco selector de temperatura 6 Cordón giratorio de 360º 7 Cordón eléctrico 8 Luz indicadora 9 Amplia base de soporte 10 Suela de Cerámica con nano hendiduras cóncavas y plexo canales 11 Botón de limpieza automática 12 Ventana visora del tanque de agua 13 Taza Medidora de Agua 1 4 2 3 5 6 7 9 12 10 8 13 11 ...

Page 5: ... Cuando la plancha llegue a la temperatura seleccionada la luz se apagará indicando que la plancha está lista para planchar La Luz Indicadora estará siempre encendida mientras la plancha esté calentando Una vez que alcance la temperatura seleccionada la luz indicadora se apagará La luz se encenderá y apagará alternadamente mientras se esté planchando pues el termostato mantiene la base en la tempe...

Page 6: ...de que el selector de vapor se encuentre en la posición de cerrado Elija la posición del disco selector de temperatura más apropiada para la tela a ser planchada Después que se apague la luz indicadora puede empezar a planchar Planchado A Vapor El planchar a vapor es sólo posible en altas temperaturas como se indica en el disco selector figura 3 Asegúrese de que hay suficiente agua en el tanque Co...

Page 7: ... las arrugas difíciles La función de golpe de vapor puede usarse con el planchado en seco o con el planchado a vapor siempre que el tanque esté lleno de agua al menos a de su capacidad y el disco selector de temperatura esté colocado en la posición de la banda de vapor Permita que la plancha se caliente por aproximadamente dos minutos Presione el botón de la función golpe de vapor varias veces par...

Page 8: ...las tenga puestas ya que esto puede provocar lesiones Temperatura de Planchado Revise las instrucciones para el planchado en la etiqueta del artículo que desea planchar Revise las instrucciones de la tabla para mayores detalles Si las instrucciones específicas no aparecen en la etiqueta siga las instrucciones de ésta tabla Esta tabla es válida sólo para los tejidos en ella indicados y no se aplica...

Page 9: ...e por ejemplo clorofibra elastodieno Nueva Tecnología de Suela con Nano Hendiduras Cóncavas y Plexo Canales Nueva suela con nano hendiduras cóncavas para un deslizamiento superior y más rápido Múltiples conductos para una máxima difusión del vapor sobre la tela Anti Calc Antisarro La función de antisarro previene la acumulación de depósitos minerales en su plancha Esto prolonga la vida de la planc...

Page 10: ...entar Importante El indicador de encendido continuará titilando hasta que la plancha sea apagada o reiniciada PARA REINICIAR LA PLANCHA Mueva la plancha hacia atrás y hacia delante permitiéndola que se caliente por 2 minutos El indicador de encendido dejará de titilar y la plancha comenzará a calentar de nuevo Mantenimiento y Limpieza Antes de limpiar la plancha asegúrese siempre de que esté desco...

Page 11: ...de un lado a otro y de atrás hacia delante por 30 segundos Al hacer esto incline la punta de la plancha ligeramente inclinada hacia abajo para asegurarse de que el agua circula completamente 7 Voltee la plancha y permita que el resto del agua fluya a través del orificio para cargar agua 8 Seque la base con un paño 9 Enchufe la plancha y gire el selector de temperatura hasta llegar a la posición de...

Page 12: ...ve to turn the Steam Iron upside down since there still may be hot water in the Reservoir 10 Do not operate Iron with a damaged cord or if the Iron has been dropped or damaged To avoid the risk of electric shock do not disassemble the Iron Take it to an Authorized Service Center for examination and repair Incorrect reassembly can cause a risk of electric shock when the Iron is used 11 Do not use i...

Page 13: ...d over 22 This appliance is not intended for use by persons including children with reduced physical sensory or mental capabilities or lack of experience and knowledge unless they have been given supervision or instruction concerning use of the appliance by a person responsible for their safety Children should be supervised to ensure that they do not play with the appliance 23 Close supervision is...

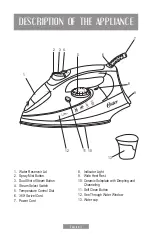
Page 14: ... Dual Shot of Steam Button 4 Steam Select Switch 5 Temperature Control Dial 6 360o Swivel Cord 7 Power Cord 8 Indicator Light 9 Wide Heel Rest 10 Ceramic Soleplate with Dimpling and Channeling 11 Self Clean Button 12 See Through Water Window 13 Water cup 1 4 2 3 5 6 7 9 12 10 8 13 11 ...

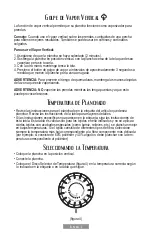
Page 15: ...The Indicator Light will go on and once the selected temperature is reached the light will go off and you can begin to Iron The Indicator Light will be on every time the Iron is heating Once it reaches the temperature setting the Indicator Light will turn off The Light will turn on and off from time to time while you are ironing since the thermostat automatically maintains the Soleplate at the sam...

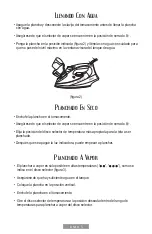
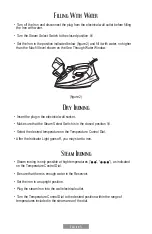
Page 16: ...all socket Make sure that the Steam Select Switch is in the closed position Select the desired temperature on the Temperature Control Dial After the Indicator Light goes off you may start to iron Steam Ironing Steam ironing is only possible at high temperatures as indicated on the Temperature Control Dial Be sure that there is enough water in the Reservoir Set the iron in an upright position Plug ...

Page 17: ...eam for deep penetration of stubborn wrinkles The Shot of Steam feature can be used with dry or steam ironing provided it has at least a tank of water and the Temperature Control Dial is set within the steam band Allow the iron to heat for approximately two minutes Press the Shot of Steam Button several times to prime the pump Press the Shot of Steam Button another three to four times in order to ...

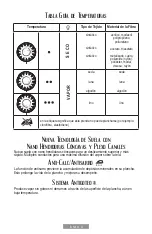
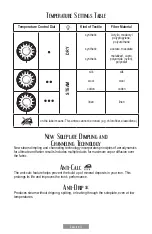
Page 18: ...e label of the item that you wish to iron Check the temperature settings table for further instructions Should the specific ironing instructions not appear on the label follow instructions on the temperature settings table This table is only valid for the fabrics indicated and does not apply to special textiles with a gloss finish etc Textiles with special coatings such as gloss relief wrinkles et...

Page 19: ... chlorofiber elastodiene New Soleplate Dimpling and Channeling Technology New steam dimpling and channeling technology incorporates principles of aerodynamics for ultimate and faster results Includes multiple ducts for maximum vapor diffusion over the fabric Anti Calc The anti calc feature helps prevent the build up of mineral deposits in your iron This prolongs its life and improves the iron s pe...

Page 20: ...o blink until the iron is unplugged or reset TO RESET THE IRON Move the iron back and forth and allow it to reheat for 2 minutes The indicator will stop blinking and the iron will start heating again Warning The 3 Way Auto Off is a safety feature not a recommended means for turning your iron off Maintenance and Cleaning Before cleaning the Iron always make sure that it is disconnected from the ele...

Page 21: ...en rocking the iron dip the nose of the iron slightly below the rear to make certain the water circulates completely 7 Turn the iron upside down and allow the remaining water to flow out of the fill hole 8 Dry the soleplate with a towel 9 Plug in the iron and turn the Temperature Control Dial to the Linen position Let the iron heat for two minutes and dry out the iron completely 10 Turn the Temper...

Page 22: ... GCSTSP6201 013 GCSTSP6202 GCSTSP6202 013 GCSTSP6203 GCSTSP6203 013 GCSTSP6204 GCSTSP6204 013 GCSTSP6205 GCSTSP6205 013 GCSTSP6206 GCSTSP6206 013 GCSTSP6212 GCSTSP6212 013 LEA EL INSTRUCTIVO ANTES DE USAR EL APARATO LA SIGUIENTE INFORMACIÓN ES PARA MÉXICO IMPORTADOR NEWELL BRANDS DE MÉXICO S A DE C V AVE JUÁREZ Nº 40 201 COLONIA EX HACIENDA SANTA MÓNICA TLALNEPANTLA 54050 ESTADO DE MÉXICO TEL 5366...

Reviews: