background image

4

OPERATING INSTRUCTIONS

1.    Once unit is fully assembled (see Assembly Instructions section) place unit on flat level 

surface and plug it into an appropriate electrical outlet.

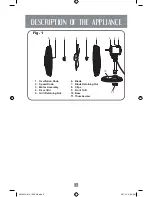
2.   Move the speed knob to select the desired fan speed or to turn it off: “ ” for “OFF”,    

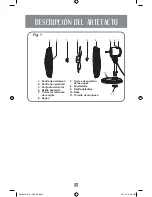
“  ” for Low Speed, “   ” for Medium Speed and “  ” for High Speed (see Figure 1).

3.   To make the fan head oscillate, push the oscillation knob DOWN. To stop the oscillation, 

pull the oscillation knob UP (see Figure 1).

4.   Adjust the tilt of the fan head to the desired angle by pushing gently up or down on the 

fan guard, while holding the fan by the motor assembly/control panel.  

CAUTION: The fan should be switched off before making this adjustment.  

Please note that the head will not latch into the low or mid position unless the guard and 

blade have been fitted to the motor. 

Follow these instructions to correctly and safely care for your table fan. Please remember:
•   Always unplug the fan before cleaning or disassembling.
•   Do not allow water to drip on or into the Fan Motor Housing.
•   Do not use any of the following as a cleaner: gasoline, thinner, benzene (See instructions 

for fan head assembly).

1.   To access the Fan Blade, remove the Front Grill and the Fan Blade Nut.
2.   Clean the Fan Blade, both Front and Rear Grills with a soft cloth moistened with a mild 

soap solution.

3.    Replace Blade, tighten the Fan Blade Nut, and securely fasten the Front Grill.

FAN HEAD AND BASE CLEANING

Using a soft, moist cloth, with or without a mild soap solution, carefully clean the Fan Base 

and Head. Please use caution around the Motor Housing area. Do not allow the motor or 

other electrical components to be exposed to water.

FAN STORAGE

When storing your fan in the off season, it is important to keep it in a safe dry location. It is 

important to protect the fan head from dust. WE STRONGLY RECOMMEND USING THE 

ORIGINAL BOX FROM PURCHASE.

MAINTENANCE AND CLEANING

001691A-814_13ESM1.indd   5

5/21/13   9:30 AM

Summary of Contents for 1691A

Page 1: ...on Manual 16 TABLE FAN P LE ASE RE AD ALL INS TRUCTIONS BEF ORE USING Manual de Instrucciones VENTILADOR DE MESA DE 40 6 CM L EA TOD AS LAS INSTRUCCION ES ANTES DE USAR 1691A 1691A 001691A 814_13ESM1...

Page 2: ...orized Service Center for its examination and or repair The use of attachments not recommended or sold by the appliance manufacturer may cause hazards Do not use outdoors Do not let the cord hang over...

Page 3: ...1 Oscillation Knob 2 Speed Knob 3 Motor Assembly 4 Rear Grill 5 Grill Retaining Nut 6 Blade 7 Blade Retaining Nut 8 Clips 9 Front Grill 10 Base 11 Thumbscrew DESCRIPTION OF THE APPLIANCE 2 001691A 814...

Page 4: ...ssembly to base hole until snapped Make sure to align the notch on the motor assembly with the rib on the base Tighten thumbscrew on the bottom of the base turning clockwise 2 Remove the grill retaini...

Page 5: ...y care for your table fan Please remember Always unplug the fan before cleaning or disassembling Do not allow water to drip on or into the Fan Motor Housing Do not use any of the following as a cleane...

Page 6: ...frido cualquier otro da o Ll velo a un Centro de Servicio Autorizado para su inspecci n o reparaci n El uso de accesorios no recomendados o vendidos por el fabricante del artefacto el ctrico puede oca...

Page 7: ...elocidad 3 Conjunto del motor 4 Rejilla posterior 5 Tuerca de retenci n de la rejilla 6 Aspas 7 Tuerca de sujeci n de las aspas 8 Sujetadores 9 Rejilla delantera 10 Base 11 Tornillo de mariposa Fig 1...

Page 8: ...e la base Apriete el tornillo de mariposa en la parte inferior de la base g relo en el sentido de las agujas del reloj 2 Retire la tuerca de retenci n de la rejilla g rela en el sentido contrario a la...

Page 9: ...ro cuidado de su ventilador de mesa por favor recuerde Siempre desenchufe el ventilador antes de limpiarlo o desarmarlo No permita que gotee agua en la caja del ventilador No utilice ninguno de los si...

Page 10: ...or required to check diagnose and repair the product It also includes any expenses related to the transportation of the product needed to fulfill this policy from the date it is received within the Ne...

Page 11: ...almente fallara y la mano de obra necesaria para su revisi n diagn stico y reparaci n as como los gastos de transportaci n del producto a partir de la fecha de su recepci n dentro de la Red de los Cen...

Page 12: ...er com Impreso en Venezuela P N 166179 001691A 814_13ESM1 GCDS OST29834 AB SELLO STAMP Producto Product Marca Brand Modelo Model D a Day Mes Month A o Year La presente p liza de garantia contar a part...

Reviews: