


OSE
C.ITOH CI-5000 Dot Matrix Printer
Print Method
Rugged dot matrix impact bi-directional
Print Speed
540cps @ HQ (12cpi), 450cps @ (10cpi), 110cps @
NLQ, 73cps @ Double Density LQ
Print Head
18 wire (2 X 9 wire parallel)
Printer Life
500 million characters
Resolution
330 dots per inch
Interfaces
Centronics Parallel:
RS-232 serial
RS-423 interfacing built in
Emulations
IBM Proprinter XL, DEC LA50/LA75/LA210, Epson
FX-286e
Paper Handling
Friction feed for cut sheets
Pin Feed (continuous/perforated paper)
Forward and reverse feed
Rear and bottom feed
Rear exit/Top exit
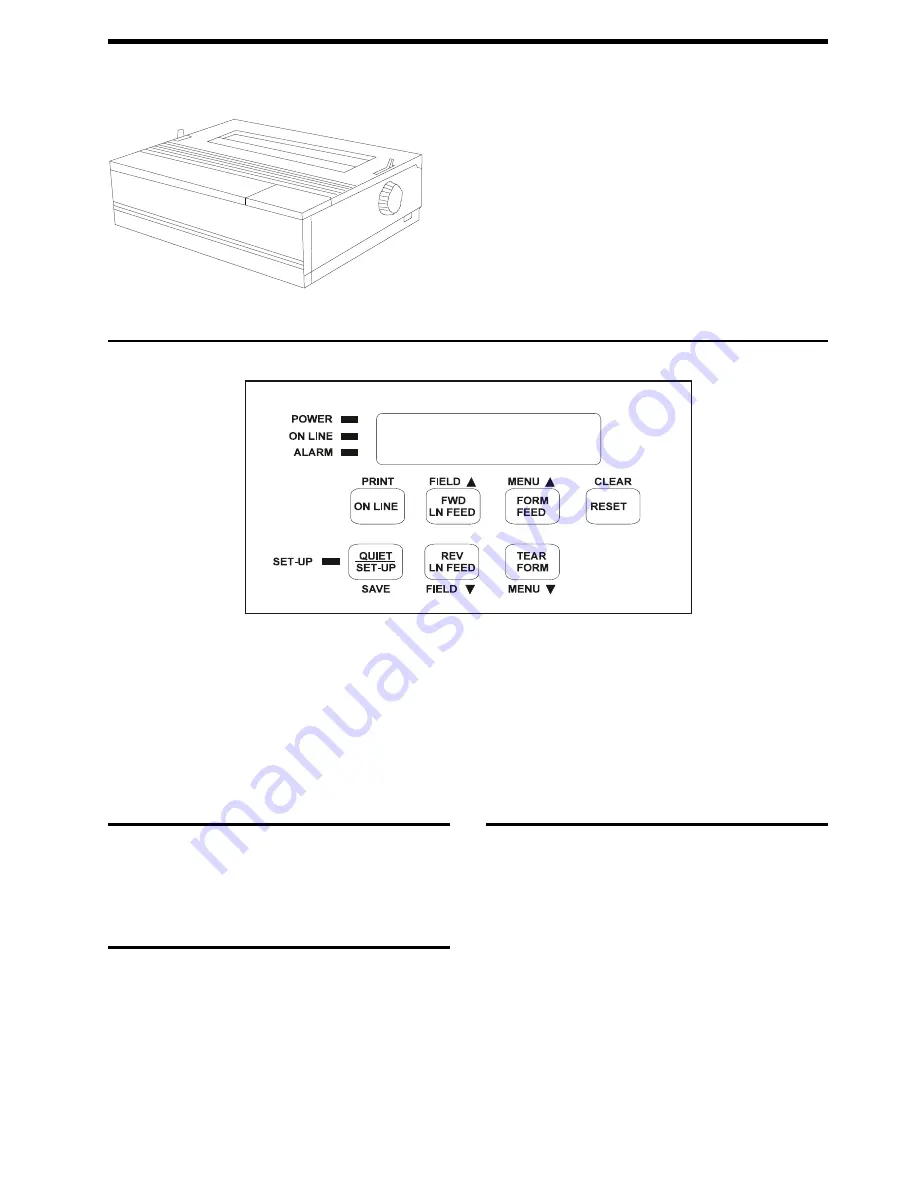
Control Panel
Buttons/Keys
ON LINE:
Toggles unit between online and offline.
FWD LN FEED:
Advances paper one line. When held down simultaneously
with RESET button advances paper one dot row.
FORM FEED:
Advances paper form length stored in Present Users Number's
attribute field 10. If Paper Park is active, this key will restore paper to its printing
position. When held down simultaneously with RESET button puts printer in
PAPER PARK mode. Pressing this button once again will take printer out of
PAPER PARK mode and restore paper to its printing position.
RESET:
Places printer offline and clears any alarm display if error condition has
been corrected.
QUIET/SET-UP:
Activates SET-UP mode.
REV LN FEED:
Backs up paper one line. When held down simultaneously with
RESET allows paper to back up one dot row.
Note: Do not use this button with bottom feeding paper or multipart forms.
TEAR FORM:
Places paper at tear line. If button is pressed a second time,
printer will return paper to print position. Paper will also return to print position by
pressing this button and the RESET button simultaneously.
LEDs/Lights
POWER (Green):
Indicates unit is functioning.
ON LINE (Green):
Indicates unit is online.
ALARM (Red):
Indicates unit is in an error status.
SET-UP (Yellow):
Indicates printer is either in SET-UP or CONFIGURATION
mode.
DISPLAY WINDOW:
Indicates status and selected choices.
Self-test
1.
Ensure printer power is off.
2.
Load continuous feed paper of at least 14 inch width (136 columns wide).
3.
Hold down the RESET key while simultaneously pressing the QUIET/SETUP
key. This will put printer in CONFIGURATION mode.
4.
Press the REV LN FEED key until field "91" appears and "TEST PRINT
PATTERN" appears in display window.
5.
Press the ON LINE key to activate test printing.
6.
To stop test printing press ON LINE key once again.
Cover Removal
Lift at both front corners of printer, moving them up and back until top cover is in a
resting position at approximately a 90 degree angle.
Configuration
General Users SET-UP Mode
Be sure printer is offline and press the QUIET/SETUP button. The display will
reflect "USER NUMBER" and the current user number will appear.
Configuration for System Managers or Operators
Ensure printer is offline then hold down RESET and QUIET/SETUP key simultane-
ously. The display will reflect "USER NUMBER" and the current user number will
appear.
Once in USER NUMBER mode you have to select a number.
1.
Use FORM FEED button to advance one User Number at a time.
2.
Press TEAR FORM button to back up one User Number at a time.
3.
Once a USER NUMBER is selected you can either go back to offline state or
into FIELD mode.
Offline State
Press ON LINE or QUIET/SET-UP button to place printer back offline.
96-03-29 Copyright IBM Corporation 1996.
All rights reserved.
CI-8
1


