background image

- 18 -

EN

USE OF THE CHILD CAR SEAT

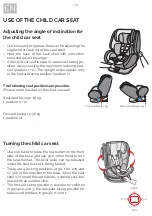
Adjusting the angle of inclination for 
the child car seat

• 

 Use one hand to operate the lever for adjusting the 
angle under the front of the seat shell.

• 

 Hold the back of the seat shell with your other 
hand and adjust the angle.

• 

 If the child car seat is used in a rearward facing po-

sition, always set it to the maximum reclining posi

-

tion (position 1 + A). The upright angle applies only 

to the forward facing position (position 2).

The following seat positions are possible:

(Please note the label on the child car seat)

Rearward facing 0-18 kg:

1 position (1 + A)

Forward facing 15-36 kg:
1 position (2)

Turning the child car seat

• 

 Use one hand to press the red button on the front 
side of the base and use your other hand to turn 

the  seat  bucket.  The  twist  lever  can  be  released 

whilst the seat bucket is being turned.

• 

 There  are  4  locking  positions  at  90,  180,  270  and 

0 / 360° in the direction of the base. When the seat 
shell is in one of these positions, it should click into 
place with an audible click. 

• 

 The forward facing position is suitable for children 

in groups 2 and 3, the rearward facing position for 

babies and toddlers in groups 0+ and 1. 

Only forward-facing

Rearward facing only

90°

270°

0/360°

180°

Summary of Contents for 108-242-05

Page 1: ...1 Four360 ECE 0 1 2 3 0 36 kg DE EN FR IT NL...

Page 2: ...fix Konnektoren im Auto montiert Das Kind wird mit dem 3 Punkt Gurt des Autos angeschnallt Alternativ kann der Kinderautositz direkt mit dem 3 Punkt Gurt des Autos ohne Isofix Konnektoren gesichert we...

Page 3: ...nd Dies ist ein semi universales Kinderr ckhaltesystem Es entspricht der UN Reg 44 04 und darf ausschlie lich in Fahrzeugen eingesetzt werden die in der beigef gten Liste zul ssiger Fahrzeuge aufgef h...

Page 4: ...den wenn er bei einem Unfall starken Belastun gen ausgesetzt war Aus Sicherheitsgr nden muss der Kinderautositz auch dann im Fahrzeug befestigt sein wenn Ihr Kind gerade nicht darin sitzt Stellen Sie...

Page 5: ...rteinstellung Einstellband Drehhebel Erweiterung Isofix Konnektor Sitzschale Schulterposter Gurtschloss Schlosspolster Hebel zur Winkeleinstellung Isofix Station Einstellung Kopfst tze Top Tether Baby...

Page 6: ...bel am Kinderautositz beachten R ckw rts gerichtet 0 18 kg 1 Position 1 A Vorw rtsgerichtet 15 36 kg 1 Position 2 Drehen des Kinderautositzes Mit einer Hand den roten Knopf an der Vorderseite der Basi...

Page 7: ...en Schlosszungen Um den Gurt zu schlie en f hren Sie zun chst die beiden Schlosszungen zusammen und schieben diese dann gemeinsam in das Gurtschloss Einstellen des Gurtes Um den Gurt zu l sen dr cken...

Page 8: ...urt zusammen sodass er hinter dem Bezug in der Mulde an der R cken lehne aufbewahrt werden kann Abb B Um das Gurtschloss zu entfernen bringen Sie zun chst den Sitz in die maximale Liegeposition Rotie...

Page 9: ...rhil fen und dr cken Sie bis Sie das Einrasten h ren Die Anzeige auf beiden Seiten wird nur gr n wenn die Verbindungen hergestellt sind Schieben Sie den Kinderautositz zur R ckenlehne bis er sicher st...

Page 10: ...Top Tether zu l sen dr cken Sie mit ei ner Hand den grauen Knopf und ziehen Sie mit der anderen Hand die Seite des Gurtankers auf die erforderliche L nge Ziehen Sie den Top Tether durch die blau mar...

Page 11: ...zes Setzen Sie das Kind in den Kinderautositz Stellen Sie die H he der Kopfst tze so ein dass der Schultergurt frei bleibt Schlie en Sie die Gurtschnalle wieder bis ein Klicken zu h ren ist Ziehen Sie...

Page 12: ...eht Die Montage in Gruppe 2 3 kann auch ohne Isofix Konnektoren erfolgen 3 Setzen Sie das Kind in den Kinderautositz Stellen Sie die H he der Kopfst tze so ein dass die rote Sicherheitsgurtf hrung unt...

Page 13: ...ttel oder aggressive Reinigungsmittel berpr fen Sie nach jedem Wasch gang die Best ndigkeit des Stoffs und der N hte Beim Waschen des Stoffs sind die Anweisun gen auf dem Etikett siehe unten sorgf lti...

Page 14: ...hild is strapped in with the car s 3 point seat belt Alternatively the child car seat can be secured directly with the car s 3 point belt without Isofix connectors It is recommended to install the chi...

Page 15: ...ECE No 16 or other equivalent standards This is a semi universal child restraint system It complies with UN Reg No 44 04 and may only be used in vehicles that appear in the attached list of permissib...

Page 16: ...f it is exposed to heavy impact during an accident For safety reasons the child car seat must be secured in the vehicle even when your child is not sitting in it Always make sure that all belts that s...

Page 17: ...ert Belt adjustment Adjusting belt Rotary lever Extension Isofix connector Seat bucket Shoulder pad Belt lock Belt lock pad Angle adjustment lever Isofix station Headrest adjustment Top Tether Baby in...

Page 18: ...te the label on the child car seat Rearward facing 0 18 kg 1 position 1 A Forward facing 15 36 kg 1 position 2 Turning the child car seat Use one hand to press the red button on the front side of the...

Page 19: ...two belt tongues To close the belt first pull together the two belt tongues and slide these into the belt lock together Adjusting the belt To loosen the belt press the belt adjustment but ton at the...

Page 20: ...ld the belt so that it can be stored behind the cover in the recess on the backrest Fig B In order to remove the belt buckle first move the seat into its maximum lying position Then rotate the seat to...

Page 21: ...and press until you hear a click The display on both sides only turns green when the connections have been established Slide the child car seat towards the backrest until it stands securely Additiona...

Page 22: ...from the bag To release the top tether press the grey button with one hand and pull the side of the belt an chor to the required length with the other hand Pull the Top Tether through the belt guide...

Page 23: ...of the seat Put the child in the child car seat Adjust the height of the head support so that the shoulder belt remains free Close the belt buckle again until you hear a click Pull the front adjustin...

Page 24: ...ly Installation in group 2 3 can also be car ried out without Isofix connectors 3 Put the child in the child car seat Adjust the height of the head support so that the red belt guide remains free unde...

Page 25: ...or aggressive cleaning agents After each wash check the resistance of the fabric and seams When washing the fabric carefully follow the instructions on the label see below MAINTENANCE Regularly check...

Page 26: ...cteurs Isofix L enfant est attach par la ceinture 3 points de la voiture Comme alternative le si ge auto enfant peut tre s curis directement par la ceinture 3 points de la voiture sans les connecteurs...

Page 27: ...t un syst me de retenue pour enfant semi universel Il correspond UN Reg 44 04 et doit tre exclusivement utilis dans les v hicules mentionn s dans la liste jointe des v hicules autoris s Ce produit est...

Page 28: ...ses lors d un accident Pour des raisons de s curit le si ge auto enfant doit galement tre fix dans le v hicule m me lorsque votre enfant ne s y trouve pas Assurez vous toujours que toutes les sangles...

Page 29: ...Bande de r glage Levier rotatif Extension Connecteur Isofix Coque du si ge paulette Fermoir de ceinture Prot ge fermeture Levier pour r glage de l inclinaison Base Isofix R glage de l appui t te Top...

Page 30: ...r l tiquette sur le si ge auto enfant Dos la route 0 18 kg 1 Position 1 A Face la route 15 36 kg 1 Position 2 Faire pivoter le si ge auto enfant Avec une main appuyer sur le bouton rouge l avant de la...

Page 31: ...ucle Pour fermer la ceinture il faut d abord r unir les deux languettes de verrouillage puis les pousser ensemble dans la boucle de ceinture R glage de la ceinture Pour lib rer la ceinture appuyez d u...

Page 32: ...nture de telle sorte qu elle puisse tre rang e derri re la housse dans la cavit sur le dossier fig B Afin de retirer la boucle de ceinture amenez d abord le si ge dans la position allong e maxi male P...

Page 33: ...ue vous entendiez l enclenchement L affichage des deux c t s devient vert unique ment lorsque les connexions sont r alis es Pous sez le si ge auto enfant contre le dossier jusqu ce qu il soit en posit...

Page 34: ...Sortez le Top Tether de la pochette Pour rel cher le Top Tether appuyez d une main sur le bouton gris et tirez d une autre main sur le c t de l ancrage de la ceinture la longueur voulue Passez le Top...

Page 35: ...ext rieure du si ge Asseyez l enfant dans le si ge auto pour enfant R glez la hauteur de l appuie t te de ma ni re ce que la sangle d paule reste libre Fermez nouveau la boucle de ceinture jusqu ente...

Page 36: ...e Le montage pour les groupes 2 3 peut aussi tre effectu sans Connecteurs Iso fix 3 Asseyez l enfant dans le si ge auto pour enfant R glez la hauteur de l appuie t te de ma ni re ce que le guidage de...

Page 37: ...e nettoyage agressifs Apr s chaque nettoyage v rifiez la r sis tance du Tissu et des coutures Lors du lavage du tissu suivez attentivement les instructions sur l tiquette voir ci dessous ENTRETIEN V r...

Page 38: ...dei connettori Isofix Il bambino deve essere legato per mezzo della cintura a 3 punti dell auto In alternativa il seggiolino auto per bambini pu essere fissato direttamente con la cintura a 3 punti de...

Page 39: ...UN ECE n 16 o ad altre norme equivalenti Questo un sistema di ritenuta per bambini semi universale conforme al regolamento UN ECE n 44 04 e pu essere utilizzato soltanto nei veicoli menzionati nell e...

Page 40: ...forti solleci tazioni a causa di un incidente Per motivi di sicurezza il seggiolino auto per bambini deve essere fissato nel veicolo anche quando il bambino non vi seduto Accertarsi sempre che tutte...

Page 41: ...ghia di regolazione Leva girevole Estensione connettore Isofix Guscio del seggiolino Spallina Fibbia e imbottitura della fibbia Leva per la regolazione dell angolo Stazione Isofix Regolazione del pogg...

Page 42: ...sul seggiolino auto per bam bini Orientato all indietro 0 18 kg 1 posizione 1 A Orientato in avanti 15 36 kg 1 posizione 2 Rotazione del seggiolino auto per bambini Premere con una mano il pulsante r...

Page 43: ...a fibbia Per chiudere la cintura innanzitutto unire le due linguette della fibbia e farle scivolare insieme all interno della fibbia Regolazione della cintura Per slacciare la cintura premere con una...

Page 44: ...intura in modo che possa essere riposta dietro la fodera nella depressione dello schienale Fig B Per rimuovere la fibbia della cintura innanzitutto spostare il seggiolino nella posizione di ripo so ma...

Page 45: ...clic L indicatore su entrambi i lati diventa verde solo quando vengono stabiliti i collegamenti Spingere il seggiolino auto per bambini verso lo schienale finch non si trova saldamente in posizione F...

Page 46: ...Tether dal suo invo lucro Per sbloccare la cinghia Top Tether premere con una mano il pulsante grigio e tirare con l al tra mano il lato dell ancoraggio della cintura alla lunghezza desiderata Far pa...

Page 47: ...il bambino sul seggiolino auto per bambini Regolare l altezza del poggiatesta in modo che la cintura di ritenuta spalle rimanga li bera Chiudere nuovamente la fibbia della cintura finch non si sente u...

Page 48: ...anche senza l utilizzo dei connettori Isofix 3 Posizionare il bambino sul seggiolino auto per bambini Regolare l altezza del poggiatesta in modo che la guida della cintura di sicurezza ros sa che si t...

Page 49: ...sivi o aggressivi Dopo ogni lavaggio controllare la tenuta del tessuto e delle cuciture Per il lavaggio del tessuto seguire attentamente le istruzioni riportate sull etichetta vedi sotto MANUTENZIONE...

Page 50: ...auto bevestigd Het kind wordt vastgezet met de 3 puntsgordel van de auto Desgewenst kan het autostoeltje direct met de 3 puntsgordel van de auto en zonder Isofix connectoren worden bevestigd Aanbevole...

Page 51: ...t is een semi universeel kinderbeveiligingssysteem Het voldoet aan Verordening UN 44 04 en mag uitsluitend worden gebruikt in voertuigen die zijn opgenomen in de bijge voegde lijst met goedgekeurde vo...

Page 52: ...is blootgesteld aan sterke belastingen Om veiligheidsredenen moet het autostoeltje ook in de auto zijn bevestigd als uw kind niet op het autostoeltje zit Zorg er altijd voor dat alle bevestigingspunt...

Page 53: ...gstuk Gordelaanpassing Instelband Draaihendel Uitbreiding Isofix connector Zitschaal Schouderkussen Gordelslot kussen gordelslot Hendel voor hoekinstelling Isofix basis Instelling hoofdsteun Top Tethe...

Page 54: ...k Neem het label op het autostoeltje in acht Achterwaarts gericht 0 18 kg 1 positie 1 A Voorwaarts gericht 15 36 kg 1 positie 2 Autostoeltje draaien Druk met uw hand op de rode knop aan de voor kant v...

Page 55: ...n gen eruit Om de gordel vast te maken plaatst u eerst de twee gesptongen naast elkaar en duwt u ze dan samen in het gordelslot Gordel instellen Om de gordel los te maken drukt u met n hand op de knop...

Page 56: ...rdel Vouw de gordel samen zodat hij achter de bekleding in de inkeping van de rugleuning kan worden opgeborgen Zet vervolgens het autostoeltje in de maximale ligstand om het gordelslot te verwijderen...

Page 57: ...uk tot u ze hoort vastklikken De indicatie aan beide kanten wordt alleen groen als de verbindingen tot stand zijn gebracht Schuif het autostoeltje naar de rugleuning tot het stabiel staat Extra bevest...

Page 58: ...e Top Tether los te maken drukt u met een hand op de grijze knop en trekt u met de andere hand de zijkant van het gordelanker tot de ver eiste lengte Trek de Top Tether door de blauw gemarkeerde gorde...

Page 59: ...het autostoeltje Plaats het kind in het autostoeltje Stel de hoogte van de hoofdsteun zo in dat de schoudergordel vrij blijft Sluit de gordelgesp weer tot u een klik hoort Trek aan de voorste instelb...

Page 60: ...leuning tot het stabiel staat De montage voor groep 2 3 is ook moge lijk zonder Isofix connectoren 3 Plaats het kind in het autostoeltje Stel de hoogte van de hoofdsteun zo in dat de rode veiligheidsg...

Page 61: ...f agressieve reinigingsmiddelen gebruiken Controleer na elke wasbeurt de bestendigheid van de stof en de naden Bij het wassen van de stof moeten de aanwijzingen op het etiket zie hieronder worden opge...

Page 62: ...62...

Page 63: ...63...

Page 64: ...str 22 D 78244 Gottmadingen Tel 49 0 7731 97 00 77 Fax 49 0 7731 97 00 55 E Mail info osann de Web www osann de Version A 08 06 2020 www facebook com Osann de www instagram com osann_kids Find us on F...

Reviews: