background image


The Five Buttons 

 
The functions of the 5 buttons may be configured on the operating system’s control panel for peripherals.  
The procedure details will vary according to the operating system in use (Windows, Linux, or Mac OS). 

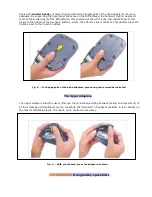
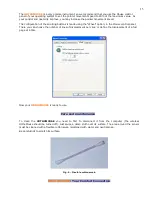
Buttons 1 and 2 perform standard functions. (See Fig. 7).               
 

                                        Button 1 – Top left: used for basic selections. 
                                        
                                        Button 2 – Top right: displays the shortcut menus. 


11 


Fig 7. – Standard buttons 


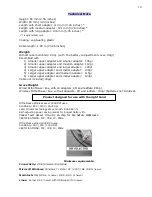
Buttons 3, 4 and 5 form a set that replaces the scrolling wheel of conventional mice, with all the 
advantages and merits of the position of function. (See Fig. 8). 


Button 3
 – Center: used for rolling selection in some programs. It performs the function 

that is associated to clicking the scroll wheel button of mice, in your system 

Click  once

:  an  icon  appears  which,  when  displaced,  moves  the  screen  upwards,  downwards,  to  the 

left  or  to  the  right.  The  longer  the  distance  traveled,  the  quicker  the  rolling.  Performs  the  same 
function that is associated to clicking the scroll wheel. 

Click a second time

: the icon disappears. 


Button 4 - Top: used for upward vertical rolling. 

Click once:

 the screen moves upwards. 

Click  twice  or  more,  and  hold:

  the  screen  moves  upwards,  continuously,  at  a  speed  proportional  to 

the number of clicks – 5 clicks reach the fastest scrolling). 

Release:

 the movement ceases. 


Button 5 - Bottom: downwards vertical rolling: 


Click once:

 the screen moves downwards. 

Click twice or more, and hold:

 the screen moves downwards, continuously, at a speed proportional to 

the number of clicks – Five result in the fastest scrolling). 


Release:

 the movement ceases. 


                   Fig 8. – Scrolling Buttons 


As any optical mouse, the ORTHOMOUSE needs a minimally reflective surface, in order to work.  In other 
words, it will not function properly over a transparent surface.  In this case, we recommend the use of a 
mouse pad.  The lens and optical sensor have no direct contact with the surface, and will keep their 
original features for a long period.  Cleaning of those parts should be performed, when needed.  


ORTHOMOUSE

: Technology up to your finger tips 


    11 

Summary of Contents for Wire 1000 DPI

Page 1: ...GOCUP Award during the 7th Applied Ergonomic Conference hosted by the Institute of Industrial Engineers IIE in Orlando Florida USA The ORTHOMOUSE won the Excellence in R D Award by Plano Editorial S o...

Page 2: ...S 06 CONECTING THE ORTHOMOUSE TO YOUR COMPUTER WIRED 07 RECOMENDATIONS TO THE USER 08 ACCESSORIES 09 ADAPTERS FOR THE PALM OF THE HAND 09 UPPER ADAPTERS 10 THE FIVE BUTTONS 11 SPECIAL CONFIGURATIONS W...

Page 3: ...s injuries and illnesses If you experience unexplainable fatigue weakness of your hands and forearms problems to open and close your hands cold and sore hands and coordination problems while using you...

Page 4: ...on movements Conventional mice require multiple coordination efforts The use of switches with lower mechanical resistance results in minimum effort even during extended tasks Involuntary clicks have b...

Page 5: ...180 days The OrthoMouse has a self adjusting power saving mode feature It will go automatically into sleep mode after 3 seconds of inactivity Its functions will be reduced however any touch in any bu...

Page 6: ...e of the battery as a leverage to take the battery out SETTING UP REPLACING THE BATTERIES Turn the OrthoMouse over and turn it off move the ON OFF switch to OFF 4 Repeat step 3 to remove the second ba...

Page 7: ...y and does not require the installation of any additional software Due to the product s high accuracy we recommend you configure the pointer movement speed in the operating system s control panel to a...

Page 8: ...and a mouse It must also support at least the lower third of the forearms as well as any other work related items without disturbing the aforementioned elements The desk height may vary always depend...

Page 9: ...nd The adapters for the palm of the hand The user should try the adapters for the palm of the hand short medium and long to see which one suits the hand best Note that the short adapter unlike the oth...

Page 10: ...where the effort to click is minimal This will also place the thumb closer to the thumb s buttons Fig 5 To change palm of the hand adapters press and push forward as indicated The Upper Adapters The u...

Page 11: ...e same function that is associated to clicking the scroll wheel Click a second time the icon disappears Button 4 Top used for upward vertical rolling Click once the screen moves upwards Click twice or...

Page 12: ...ions Motion and under the option Select a pointer speed move the slider to the right in order to choose the highest speed that you can use without losing precision Click to mark the check box Enhance...

Page 13: ...l panel There you can choose the number of lines of displacement per click or define the displacement of a full page at a time Now your ORTHOMOUSE is ready to use Care and maintenance To clean the ORT...

Page 14: ...nd smaller adapter 123gr Cable not included 40gr Gross Weight Wired OrthoMouse box with all adapters CD and leaflets 280gr Wireless OrthoMouse box with all adapters CD and leaflets 240gr batteries not...

Page 15: ...tection against harmful interference in a residential installation This equipment generates uses and can radiate radio frequency energy and if not installed and used in accordance with the instruction...

Reviews: