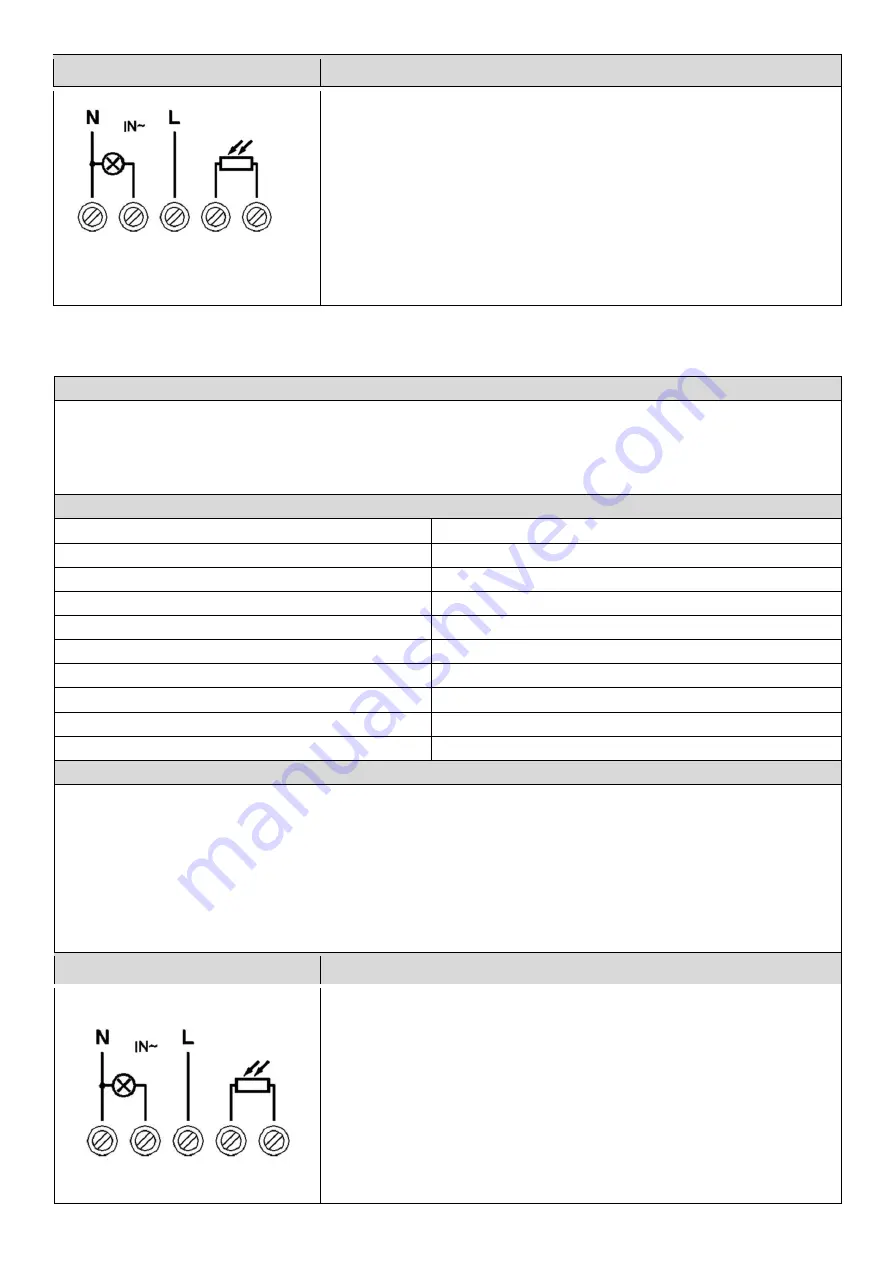
SCHEMAT PODŁĄCZENIA
TEST
rys. 4
1.
Ustaw pokrętło LUX w pozycji księżyca i włącz zasilanie.
2.
Podczas przeprowadzania testu w dzień przykryj sondę pudełkiem tekturowym lub grubą ciemną
tkaniną. Zakrycie sondy palcem jest niewystarczające.
3.
Odkrycie sondy wyłączy światło automatycznie.
Us
tawienie pokrętła w kierunku znaku księżyca powoduje załączenie czujnika przy mniejszym natężeniu
oświetlenia (2 LUX), natomiast bliżej słońca powoduje załączenie przy większym natężeniu oświetlenia
(100 LUX).
Jeżeli natężenie oświetlenia sondy spadnie poniżej ustawionego progu układ załączy
przekaźnik wyjściowy oraz podłączone do niego odbiorniki. Przekaźnik będzie załączony do czasu, gdy
natężenie oświetlenia nie wzrośnie powyżej ustawionego progu.
(EN) Operating Manual
CHARACTERISTICS
The device is used to automatically control lighting or other electrical receivers, and save electric energy at the same time. Its task is to switch on
and off the electric circuit if the ambient light drops below the set level. The photosensitive sensor is small in size, easy to install and equipped in
standard with a round cord (ca. 1m long, 2×0.5mm²) which can be extended. All wires should be connected in a hermetic junction box or in place
that is protected from any atmospheric influences.
TECHNICAL SPECIFICATION
Power supply:
230VAC / 50 Hz
Max. load:
2300W
Light intensity adjustment:
<2
– 100 lux
Switch ON delay:
1-2 secs
Switch OFF delay:
4-5 secs
Power consumption:
ca. 0.5W
Protection level of the probe / sensor:
IP65/IP20
Working temperature:
-20~+40
0
C
Dimensions:
48 x 63.4 x 29.3 mm
Net weight:
0.092 kg
INSTALLATION
1. Disconnect power supply.
2. Check with an appropriate meter if all power wires are dead.
3. Use the two screws and install the sensor vertically (with the junction terminal oriented downwards).
4. External probe should be installed in a place which is away from any electrical or other light source. The connection wire of the probe cannot be put close to the
parallel power wire or any other wire transmitting high currents.
5. Connect all wires to terminals, as per the wiring diagram.
6. Adjust working parameters of the
sensor’s LUX knob.
WIRING SCHEME
TEST
Fig. 4
1.
Put the LUX knob to the
moon
position and switch on the power.
2.
When testing in daylight, cover the probe with a cardboard box or an opaque cloth. Covering the probe
with your finger is not sufficient.
3.
If you uncover the probe, the light will switch off automatically.
If the knob is turned to the
moon
position, the sensor will be switched on when the ambient light is less intense
(2 lux), but if it is turned towards the
sun
position it will be switched on when the ambient light is more intense
(100 lux). If the light intensity near the probe drops below the specified level, the system will turn on the output
relay and the connected receivers. The relay will be activated until the light intensity increases above the
specified level.


