background image


Page 30 of 48 

GENERAL INSTRUCTIONS FOR PF 

MODULAR ENCLOSURES FOR  

TRANSFORMER SUBSTATIONS


IG-021-GB 

version 07

29.08.2008

 
Before laying the closing panel, remove the last prop fitted to finish so that the enclosure 
closing can be finished. 


3.7.4.  Floor Plates, Slabs and Transformer Platform 

The 

floor plates

 are installed according to the assembling drawing, if any, as required by the 

transformer substation configuration. 
 
The procedure is as follows: 


ƒ

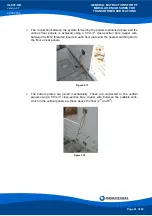
  The floor plate supports are bolted to the front and rear panels using M12 x 180 screws 

with a plastic DUBO washer on the outside. 


Figure 

3.45 

      Figure 

3.46


Figure 3.47:


M12x180 nuts and bolts 

to join floor plate supports 


Note: 

Remember that there are floor plates of different thicknesses that require supports of 

different heights. Great care should be taken to use the correct supports for each floor plate.

Summary of Contents for PF 302

Page 1: ...MER SUBSTATIONS General Instructions LIB 29 08 2008 Primary Distribution Switchgear Secondary Distribution Switchgear Protection and Automation Distribution Transformers IG 021 GB version 07 Transform...

Page 2: ...ording to current legislation The above must be carefully observed as the correct and safe operation of this equipment depends not only on its design but also on general circumstances which are in gen...

Page 3: ...2015 3015 SERIES CONCRETE COMPONENTS 14 3 6 ASSEMBLING TOOLS 15 3 7 PF ENCLOSURE ASSEMBLY PROCESS 15 3 7 1 Assembling Bottom Plates 17 3 7 2 Assembling the Vertical Panels 20 3 7 3 Remaining Vertical...

Page 4: ...tary floor plates Hinged personnel access door folding 180 over the outside wall with a two fixing point lock and a fastening rod to hold it open Hinged transformer door folding 180 over the outside w...

Page 5: ...ecautions to avoid breakage caused by differential settlements The elements required to assemble the PF Transformer Substation are grouped into two classes according to how they are transported a Hori...

Page 6: ...wn on the truck using slings or cables that are tensed using the truck s reels In turn the concrete components have rubber and or metal protection parts as shown in figure 2 4 to avoid any damage as t...

Page 7: ...Page 7 of 48 Figure 2 6 2360 mm wide panel placed vertically Side panels must be rested on the ground in order to insert the rubber strip required for sealing the enclosures 2 2 See section 3 7 PF Enc...

Page 8: ...installation of PF TS must only be carried out by qualified personnel with sufficient experience and training All safety rules for unloading and handling elevated loads must be observed Operators must...

Page 9: ...Modular Transformer Substation will rest is an essential factor given the weight of the equipment The ground could subside or become uneven or could provide differential settlements causing cracks in...

Page 10: ...operation which has a decisive influence in both the assembly and the stability of the PF Modular Transformer Substation 3 4 1 Levelling Tools 1 Spirit Level 1 Pickaxe 1 Round end spade 1 Square end s...

Page 11: ...should be prepared in such a way that the base platform is on a hard area In these cases it is essential that rainwater from the higher ground be channelled to avoid it washing the ground away from u...

Page 12: ...008 100 Water table 0 Level 350 550 C Ground with a High Water Table When there is a high water table proceed as follows 1 Establish the water table level 2 Excavate no deeper than necessary then leve...

Page 13: ...e foundations as in section A Example The landfill should be such that the distance X is at least 400 mm and the slope angle is 45 A one meter wide pavement around the enclosure is recommended Since t...

Page 14: ...CRETE COMPONENTS PF enclosure concrete components have RD20 threaded inserts embedded in the concrete therefore the components can be lifted and handled with a crane by anchoring RD20 threaded turning...

Page 15: ...F Assembling Ratchet 2 ladders 1 brush 1 set of spanners and screwdrivers Painting utensils for painting the transformer substation or for retouching painted panels For correct assembly of the panels...

Page 16: ...rane can be attached to lift them off the truck and lay them flat on the ground Once on the ground or on the truck bed itself if they are transported flat they should be lifted using the 4 inserts in...

Page 17: ...m Plates After checking that the ground is correctly levelled the enclosure assembly starts by placing the first bottom plate in its final position Check that the plate is properly levelled by means o...

Page 18: ...nels will rest After the second or subsequent bottom plates are put into place the plates should be firmly bolted together using M16 x 40 nuts and bolts After this a flexible earthing cable must be bo...

Page 19: ...ean the slots where the vertical panels will rest Next insert the sealing strip between the bottom plates and the vertical panels placing it in the centre of the slots Double 20 x 10 mm rubber strips...

Page 20: ...the end bottom plates Figure 3 28 Figure 3 29 In order to assemble the vertical panels the assembling props must be employed reference 160028 PF Assembling Prop The 2 piece telescopic PF panel assembl...

Page 21: ...ack panel corresponding to one of the enclosure ends in this example the left end in its position in the bottom plate Fix the panel using the PF panel assembling prop without releasing it from the cha...

Page 22: ...s can be properly fastened When the next panel is joined this bar will be removed Once the prop is laid and fixed to the first panel the panel can be released from the crane Fit the panel joining angl...

Page 23: ...rear panels After attaching the first front panel a side panel must be added to close off the corner All side panels have a 20 x 10 mm rubber strip placed as follows A continuous strip is placed aroun...

Page 24: ...x 10 mm rubber strip is also placed along the edge of the bottom plate where the side panel supports will rest see figure 3 36 Figure 3 36 This side panel is attached to the bottom plate using M16 x 1...

Page 25: ...LOSURES FOR TRANSFORMER SUBSTATIONS IG 021 GB version 07 29 08 2008 Page 25 of 48 Next the side panels and the front panels are attached using M16 x 30 screws Figure 3 39 Figure 3 40 Figure 3 41 View...

Page 26: ...oncrete is very thin The front panels are joined together using M16 x 40 nuts and bolts see figures 3 42 and 3 43 and the front panels are joined to the bottom plate using the 394256 64 flatbar PANEL...

Page 27: ...he above stated premises section 3 7 3 to join panels to each other and to bottom plates Put a new prop in the second front panel in the opposite direction to the first one As in the first panel use t...

Page 28: ...nel and fit the prop again using the screws and fixing the 2 panels Afterwards lay the next back panel in this case it is the third one and follow the same procedure as in the first panel to fit the a...

Page 29: ...ENCLOSURES FOR TRANSFORMER SUBSTATIONS IG 021 GB version 07 29 08 2008 Page 29 of 48 From here on follow the same assembling sequence until all front and back vertical panels have been fitted The prop...

Page 30: ...ing to the assembling drawing if any as required by the transformer substation configuration The procedure is as follows The floor plate supports are bolted to the front and rear panels using M12 x 18...

Page 31: ...ates will rest In order to insert the floor plates start releasing the first prop Afterwards introduce the first floor plate through the enclosure upper part Figure 3 48 Figure 3 49 Fit the floor plat...

Page 32: ...07 29 08 2008 Fixing the first prop after laying the floor plate Follow the same procedure to lay the next floor plates and transformer platforms according to the specific configuration of each trans...

Page 33: ...tion Before installing them a 20 x 10 mm sealing rubber strip should be placed around the bottom edge Figure 3 51 Figure 3 52 When the transformer is to be introduced through the transformer door rath...

Page 34: ...equipment the various props may have to be released to lay this equipment If possible the cubicles and transformer should be installed in the positions corresponding to the configuration before the c...

Page 35: ...plate and to the front and rear panels Figure 3 56 Figure 3 57 3 7 8 Covers The covers are lowered onto the vertical panels using the crane Figure 3 58 Figure 3 59 Figure 3 61 Once the first roof pane...

Page 36: ...ES FOR TRANSFORMER SUBSTATIONS IG 021 GB version 07 29 08 2008 After laying the cover this module s prop can be removed if it has not already been done Finish the process by assembling all the covers...

Page 37: ...ounting the ventilation grilles a 4 x 15 mm rubber strip should be placed on the top edge of the concrete in order to prevent water from getting in Figure 3 62 Figure 3 63 Figure 3 64 Figure 3 65 The...

Page 38: ...ES FOR TRANSFORMER SUBSTATIONS IG 021 GB version 07 29 08 2008 3 7 10 Doors The doors are hung on the hinges which first have to be mounted in the holes that exist in the panels for this purpose Figur...

Page 39: ...der This auxiliary input is located 2000 mm above level 0 and can be closed using a cover that assures an IP 23D rating This cover can only be removed by manually loosening the wing nut and unscrewing...

Page 40: ...ve an M12 threaded insert for the earth connection Covers The covers have earth connections in their end slots except for single module covers that have an M12 nut for the earth connection To allow co...

Page 41: ...els is achieved using a 50 mm2 cross section bare copper wire between the M12 threaded inserts in each floor plate and the nearest earthing slot to the front or rear panels Figure 3 71 4 The bottom pl...

Page 42: ...tility s standard project as well as justification of its sizing The requirements for this type of installation are established in the Regulations on Power Plants Substations and Transformer Substatio...

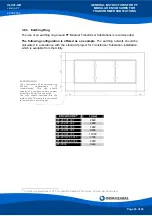
Page 43: ...tation installation which is available from the Utility ENCLOSURE 6 L mm PF 201 PF 301 2620 PF 202 PF 302 4880 PF 203 PF 303 7240 PF 204 PF 304 9600 PF 205 PF 305 11960 PF 2015 PF 3015 3700 PF 2030 PF...

Page 44: ...lifted cover on another of the covers Change the equipment as required Replace the cover checking the sealing of the rubber strip and reset the joint 4 2 REMOVING THE CENTRAL COVERS Undo and remove th...

Page 45: ...4848 GENERAL INSTRUCTIONS FOR PF MODULAR ENCLOSURES FOR TRANSFORMER SUBSTATIONS IG 021 GB version 07 29 08 2008 Page 45 of 48 NOTES...

Page 46: ...Page 46 of 48 GENERAL INSTRUCTIONS FOR PF MODULAR ENCLOSURES FOR TRANSFORMER SUBSTATIONS IG 021 GB version 07 29 08 2008...

Page 47: ...4848 GENERAL INSTRUCTIONS FOR PF MODULAR ENCLOSURES FOR TRANSFORMER SUBSTATIONS IG 021 GB version 07 29 08 2008 Page 47 of 48...

Page 48: ...Page 48 of 48 TECHNICAL COMMERCIAL DEPARTMENT www ormazabal com...

Reviews: