background image


PANEL DISPLAY INDICATIONS 

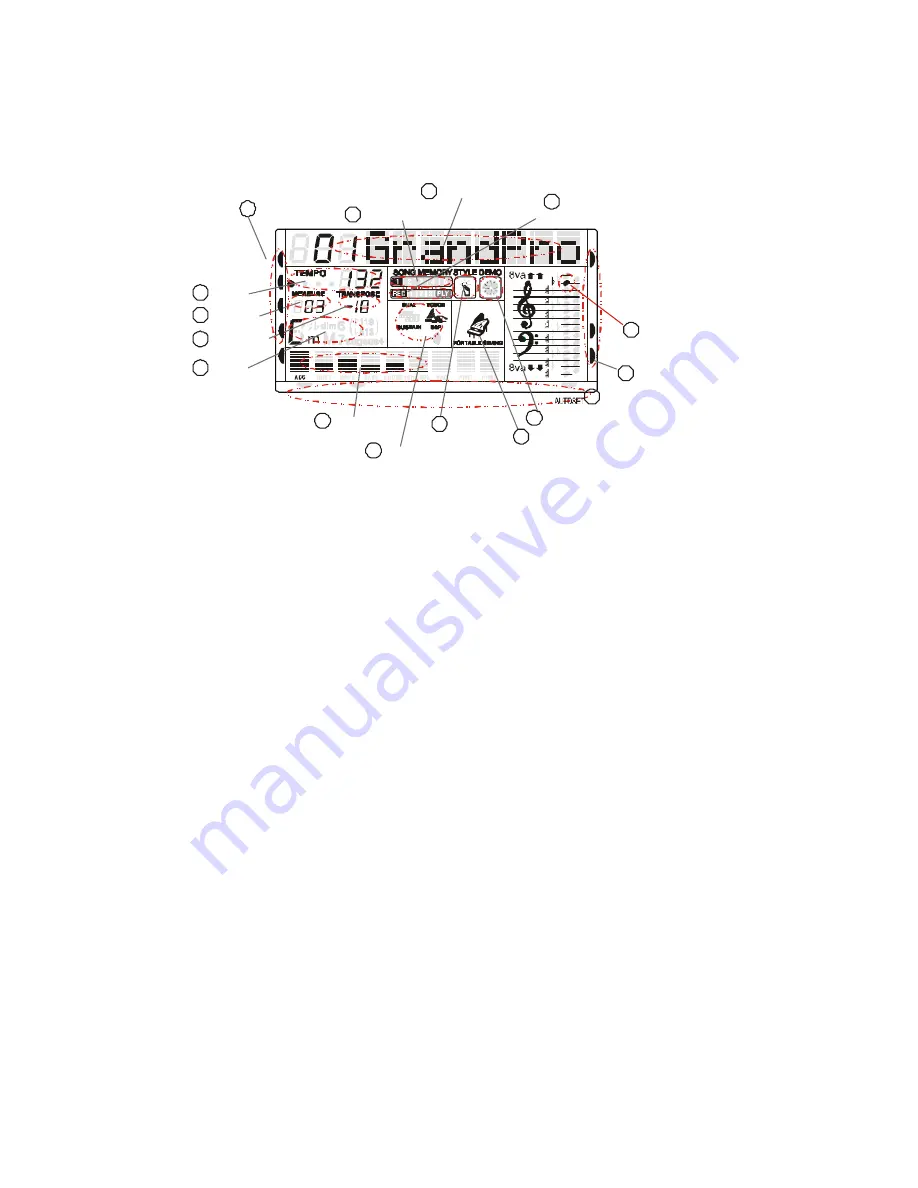
Your instrument features a large multi-function display (MULTI DISPLAY) that shows all important 
settings for the instrument. The section below briefly explains the various icons and indications in the 
display.  

1

Message Display

2

Active Input

4

Note Display

5

Voice Effect

touch/sustain

(

)

6

Track Volume

7

8

Chord

9

Measure 

10

Tempo  

11

Song Memory

12

Record & Play

13

Demo Play

Transpose

NORMAL

SINGLE

FINGERED

SPLIT

Style

14

15

Portable Piano

RIGHT VOICE

STYLE

DEMO

3

Finger Select

SPLIT

MIDI IN

MIDI OUT

16

Overall Control

PERCUSSION


(1) Message Display

 - This section displays the demo song, voice or style name and number you have 

selected. 


(2) Active Input 

- When you play the instrument, you need to change the voice, style, demo. The arrow 

point to which is the active section.   


(3) Finger Select

 - This arrow tells you which finger mode is selected and if the keyboard is split into two 

parts or not. 


(4) Note Display 

- When you play a key on the keyboard, the note will be displayed. 


(5) Voice Effect

 - These icons display the Dual, Sustain, Touch and Effect function is turned ON/OFF.  


(6) Track Volume

  - It displays the volume of each track dynamically when the demo song or style is 

played. 


(7) Transpose

 - Display the current transpose status of the keyboard. The number  00  indicates No 

transpose. 


(8) Chord Type

 - Display current chord type you play on the keyboard accompaniment section when the 

keyboard is in the Single or Fingered mode. 


(9) Measure

 - Display the measure of the demo song, style or record/play back have played. 


(10) Tempo

 - Display the tempo of the demo song, lesson, style or record/play.  


(11) Song Memory

 - Display the record and play  track  during recording and play back.   


(12) Record and Play

 - Display the record and play status. 


(13) Demo

 - Display the demo is playing. 


(14) Style

 - Display the accompaniment is playing. 


(15) Piano

 - Display if  the current voice name is Piano. 


Summary of Contents for KARAWAN

Page 1: ...M u s i c a l I n s t r u m e n t s KARAWAN Oriental Keyboard O w n e r s M a n u a l...

Page 2: ......

Page 3: ...hat cause heat 7 The product should be connected only to the type of power supply described in the operating instructions or as marked on the product 8 This product may be equipped with a polarised pl...

Page 4: ...h the power Off after use Use a cloth or a damp sponge If the dirt is particularly persistent use a neutral detergent to remove it Never use solvents or alcohol Do not place your instrument near elect...

Page 5: ...o the PHONES socket for private practice or late night playing The internal speaker system is automatically switched off when a pair of headphones are plugged into the PHONE socket The LINE OUT socket...

Page 6: ...ou which finger mode is selected and if the keyboard is split into two parts or not 4 Note Display When you play a key on the keyboard the note will be displayed 5 Voice Effect These icons display the...

Page 7: ...ny of the available Drum Kits 150 159 or Arabic Drum Kits 158 159 or in the Effect Sound Bank 160 Press one of the Multipad to play the sounds stored in the buttons RIGHT VOICE STYLE DEMO MIDI IN MIDI...

Page 8: ...its 65 72 Reeds 158 159 Arabic Drum Kits 73 80 Pipe 160 Effects SELECT A MAIN VOICE Press the VOICE button the voice mode is selected and the current voice number and name will be indicated on the Mes...

Page 9: ...A DUAL VOICE There are 10 sounds available for the Dual Voice function MIDI IN MIDI OUT NORMAL SINGLE FINGERED SPLIT PERCUSSION Dual voice Flag RIGHT VOICE STYLE DEMO Press one of the buttons the dual...

Page 10: ...o set the new Split point This may depend by the status of the internal computer The display shows the new Split point Release the SELECT button The new Split Point is now set For standard use when ch...

Page 11: ...N MIDI OUT NORMAL SINGLE FINGERED SPLIT PERCUSSION Transpose Value RIGHT VOICE STYLE DEMO To change the key of the instrument use the TRANSPOSE or buttons as many time as indicated as C0 in the follow...

Page 12: ...sound to 127 maximum volume Press the two buttons at the same time to restore the Volume default value at 100 PITCH BEND The PITCH BEND wheel is located on the left side of your keyboard and can be us...

Page 13: ...to select the style the style number 27 RAI is now selected To select a style which number is higher than 99 for example 124 Standard Waltz press the buttons until the number 124 is selected on the di...

Page 14: ...ss the key C any white key to the left C minor 7th Press the key C any black any white key to the left C chord press C key C minor press C any black key to left C 7th press C any white key to left C m...

Page 15: ...ds Note that when in Fingered mode the keyboard will recognizes the chords also played with a second different Single Finger system This will help the players that are used to this second Single Finge...

Page 16: ...nt will start with the rhythm drum sound when the START STOP button is pressed then the bass and chord parts will play as soon as the first note or chord is played on the accompaniment part of the key...

Page 17: ...iment to make your performance sound even more professional Simply press the FILL IN button as you play and the fill in plays automatically VARIATIONS There are three different levels of accompaniment...

Page 18: ...lected and the AUTOMATIC SET UP activated the icon appears on the bottom right part of the display a nice registration for both the left hand and right hand parts will be automatically selected AUTOSE...

Page 19: ...ttings selecting the sounds and the style you like balance the sounds and select the effects Select also if necessary the desired Arabic Scale setting by selecting On the notes in the Arabic Scale Key...

Page 20: ...start the recording The START STOP button can start the recording also but the bass and chord can not be started until the key is pressed on the keyboard Press the RECORD button or the ENDING button t...

Page 21: ...ESET If it should be necessary to completely erase the internal RAM memory a very simple reset feature is provided 1 Make sure that the instrument is switched off 2 Press and hold the and buttons 3 Sw...

Page 22: ...nector transmits MIDI data generated by your instrument e g Note and velocity data produced by playing the keyboard MIDI OUT Use the MIDI OUT button to select No MIDI Out the display will indicate MOU...

Page 23: ...et 122 Breath Noise 23 Harmonica 73 Piccolo 123 Seashore 24 Tango Accord 74 Flute 124 Birds 25 Nylon Guitar 75 Recorder 125 Telephone 26 Steel Guitar 76 Pan Flute 126 Helicopter 27 Jazz Guitar 77 Blow...

Page 24: ...ie 1 TRADITIONAL 22 KERKENI 69 Dixie 2 115 March 23 M HOUZI 70 Hully Gully 116 March 6 8 24 BONAWARA ROCK BOOGIE 117 Tarantella 25 JERBI 71 Rock 118 Polka 26 6 8GHITA 72 Rock Roll 119 Party Polka 27 H...

Page 25: ...Rek9roll 56 G 3 Bandirwdom Rek10 57 A3 Bandirwess Rek11 58 A 3 Bandirwtak1 Rek12 59 B3 Bandirwtak2 Rek13 60 C4 Saghat Open Rek14 61 C 4 Saghatclosed Rek15 62 D4 Saghatclose 2 Rek16 63 D 4 Saghatclose...

Page 26: ...Cymbal Chinese Cymbal Reverse Cymbal Chinese Cymbal 53 F3 Ride Bell Ride Bell Ride Bell Ride Bell Ride Bell 54 F 3 Tambourine Tambourine Tambourine Tambourine Tambourine 55 G3 Splash Cymbal Splash Cy...

Page 27: ...ey Click 52 E3 Chinese Cymbal Chinese Cymbal Timpani E Laughing 53 F3 Ride Bell Ride Bell Timpani F Screaming 54 F 3 Tambourine Tambourine Tambourine Punch 55 G3 Splash Cymbal Splash Cymbal Splash Cym...

Page 28: ...127 True Song Position Song Select Tune Clock Commands Local ON OFF All Notes Off Active Sense Reset s 1 1 Mode 3 X 0 127 O 9nH v 1 127 X O O 2 O 2 O X X X O X O 0 27 X X X X X X X O X X O 9nH v 0 X 1...

Page 29: ...29...

Page 30: ...30 ORLA srl Italy www orla it info orla it...

Reviews: