background image

2

3

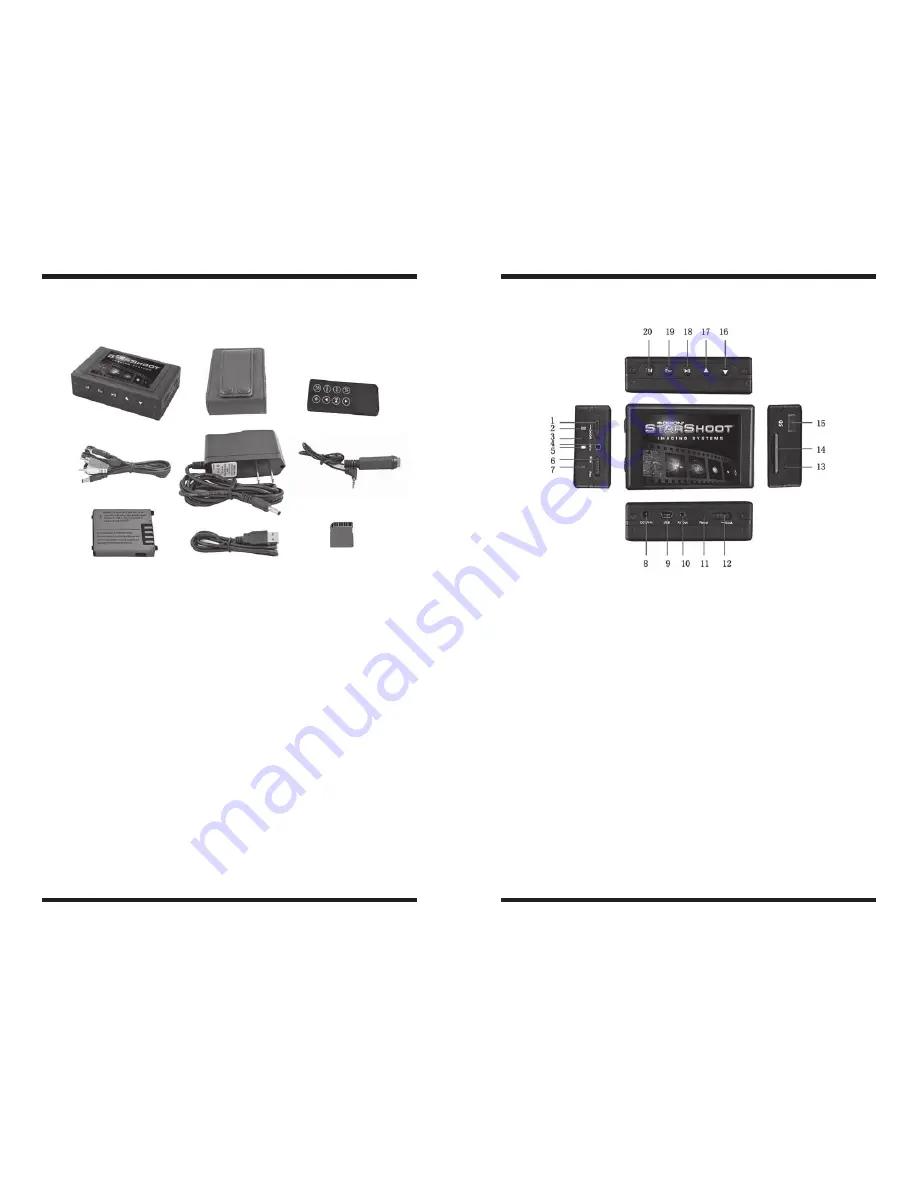
LCD-DVR

Figure 2.

The Orion Starshoot LCD-DVR.

1. Power On/Off
2. Charge LED
3. Internal Microphone
4. AV Input & DC Out jack
5. Low Power LED
6. Record / Stop Button
7. Power On/Record LED
8. DC5V In Jack
9. USB Port
10. AV Out /  
Control Button In Jack

11. Reset Button
12. Lock Switch
13. Internal Speaker
14. SD Card Socket
15. IR Sensor
16. Down Button
17. Up Button
18. Select Button
19. Esc Button
20. Menu Button

Parts List

Figure 1

. Included items.

•  StarShoot™ LCD-DVR
•  Leather case
•  IR Remote Control
•  AV Cable
•  Mains AC->DC Power Adapter
•  Wired Control Button
•  Rechargeable Lithium battery
•  USB Cable
•  2G SD card
•  Velcro strip to optionally attach device to telescope

Summary of Contents for StarShoot LCD-DVR

Page 1: ...ice for video cameras other devices with composite output video signals NTSC or PAL With this device astronomers can easily attach a video camera to a telescope to view and record color images and mov...

Page 2: ...trol Button In Jack 11 Reset Button 12 Lock Switch 13 Internal Speaker 14 SD Card Socket 15 IR Sensor 16 Down Button 17 Up Button 18 Select Button 19 Esc Button 20 Menu Button Parts List Figure 1 Incl...

Page 3: ...holding until the red LED turns on You will briefly see the startup screen Figure 4 before entering the Camera Manager Screen Figure 6 Turn off the LCD DVR by pushing the Power On Off switch in the di...

Page 4: ...Record Stop button to Stop to stop recording IR Remote Control Press the Record Stop Button on the IR Remote to Start Stop recording Push Button Plug the Wired Control Button into the AV Out port on t...

Page 5: ...System Settings Video Output section of this manual USB Copy movies stills and audio from the LCD DVR directly to computer hard drive for playback on laptop PC or for further processing Plug USB cable...

Page 6: ...as Images that were recorded with Orion Video Cameras and then enhanced using astronomical post processing software such as Registax MaximDL and Photoshop Orion Video camera training Videos Connecting...

Page 7: ...Recorder Settings Work Mode There are three work modes for selection Record Record Movie AVI file format Photo Record Photo JPG file format Audio Record Audio WAV file format Record Movie mode is the...

Page 8: ...eo capture D1 720 480 D1 720 576 VGA 680 480 Video Quality There are three video quality options available for video recording High is about 8 9 Mbps Medium is about 3 5 Mbps Low is about 2 5 Mbps The...

Page 9: ...of the audio input from 1 to 10 If noise is present please adjust the volume to a lower value otherwise select a higher volume for audio recording Microphone Select Select the built in microphone or e...

Page 10: ...DAY or MONTH Next move to the time line and adjust to the correct time for your time zone Press the Select button to save setting Password Protection You can set or cancel the password protection for...

Page 11: ...at to match TV set NTSC or PAL It is also possible to cycle between PAL NTSC and LCD by pressing the LCD TV button on the IR remote controller Power Save In order to save more power You can set the LC...

Page 12: ...he default password is 000000 Firmware Update Copy the firmware update file to SD card and insert into LCD DVR Select Firmware update then the firmware update dialog block will appear on the screen Wh...

Page 13: ...own keys to adjust the audio volume Press and hold the up or down keys to adjust playback speed to values of 1x 2x 4x 8x and 20x When files are initially recorded they will named according to the curr...

Page 14: ...D DVR Specifications High Resolution LCD 2 5 TFT true color High Resolution LCD Recorded Video MPEG AVI Recorded Photo JPG Recorded Audio WAV Video In Out RCA Composite NTSC or PAL Storage type SD car...

Page 15: ...tsonville CA 95076 If the product is not registered proof of purchase such as a copy of the original invoice is required This warranty does not apply if in Orion s judgment the instrument has been abu...

Reviews: