Orion SPACEPROBE 130mm EQ Manual Download Page 15

15

brightest deep-sky objects, first catalogued about 200 years 
ago by the French astronomer Charles Messier.
Determine in which constellation the object lies. Now, find the 
constellation in the sky. If you do not recognize the constella-
tions on sight, consult a planisphere. The planisphere gives 
an all-sky view and shows which constellations are visible on 
a given night at a given time. 
Now, look at your star chart and find the brightest star in the 
constellation  that  is  near  the  object  you  are  trying  to  find. 
Using  the  finder  scope,  point  the  telescope  at  this  star  and 
center it on the crosshairs. Next, look again at the star chart 
and find another suitably bright star near the bright star cur-
rently  centered  in  the  finder.  Keep  in  mind  that  the  field  of 
view of the finder scope is 7°, so you should choose another 
star  that  is  no  more  that  7°  from  the  first  star,  if  possible. 
Move  the  telescope  slightly,  until  the  telescope  is  centered 
on the new star. 
Continue using stars as guideposts in this way until you are 
at  the  approximate  position  of  the  object  you  are  trying  to 
find  (Figure  14).  Look  in  the  telescope’s  eyepiece,  and  the 
object  should  be  somewhere  within  the  field  of  view.  If  it’s 
not,  sweep  the  telescope  carefully  around  the  immediate 
vicinity until the object is found. 
If you have trouble finding the object, start the starhop again 
from the brightest star near the object you wish to view. This 
time, be sure the stars indicated on the star chart are in fact 
the stars you are centering in the eyepiece. Remember, the 
finder scope (and main telescope eyepiece, for that matter) 

gives an inverted image, so you must keep this in mind when 
star hopping from star to star. 

8. Care and Maintenance

If  you  give  your  telescope  reasonable  care,  it  will  last  a 
lifetime.  Store  it  in  a  clean,  dry,  dust-free  place,  safe  from 
rapid changes in temperature and humidity. Do not store the 
telescope outdoors, although storage in a garage or shed is 
OK. Small components like eyepieces and other accessories 
should be kept in a protective box or storage case. Keep the 
caps on the front of the telescope and on the focuser draw-
tube when it is not in use. 
Your  SpaceProbe  130mm  EQ  telescope  requires  very  little 
mechanical  maintenance. The  optical  tube  is  steel  and  has 
a  smooth  painted  finish  that  is  fairly  scratch-resistant.  If  a 
scratch  does  appear  on  the  tube,  it  will  not  harm  the  tele-
scope. If you wish, you may apply some auto touch-up paint 
to  the  scratch.  Smudges  on  the  tube  can  be  wiped  off  with 
a  soft  cloth  and  a  household  cleaner  such  as  Windex  or 
Formula 409. 

Cleaning lenses

Any quality optical lens cleaning tissue and optical lens clean-
ing  fluid  specifically  designed  for  multi-coated  optics  can 
be  used  to  clean  the  exposed  lenses  of  your  eyepieces  or 
finder scope. Never use regular glass cleaner or cleaning fluid 
designed for eyeglasses. Before cleaning with fluid and tissue, 
however,  blow  any  loose  particles  off  the  lens  with  a  blower 
bulb or compressed air. Then apply some cleaning fluid to a 
tissue, never directly on the optics. Wipe the lens gently in a 
circular motion, then remove any excess fluid with a fresh lens 
tissue. Oily fingerprints and smudges may be removed using 
this  method.  Use  caution;  rubbing  too  hard  may  scratch  the 
lens. On larger lenses, clean only a small area at a time, using 
a fresh lens tissue on each area. Never reuse tissues. 

Cleaning Mirrors

You  should  not  have  to  clean  your  telescope’s  mirrors  very 
often;  normally  once  every  year  or  so.  Covering  your  tele-
scope  when  it  is  not  in  use  will  prevent  dust  from  accumu-
lating  on  the  mirrors.  Improper  cleaning  can  scratch  mirror 
coatings,  so  the  fewer  times  you  have  to  clean  the  mirrors, 
the better. Small specks of dust or flecks of paint have virtu-
ally no effect on the visual performance of the telescope.
The large primary mirror and the elliptical secondary mirror 
of  your  telescope  are  front-surface  aluminized  and  over-
coated  with  hard  silicon  dioxide,  which  prevents  the  alumi-
num  from  oxidizing. These  coatings  normally  last  through 
many, many years of use before requiring re-coating (which 
is  easily done).
To clean the secondary mirror, remove the mirror in its holder 
from the 4-vaned spider in the tube. Do this by grasping the 
secondary mirror holder with your fingertips while turning the 
central  screw  on  the  spider’s  central  hub  counterclockwise. 
handle the mirror holder only; do not touch the mirror surface. 
Also be sure not to lose the spring behind the mirror holder. 
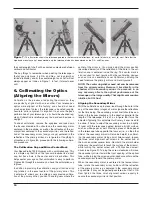
Figure 14. 

Star hopping is a good way to locate hard-to-find 

objects. Refer to a star chart to map a route to the object that uses 
bright stars as guideposts. Center the first star you’ve chosen 
in the finder scope and telescope eyepiece (1). Now move the 
scope carefully in the direction of the next bright star (2), until it 
is centered. Repeat (3 and 4). The last hop (5) should place the 
desired object in the eyepiece.

Summary of Contents for SPACEPROBE 130mm EQ

Page 1: ...mer Optical Products Since 1975 Customer Support 800 676 1343 E mail support telescope com Corporate Offices 831 763 7000 89 Hangar Way Watsonville CA 95076 instruction Manual Orion SpaceProbe 130mm EQ 9851 Equatorial Newtonian Reflector Telescope ...

Page 2: ... Tube mounting rings Tube ring clamps Primary mirror cell Collimation screws 6 R A setting circle Latitude adjustment T bolt Azimuth lock knob Leg lock knob Accessory tray Accessory tray bracket Eyepiece Focuser Dec slow motion control cable Dec setting circle R A lock knob Counterweight Counterweight lock knob Counterweight shaft R A slow motion control cable ...

Page 3: ... screws should be tightened securely to eliminate flexing and wobbling but be careful not to over tighten or the threads may strip Refer to Figure 1 during the assembly process During assembly and anytime for that matter Do not touch the surfaces of the telescope mirrors or the lenses of the finder scopes or eyepieces with your fingers The optical sur Congratulations on your purchase of a quality ...

Page 4: ... latitude lock T bolt is pointing to the mark at 40 To do this loosen the latitude lock T bolt and turn the latitude adjustment T bolt until the pointer and the 40 line up Then retighten the latitude lock T bolt The declination Dec and right ascension R A axes may need re positioning rotation as well Be sure to loosen the RA and Dec lock knobs before doing this Retighten the R A and Dec lock knobs...

Page 5: ... To place the finder scope in the finder scope bracket first unthread the two black nylon screws until the screw ends are flush with the inside diameter of the bracket Place the O ring that comes on the base of the bracket over the body of the finder scope until it seats into the slot on the middle of the finder scope Slide the eyepiece end nar row end of the finder scope into the end of the brack...

Page 6: ...g When you are actually observing with the tele scope you can adjust the eyepiece position by loosening the tube rings and rotating the optical tube 7 Retighten the tube ring clamps The telescope is now balanced on both axes Now when you loosen the lock knob on one or both axes and manually point the telescope it should move without resistance and should not drift from where you point it Focusing ...

Page 7: ...y adjustments until the two images match up NOTE The image in both the finder scope and the main telescope will appear upside down rotated 180 This is normal for finder scopes and reflector telescopes see Figure 5 The finder scope alignment needs to be checked before every observing session This can easily be done at night before viewing through the telescope Choose any bright star or planet cente...

Page 8: ...of the telescope s position to center objects within the field of view Before you can use the cables you must manually slew the mount to point the telescope in the vicinity of the desired target Do this by loosening the R A and Dec lock knobs and moving the telescope about the mount s R A and Dec axes Once the telescope is pointed somewhere close to the object to be viewed retighten the mount s R ...

Page 9: ... object Retighten the thumb screw Finding Objects With the Setting Circles Now that both setting circles are calibrated look up in a star atlas the coordinates of an object you wish to view 1 Loosen the Dec lock knob and rotate the telescope until the Dec value from the star atlas matches the reading on the Dec setting circle Retighten the Dec lock knob 2 Loosen the R A lock knob and rotate the te...

Page 10: ... other collimating devices such as Orion s LaserMate Laser Collimator obviating the need to remove the primary mirror and mark it yourself NOTE The center ring sticker need not ever be removed from the primary mirror Because it lies directly in the shadow of the secondary mirror its presence in no way adversely affects the optical performance of the telescope or the image quality That might seem c...

Page 11: ... one of the pairs of Phillips headed collimation screws one turn Look into the focuser and see if the secondary mirror reflection has moved closer to the center of the primary mirror reflection Repeat this process on the other two pairs of collimation screws if nec essary It will take a little trial and error to get a feel for how to tilt the mirror in this way to center the reflection Look into t...

Page 12: ...ing and Transparency Atmospheric conditions play a huge part in quality of view ing In conditions of good seeing star twinkling is minimal and objects appear steady in the eyepiece Seeing is best overhead worst at the horizon Also seeing generally gets better after midnight when much of the heat absorbed by the Earth during the day has radiated off into space Typically seeing conditions will be be...

Page 13: ...a magnifica tion of 36x and a 10mm which gives a magnification of 90x Other eyepieces can be used to achieve higher or lower powers It is quite common for an observer to own five or more eyepieces to access a wide range of magnifications This allows the observer to choose the best eyepiece to use depending on the object being viewed At least to begin with the two supplied eyepieces will suffice ni...

Page 14: ...ally Venus appears as a thin crescent not a full disk when at its peak brightness Because it is so close to the Sun it never wanders too far from the morning or evening horizon No surface markings can be seen on Venus which is always shrouded in dense clouds MARS The Red Planet makes its closest approach to Earth every two years During close approaches you ll see a red disk and may be able to see ...

Page 15: ...ar on the tube it will not harm the tele scope If you wish you may apply some auto touch up paint to the scratch Smudges on the tube can be wiped off with a soft cloth and a household cleaner such as Windex or Formula 409 Cleaning Lenses Any quality optical lens cleaning tissue and optical lens clean ing fluid specifically designed for multi coated optics can be used to clean the exposed lenses of...

Page 16: ...n a warm area until it is completely dry before reassembling the telescope 9 Specifications Optical tube Steel Primary mirror diameter 130mm Primary mirror coating Aluminized silicon dioxide overcoat Secondary mirror minor axis 34mm Focal length 900mm Focal ratio f 7 Eyepieces 25mm and 10mm Explorer II fully coated 1 25 Magnification 36x with 25mm 90x with 10mm Focuser Rack and pinion Finder scope...

Reviews: