


4
5
Before You Begin collimating using the
laserMate Pro
Accurate collimation of your telescope’s optics
using the LaserMate Pro will most easily be
achieved if you do a rough collimation of the
optics with your eye first. This is because if the
optics are grossly misaligned, it may be confus-
ing to interpret which surfaces the laser is being
reflected off of. Refer to your telescope’s instruc-
tion manual for the procedure on how to do a
rough collimation with your eye.
note about centering the secondary
Mirror under the Focuser
Centering the secondary mirror under the focuser
is an adjustment that can be made with the aid
of the LaserMate Pro, but it requires marking the
center of the secondary mirror in the same way the center of the primary mirror
was marked. This is generally undesirable due to the large area of the supplied
collimation targets compared to the total area of the secondary mirror. Since cen-
tering the secondary mirror under the focuser is an adjustment that very rarely,
if ever, needs to be done, we recommend simply making this adjustment by eye.
Again, refer to the collimation instructions in your telescope’s manual for the
procedure on how to do this.
If you wish to use the LaserMate Pro for centering the secondary mirror under the
focuser, refer to the appendix section at the end of this manual.
adjusting the tilt of the secondary Mirror
The first collimation adjustment made with the LaserMate Pro will be to adjust the
tilt of the secondary mirror. This is performed with the Laser collimator.
Insert the LaserMate Pro into your telescope’s focuser drawtube. Point your opti-
cal tube so that it is level with the horizon to limit the play in the eyepiece holder.
You want the LaserMate Pro to be “balanced” as possible in the focuser. Secure
it in place by lightly tightening the thumbscrew on the drawtube that holds the
eyepiece. Then turn the LaserMate Pro on by pressing the red button on the top
of the unit until it clicks on.
Before looking into the optical tube, take a sheet of white paper and place it
across the front aperture of the telescope. If you see a red laser spot on the sheet
of paper, then your telescope is considerably out of collimation (Figure 8). Take
note of the position of the red spot, and be careful not to place your eye in that
position. Remember, it is safe to view the reflection of the laser beam off mirror
surfaces as long as the beam is not directed into your eye.
Look down the front of the optical tube. Remember to keep your eyes clear of
any direct reflections of the beam. Notice the red spot on the surface of the
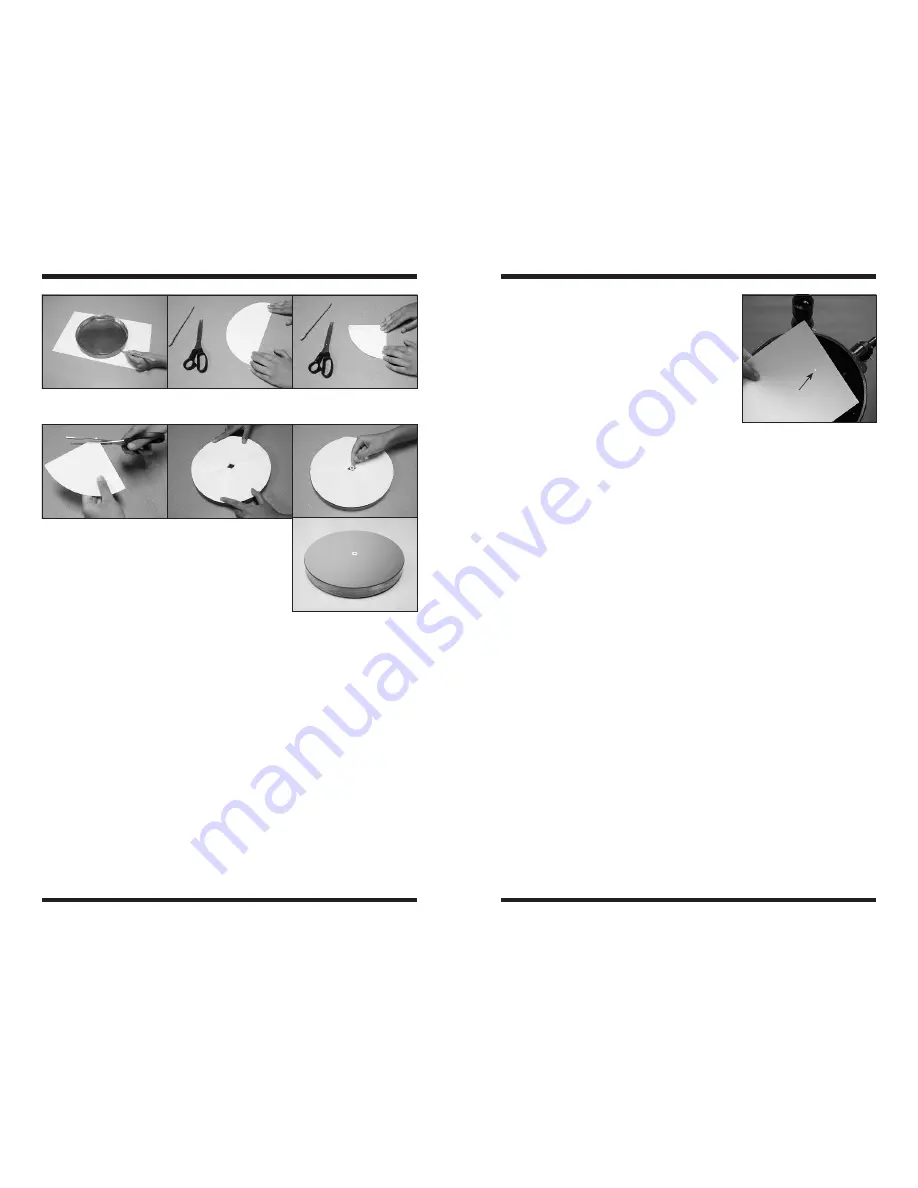
Next, cut out the circle you have just traced with a pair of scissors. Fold the paper
circle into quarters by folding the circle precisely in half, and then folding it in half
again.
Now, cut about 1/4 inch off the tip of the paper wedge you have created.
Unfold the paper, and you will find that you have a paper template of your mirror
with a hole at the center. Make sure the template is still clean; place the paper
template over the surface of the primary mirror.
Carefully register the template edge with the edge of the mirror.
Now, take one of the supplied collimation targets and affix it to the center of the
mirror’s surface through the hole of the paper template. The center of the primary
mirror is now marked, and you can reinstall the primary mirror in the telescope.
Note: For mirror cells that use mirror clips to secure the primary mirror in place,
it is important not to over tighten the mirror clips. For Orion reflector telescopes,
tighten the mirror clip anchor screws until just snug, and then back off each screw
by 1/2 turn. Over tightened mirror clips will put stress on the primary mirror’s fig-
ure, and will introduce astigmatism into the optical system as a result.
Figure 4.
Cut the tip off the paper wedge.
Figure 5.
Place the template on the mirror surface and
carefully register its edge.
Figure 6.
Affix the ring label to the mirror surface
through the hole in the template.
Figure 7.
The primary mirror’s center is now marked,
and it is ready to be reinstalled.
Figure 2.
Trace the outline of the mirror on the paper.
Figure 3a, 3b.
Fold the paper circle in half, and then in half again.
2.
4.
3a.
5.
3b.
6.
7.
Red laser spot
Figure 8.
Place a piece of
white paper in front of the open
tube. If you see a laser spot
on the paper, be careful not to
place your eye in that position.


