2
Terrestrial Viewing
For daytime land viewing, we recommend using a “correct image”
45-degree diagonal so that the image viewed through the tele-
scope is oriented correctly. With a “star diagonal,” typically used
for astronomical viewing, the image in the 150mm Maksutov-
Cassegrain would be mirror reversed. For terrestrial viewing you
will also probably want a correct-image finder scope, as a standard
finder scope produces an upside-down view. That’s not a big deal
for astronomy, but for terrestrial viewing is not ideal.
For daytime terrestrial viewing it’s best to stick with low power
eyepieces that yield a magnification under 100x. At higher pow-
ers, images rapidly lose sharpness and clarity due to “heat waves”
caused by Sun-heated air. Remember to aim well clear of the
Sun, unless the front of the telescope is fitted with a professionally
made solar filter and the finder scope is covered with a completely
opaque material or removed altogether.
Care & Maintenance
If you give your telescope reasonable care, it will last a lifetime.
When not in use, keep the dust cover on the front of the tube and
the dust cap on the eyepiece adapter. Store it in a clean, dry, dust-
free place, safe from rapid changes in temperature and humidity.
Do not store the telescope outdoors, although storage in a garage
or shed is OK.
Your telescope requires very little mechanical maintenance. The
optical tube is aluminum and has a smooth painted finish that is
fairly scratch-resistant. If a scratch does appear on the tube, it will
not harm the telescope. If you wish, you may apply some auto
touch-up paint to the scratch. Smudges on the tube can be wiped
off with a soft cloth and household cleaning fluid.
Any quality optical lens cleaning tissue and optical lens cleaning
fluid specifically designed for multi-coated optics can be used to
clean the front meniscus lens of the telescope. Never use regular
glass cleaner or cleaning fluid designed for eyeglasses. Before
cleaning with fluid and tissue, however, blow any loose particles
off the lens with a blower bulb or compressed air. Then apply some
cleaning fluid to a tissue, never directly on the optics. Wipe the lens
gently, then remove any excess fluid with a fresh lens tissue. Oily
fingerprints and smudges may be removed using this method. Use
caution; rubbing too hard may scratch the lens. For the large sur-
face of the meniscus lens, clean only a small area at a time, using
a fresh lens tissue on each area. Never reuse tissues.
Collimating the Optics
Collimating is the process of aligning a telescope’s optics. Your
Maksutov-Cassegrain's optics were aligned at the factory and
should not need adjustment unless the telescope is handled
roughly. Below you’ll find information on how to test the collimation
of your telescope and instructions for proper alignment should that
be needed.
Star-Testing the Telescope
Before you start adjusting the primary mirror of your telescope,
make certain that it is actually out of collimation byperforming a
star test. Take your telescope out at dusk and let it acclimate to the
outside temperature; this usually takes 30-60 minutes. When it is
dark, point the telescope upwards at a bright star and accurately
center it in the eyepiece’s field of view. Slowly de-focus the image
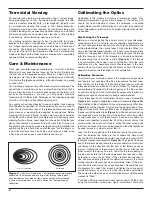
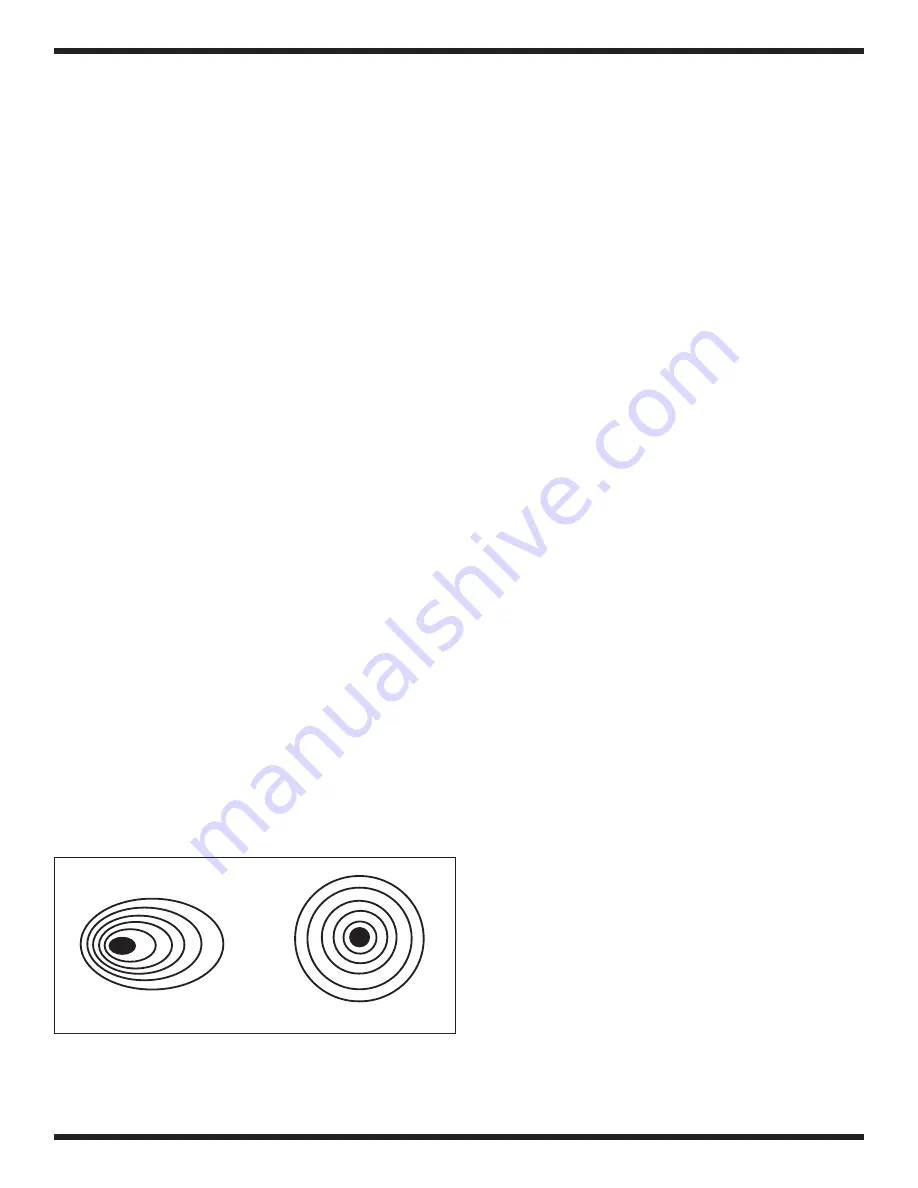
with the focusing knob. If the telescope is correctly collimated,
the expanding disk should be a circle
(Figure 3). If the image
is unsymmetrical, the scope is out of collimation. Also, the dark
shadow cast by the secondary mirror should appear in the very
center of the out-of-focus circle, like the hole in a donut. If the “hole”
appears off-center, the telescope is out of collimation.
Collimation Procedure
To collimate your telescope, remove the diagonal and eyepiece
and look into rear opening of the tube (also remove the dust cover
from the front of the tube). This should be done indoors, with the
telescope pointed at a white wall in a well-lit room. Try to keep your
eye centered with respect to the rear opening of the tube as best
as possible. Using an Orion Collimating Eyepiece will aid greatly in
keeping your eye centered and is strongly recommended.
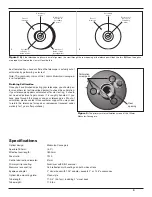
If your telescope is out of collimation, what you see will resemble
Figure 4A. A properly collimated scope will resemble Figure 4B.
The direction of the misalignment in your telescope may differ from
Figure 4A, but the diagram will give you the general idea of how
things will look. Note there are three pairs of alignment screws on
the rear cell of the optical tube
(Figure 5), with each pair consisting
of a large and a small screw. You will need 4mm and 2.5mm met-
ric Allen wrenches to turn these screws. Each pair of collimation
screws work together to adjust the tilt of the primary mirror. One
screw pushes the mirror cell forward, while the other screw pulls
the mirror cell back. One must be loosened and the other tightened
by equal amounts in order to adjust the tilt.
Look into the rear opening of the tube and locate the black cres-
cent that indicates the optics are out of collimation. Note which
way the front of the telescope would need to move in order to “fill”
that black crescent and resemble
Figure 4B. Then look at the back
end of the telescope and locate the pair of collimation screws that
are nearest to the direction that the front of the telescope needs
to move. Tighten one of these screws by one turn, and loosen the
other screw of the pair by one turn. Look into the rear opening of
the tube and determine if the black crescent has reduced in size,
increased in size, or been “filled.” If the crescent has reduced in
size, continue adjusting the pair of collimation screws in the same
manner until the crescent has been completely “filled.” If the cres-
cent has increased in size, the optics have been moved further out
of alignment. To correct this, loosen and tighten the same pair of
collimation screws by one turn to undo the previous adjustment.
Then adjust the other two pairs of collimation screws until the black
crescent is “filled.”
It will take a little trial and error to get a feel for how to tilt the mirror
using the collimation screw pairs. Again, collimation should only
Figure 3
. A star test will determine if a telescope’s optics are properly
collimated. An unfocused view of a bright star through the eyepiece
should appear as illustrated on right if optics are perfectly collimated.
If circle is unsymmetrical, as in illustration on left, the scope needs
collimation.
Out of collimation
Collimated


