background image

12

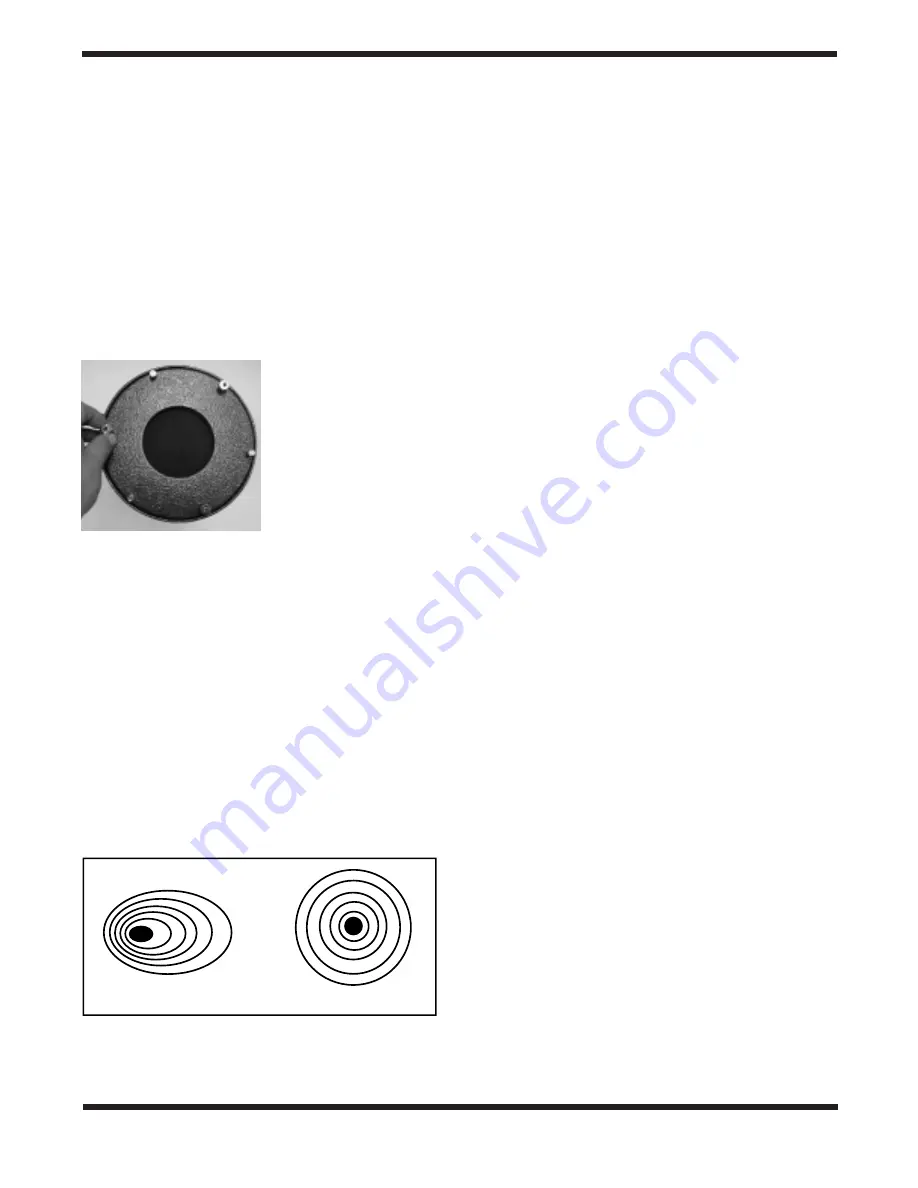
Now, try tightening or loosening one of the spring-loaded col-
limation thumb screws one turn (Figure 13). Look into the
focuser and see if the secondary mirror reflection has moved
closer to the center of the primary mirror reflection. Repeat
this process on the other two collimation thumb screws, if
necessary. It will take a little trial and error to get a feel for how
to tilt the primary mirror in this way to center the secondary
mirror reflection. Do not loosen (rotate counter-clockwise)
each collimation thumb screw too much, or the screw will
completely unthread from the mirror cell casting. Rather, try
tightening the other two collimation thumb screws. Once the
secondary mirror reflection is centered in the primary mirror
reflection, retighten the smaller thumb screws with your fin-
gers to lock the primary mirror in place.

The view down the focuser should now resemble Figure 8a.
The secondary mirror is centered under the focuser; the
reflection of the primary mirror is centered in the secondary
mirror, and the reflection of the secondary mirror is centered
in the reflection of the primary mirror.

A simple star test will tell you whether the optics are accu-
rately collimated.

Star-Testing Your Telescope

When it is dark, point the telescope at a bright star and center it
in the eyepiece’s field of view with the R.A. and Dec. slow-
motion controls. Slowly rack the image out of focus with the
focusing knob. If the telescope is correctly collimated, the
expanding disk should be a circle (Figure 14). If it is unsymmet-
rical, the scope is out of collimation. The dark shadow cast by
the secondary mirror should appear in the very center of the

out-of-focus circle, like the hole in a doughnut. If the “hole”
appears off-center, the telescope is out of collimation.

If you try the star test and the bright star you have selected is
not accurately centered in the eyepiece, then the optics will
always appear out of collimation, even though they may be
perfectly aligned. It is critical to keep the star centered, so over
time you will need to make slight corrections to the telescope’s
position in order to account for the sky’s apparent motion.

7. Using Your Telescope—

Astronomical Observing

Choosing an Observing Site

When selecting a location for observing, get as far away as
possible from direct artificial light such as street lights, porch
lights, and automobile headlights. The glare from these lights
will greatly impair your dark-adapted night vision. Set up on a
grass or dirt surface, not asphalt, because asphalt radiates
more heat. Heat disturbs the surrounding air and degrades
the images seen through the telescope. Avoid viewing over
rooftops and chimneys, as they often have warm air currents
rising from them. Similarly, avoid observing from indoors
through an open (or closed) window, because the tempera-
ture difference between the indoor and outdoor air will cause
image blurring and distortion.

If at all possible, escape the light-polluted city sky and head
for darker country skies. You’ll be amazed at how many more
stars and deep-sky objects are visible in a dark sky! 

“Seeing” and Transparency

Atmospheric conditions vary significantly from night to night.
“Seeing” refers to the steadiness of the Earth’s atmosphere at
a given time. In conditions of poor seeing, atmospheric turbu-
lence causes objects viewed through the telescope to “boil.” If,
when you look up at the sky with just your eyes, the stars are
twinkling noticeably, the seeing is bad and you will be limited
to viewing with low powers (bad seeing affects images at high
powers more severely). Planetary observing may also be poor.

In conditions of good seeing, star twinkling is minimal and
images appear steady in the eyepiece. Seeing is best over-
head, worst at the horizon. Also, seeing generally gets better
after midnight, when much of the heat absorbed by the Earth
during the day has radiated off into space.

Especially important for observing faint objects is good “trans-
parency”—air free of moisture, smoke, and dust. All tend to
scatter light, which reduces an object’s brightness. Transparency
is judged by the magnitude of the faintest stars you can see with
the unaided eye (6th magnitude or fainter is desirable).

Cooling the Telescope

All optical instruments need time to reach “thermal equilib-
rium.” The bigger the instrument and the larger the
temperature change, the more time is needed. Allow at least
a 30 minutes for your telescope to cool to the temperature
outdoors. In very cold climates (below freezing), it is essen-
tial to store the telescope as cold as possible. If it has to

Figure 14. A star test will determine if a telescope’s optics are properly
collimated. An unfocused view of a bright star through the eyepiece
should appear as illustrated on right if optics are perfectly collimated. If
circle is unsymmetrical, as in illustration on left, scope needs collimation.

Out of collimation

Collimated

Figure 13. Use the three
spring-loaded primary mirror
collimation screws to adjust
the tilt of the primary mirror.

Summary of Contents for SkyView Deluxe 6 EQ 9403

Page 1: ...Consumer Optical Products Since 1975 Customer Support 800 676 1343 E mail support telescope com Corporate Offices 831 763 7000 P O Box 1815 Santa Cruz CA 95061 INSTRUCTION MANUAL Orion SkyView Deluxe 6 EQ Equatorial Reflecting Telescope 9403 ...

Page 2: ...e adjustment knob Tripod leg attachment bolt Latitude scale Tripod leg Leg lock knob Rubber foot Finder scope alignment screws 6 Finder scope Finder scope bracket Secondary mirror holder Declination slow motion control Declination setting circle Declination lock lever not pictured Latitude lock lever not pictured Counterweight shaft Counterweights Counterweight lock knobs Retaining washer and knob...

Page 3: ...on viewing of astronomical objects With its precision optics and equatorial mount you ll be able to locate and enjoy hundreds of fascinating celestial denizens including the plan ets Moon and a variety of deep sky galaxies nebulas and star clusters If you have never owned a telescope before we would like to welcome you to amateur astronomy Take some time to familiarize yourself with the night sky ...

Page 4: ...tighten the counterweight lock knobs 8 Orient the equatorial mount as it appears in Figure 1 at a latitude of about 40 i e so the pointer next to the gold colored latitude scale is pointing to the hash mark at 40 To do this loosen the latitude lock lever on the side of the mount opposite the gold latitude scale and turn the lati tude adjustment knob until the pointer and the 40 line up Then tighte...

Page 5: ...urns until you can slide the telescope tube forward and back inside the rings this can be aided by using a slight twisting motion on the optical tube while you push or pull on it Figure 2c 6 Position the telescope so it remains horizontal when you carefully let go with both hands This is the balance point Figure 2d Before clamping the rings tight again rotate the telescope so the eyepiece is at a ...

Page 6: ...l appear upside down rotated 180 This is normal for finder scopes and reflector telescopes see Figure 3 By loosening one alignment screw and tightening another you change the line of sight of the finder scope The round knurled lock nuts installed on the alignment screws must be adequately loosened to allow the screws to be threaded in or out Continue making adjustments to the alignment screws unti...

Page 7: ...tude scale is set at the latitude of your observing site If you don t know your latitude consult a geographical atlas to find it For example if your latitude is 35 North set the pointer to 35 Then retighten the latitude lock lever The latitude setting should not have to be adjusted again unless you move to a different viewing location some distance away 3 Loosen the Dec lock lever and rotate the t...

Page 8: ...ppear to move faster at higher magnifications because the field of view is narrower Optional Motor Drives for Automatic Tracking An optional DC motor drive Orion AccuTrack SVD 7825 can be mounted on the R A axis of the SkyView Deluxe equatorial mount to provide hands free tracking Objects will then remain stationary in the field of view without any manu al adjustment of the R A slow motion control...

Page 9: ...unt is polar aligned the telescope should be moved only on the R A and Dec axes To point the scope overhead first loosen the R A lock lever and rotate the telescope on the R A axis until the counter weight shaft is horizontal parallel to the ground Then loosen the Dec lock lever and rotate the telescope until it is pointing straight overhead The counterweight shaft is still horizontal Then retight...

Page 10: ...red under the drawtube the reflection of the primary mirror centered in the secondary mirror and the reflection of the secondary mirror and your eye centered in the reflec tion of the primary mirror as in Figure 8a If anything is off center follow the collimation procedure below It helps to put a piece of white paper on the inside of the opti cal tube opposite the focuser The white paper forms a b...

Page 11: ...lso is the case in Figure 8d you will fix that in the next step Adjusting the Primary Mirror The final adjustment is made to the primary mirror It will need adjustment if as in Figure 8d the secondary mirror is cen tered under the focuser and the reflection of the primary mirror is centered in the secondary mirror but the small reflection of the secondary mirror with your eye inside is off center ...

Page 12: ...hese lights will greatly impair your dark adapted night vision Set up on a grass or dirt surface not asphalt because asphalt radiates more heat Heat disturbs the surrounding air and degrades the images seen through the telescope Avoid viewing over rooftops and chimneys as they often have warm air currents rising from them Similarly avoid observing from indoors through an open or closed window beca...

Page 13: ...l length eyepiece As a general rule a small but well resolved image will show more detail and provide a more enjoyable view than a dim and fuzzy over magnified image Eyepiece Selection By using eyepieces of varying focal lengths it is possible to attain a great many magnifications with the SkyView Deluxe 6 The telescopes come with two high quality Plössl eye pieces a 25mm which gives a magnificati...

Page 14: ... able to see the polar ice cap To see surface detail on Mars you will need a high power eyepiece and very steady air E The Stars Stars will appear like twinkling points of light Even powerful telescopes cannot magnify stars to appear as more than a point of light You can however enjoy the different colors of the stars and locate many pretty double and multiple stars The famous Double Double in the...

Page 15: ... lens On larger lenses clean only a small area at a time using a fresh lens tissue on each area Never reuse tissues Cleaning Mirrors You should not have to clean your telescope s mirrors very often normally once every year or so Covering your tele scope when it is not in use will prevent dust from accumulating on the mirrors Improper cleaning can scratch mirror coatings so the fewer times you have...

Page 16: ...ian optics which is espe cially critical for short focal length telescopes such as the SkyView Deluxe 6 Shorty 2x Barlow 8711 A practical accessory for achieving higher power with the SVD 6 Doubles the power of any eyepiece it s used with For use with 1 25 eyepieces DeepMap 600 Folding Star Chart 4150 Terrific deep sky observing companion showing the locations of the 600 best celestial objects for...

Reviews: