

2
Installation
\
\
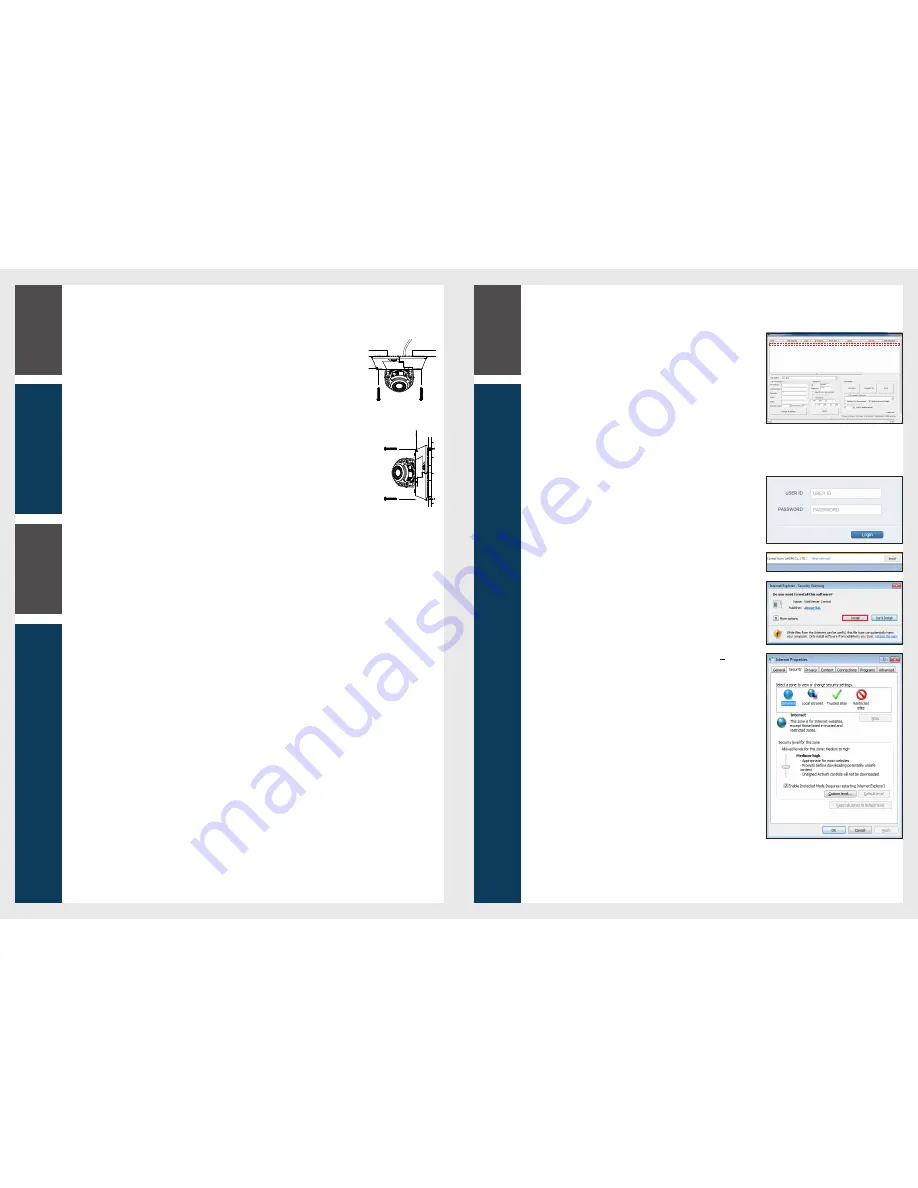
Web Viewer
1.
Security page (Internet Explorer) is displayed. Click <
Continue to this website (not recommended).
>.
2.
Enter your ID and password in the ID input window.
Default User ID : ADMIN
Password : 1234
3.
You should run the activities after installing corresponding Active-X.
4.
If the Active-X installation window does not appear in the top right area for a
long time (longer than 1 minute), change the
“
Internet Options
”
settings.
5.
"
Control Panel > Internet Options > Security
" menu, press [
Custom
level...
] button.
6.
Select all the ActiveX-related options as available.
\
\
Connecting to External Device
Installation monitor
Connect the video output cable of the network camera with the installation monitor.
You can watch the video input from the installed camera in the monitor.
J
You should not use the installation monitor continuously as it is only designed to check the video output during the camera installation process.
Connecting with power supply
Connect the PoE (Power Over Ethernet) cable between the power supply and the network port.
J
If your network camera is installed as standalone setup, the power should be supplied by PoE Hub.
Connecting to the network
To connect with a PC ina local network
If you connect the network camera with a PC in the same network, you can perform monitoring and setting process by using the PC's Web
Viewer.
1.
Connect the network port on the back panel with a router or hub.
2.
Connect a local PC with a router or hub.
3.
Enter the address in
“
http://IP address:web service port
”
format in address window of the web browser or dedicated software
program at local PC.
Ex : http://192.168.0.23:80 web service port is set as 80 by factory default. You can modify the port number in Network Setup screen.
4.
Enter your ID and password to log in. You can watch the monitoring screen after login.
J
You must register your login password when accessing for the first time.
To change your password, refer to "
How to connect
".
To connect with a PC in remote network
You can access the network camera from your PC through the internet.
1.
Connect router's network port directly with static IP LAN cable or with the ADSL modem.
2.
If using a router, you should configure the port forwarding settings.
You can get relevant support from your router manufacturer or qualified installation company for how to configure the port forwarding of your
router.
When you access the network camera from your PC via internet, make sure to access the following site.
\
\
How to connect to the camera
Since the network settings of your network camera are not configured by factory default, you cannot access to WebRA. To configure your
network, run the
“
MDload
”
in CD to check the IP and access to your camera.
1.
Press <
Search
> button to search for the network camera linked to your
network.
2.
The search results are displayed if finished. You can distinguish your network
camera(s) by checking its model information. Click your desired apparatus
whose network settings you want to configure in the list.
3.
Select
“
DHCP
”
or
“
STATIC
”
for <
Network Type
> in bottom left. If selecting
“
STATIC
”
, enter the values for IP Address, Subnet Mask, Gateway, and DNS
information, and then press <
Apply
>.
4.
The list is automatically updated in a moment. Check if all the values look
correct and finish the network environment settings.
\
\
Installing
Installing on the ceiling
You can install the camera on the ceiling, and then adjust and fix its angle.
1.
Find a suitable location on the ceiling to install the camera.
It must be installed in a place where it can bear the camera's weight.
It is recommended to inject silicon into the gap between the camera and the ceiling for secure waterproofing.
2.
Fix the camera main body onto the ceiling using the screws provided.
Installing on a surface
You can install the camera on a wall, and then adjust and fix its angle.
1.
Find a suitable location on the wall to install the camera.
It must be installed in a place where it can bear the camera's weight.
2.
Fix the camera main body onto the wall using the screws provided.
It is recommended to inject silicon into the gap between the camera and the wall for secure waterproofing.
4
Web Viewer
3
Connecting


