ORION Images 32PVMV Installation And User Manual Download Page 33

33

Installation and User's Guide
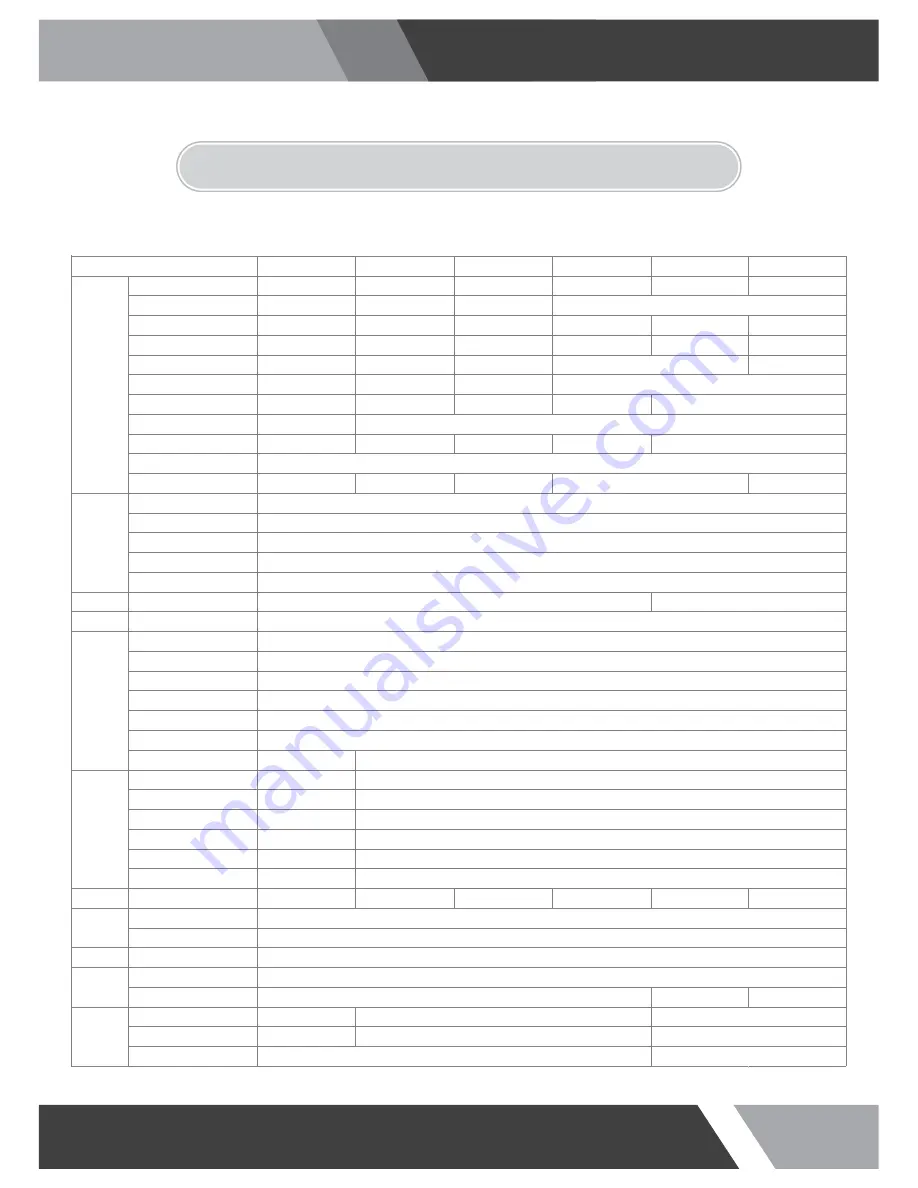
5. FEATURE

19 inches

20 inches

23 inches

32 inches

Screen Size

19.0 inches

20.1 inches

23.0 inches

31.6 inches

Resolution

1280*1024 pixels

1600*1200 pixels

Pixel Pitch

0.294*0.294 mm

0.255*0.255 mm

0.265*0.265 mm

0.364*0.364 mm

Brightness

250 cd/m^2

300 cd/m^2

250 cd/m^2

360 cd/m^2

Contrast Ratio

Aspect Ratio

5:4

4:3

Viewing Angle (H/V)

170/160 degrees

178/178 degrees

178/178 degrees

170/160 degrees

Display Color

Response Time

5 ms

6 ms

5 ms

Video System

Panel Life Time (hours)

30,000 hours

45,000 hours

30,000 hours

50,000 hours

Video In/Out (BNC Type)

VGA In (15Pin D-Sub)

HDMI In

Audio In (RCA Type)

PC Stereo In

Audio

Built in Speakers

Y (7.5W*2)

Transmitter

Remote Control

Multi Display Function

Filter Type

Deinterlacing

Noise reduction

Auto source sequencing

Multi Lingual Language

 Motion Detection

Camera Type

 Mechanical Design

Image Sensor

S/N Ratio

Resolution

Sensitivity (Normal/DSS)

Dimension

Outline Dimension (w Stand)

16.54*3.15*15.94 inches 18.03*3.15*16.44 inches 21.97*3.15*15.61 inches

29.61*3.15*20.28 inches

Cabinet color

Black

Cabinet Material

Electro-Galvanized Steel

Power

Electrical Ratings

AC 100~240 V (50/60Hz)

Operating  Temperature

Storage Temperature

-20~60 celsius

VESA Mounts Size

Ceiling Mount

Wall

-20~60 celsius

100*100 mm

CMK-01

WB-5, 10, 30, 31

Tilt Swivel Camera

1/3" SONY Super HAD CCD

>52dB

Horizontal : 650 TV Lines

0.05 /0.0001 Lux

0~50 celsius

Y

Y

Eng, Spa, Fre, Ger, Ita

PIR Motion Sensor

WDR

Pin Hole Camera

1/3" 520K Color CCD

>50dB

700 TV Lines (906H)

Min. 0.1 Lux

Digital WDR

Y (1W*2)

Y

PIP

3D Comb Filter

Y

Mounts

NTSC/PAL

16.7 million

1/2 (Included Cam Out)

1

1

1

1

Cabinet

Circumstance

Display

Interface

Special

Features

Camera

1920*1080 pixels

800:1

1000:1

1000:1

1400:1

16:9

10 inches

9.7 inches

1024*768 pixels

0.192*0.192 mm

350 cd/m^2

4:3

160/160 degrees

35 ms

262,144

10,000 hours

9.33*1.97*8.27 inches

600:1

75*75 mm

SIDE MOUNT(1/4-20), CMK-01

DVR Option

27 inches

27.0 inches

0.311*0.311 mm

250 cd/m^2

8 ms

25.79*3.15*17.85 inches

-20~65 celsius

200*200 mm

CMK-01 with FMA-01

WB-2642

Summary of Contents for 32PVMV

Page 1: ...Installation and User s Guide PUBLIC VIEW MONITOR SERIES 10 32 inches...

Page 2: ...ot follow this instruction it may cause the slight damage to the user or cause some damages to the monitor Warning Keep away the monitor from the direct sunlight and a heating appliance Never push obj...

Page 3: ...he wall outlet and never touch it When smoking and noising from the monitor unplug the product from the wall outlet and contact a service center Unplug this product from the wall outlet when It does n...

Page 4: ...the monitor and people The openings must not be blocked by curtain rug or other similar surface Before carrying the monitor tum it off and Unplug the signal cables and the power code From the wall out...

Page 5: ...licable in the European Union and other European countries with garbage separate disposal and collection methods This symbol on the product or in the related documents in the package indicates that th...

Page 6: ...rning the equipment off and on the user is encouraged to try to correct the interference by one or more of the following measures NOTE Reorient or relocate the receiving antenna Increase the separatio...

Page 7: ...Caution 6 2 FCC STATEMENT 3 1 Parts 3 2 How to Install 33 6 TROUBLESHOOTING 8 3 INSTALLATION 4 1 Mode Setting 4 2 Menu Setting CAMERA VIDEO Mode 4 3 Menu Setting VGA Mode 4 4 Menu Setting HDMI Mode 4...

Page 8: ...8 Installation and User s Guide 3 INSTALLATION 3 1 Parts LCD Monitor VGA Cable Power Cable Remote Controller Battery User Manual Adapter 10 only...

Page 9: ...o adjustment of RGB source Decrease the level of volume and move the previous menu Increase the level of volume and select rhe OSD menu Turns the power ON or OFF There will be a few seconds delay befo...

Page 10: ...7 4 8 CAMERA OUT CAMERA signal looping out HDMI HDMI signal input AUDIO VIDEO Stereo audio input for VIDEO or S VIDEO VGA VGA PC RGB signal input 19 23 inches 1 2 3 5 6 7 8 4 10 inches 20 27 32 inche...

Page 11: ...N MODE Select the scan mode of the screen VOL VOL Increase Decrease the volume level MENU EXIT Activate and exit the OSD menu KEY LOCK Locking the button Prevent operation A OSD CONTROL MENU B S SET S...

Page 12: ...Select VIDEO mode RGB PC Select VGA mode HDM Select HDMI mode CAMERA VIDEO RGB PC HDMI MOVE ENTER INPUT Use SOURCE button and then button to move the source 1 Press the button to select the source 2 P...

Page 13: ...t of color SHARPNESS Adjust sharpness of screen SCAN MODE Select the scan mode of the screen COLOR TEMP Switch color temperature of screen PICTURE CONTRAST 60 BRIGHTNESS 50 COLOR 50 TINT 50 SHARPNESS...

Page 14: ...VE ADJUST ENTER MENU EXIT VER 50 PICTURE SCREEN SETUP RGB SETUP SETUP CYCLE SETUP PVM SCAN MODE FULL PICTURE CONTRAST 60 BRIGHTNESS 50 COLOR 50 TINT 50 SHARPNESS 50 COLOR TEMP MEDIUM RED 50 GREEN 50 B...

Page 15: ...is FULL switch to UNDER and OVER scan mode options PICTURE CONTRAST 60 BRIGHTNESS 50 COLOR 50 TINT 50 SHARPNESS 50 COLOR TEMP MEDIUM RED 50 GREEN 50 BLUE MOVE ADJUST ENTER MENU EXIT VER 50 PICTURE SC...

Page 16: ...NPUT LANGUAGE Inputs can be set to CAMERA VIDEO RGB PC and HDMI mode Default setting is ENGLISH and language setting can be set to ITALIAN FRENCH SPANISH and GERMAN SETUP INPUT LANGUAGE SOUND MUTE BUT...

Page 17: ...CREEN SETUP RGB SETUP SETUP CYCLE SETUP PVM DEFAULT ON OFF OFF ENGLISH CAMERA MOVE ADJUST ENTER MENU EXIT VER 15s SETUP INPUT LANGUAGE SOUND MUTE BUTTON LOCK NOISE REDUCTION OSD TIME PICTURE SCREEN SE...

Page 18: ...LT DEFAULT is set OSD menu to factory default SETUP INPUT LANGUAGE SOUND MUTE BUTTON LOCK NOISE REDUCTION OSD TIME PICTURE SCREEN SETUP RGB SETUP SETUP CYCLE SETUP PVM DEFAULT ON OFF OFF ENGLISH CAMER...

Page 19: ...CLE CAMERA VIDEO RGB PC HDMI PICTURE SCREEN SETUP RGB SETUP SETUP PVM SETUP CYCLE OFF OFF OFF OFF OFF MOVE ADJUST ENTER MENU EXIT VER 10s CYCLE SETUP CYCLE TIME CYCLE CAMERA VIDEO RGB PC HDMI PICTURE...

Page 20: ...the arrow to highlight a selection 5 Use the arrow to adjust the setting on a selected item PVM SETUP MOTION MODE MOTION INPUT PICTURE SCREEN SETUP RGB SETUP SETUP PVM SETUP CYCLE OFF CAMERA MOVE ADJU...

Page 21: ...OLOR 50 TINT 50 SHARPNESS 50 COLOR TEMP MEDIUM RED 50 GREEN 50 BLUE MOVE ADJUST ENTER MENU EXIT VER 50 PICTURE SCREEN SETUP RGB SETUP SETUP CYCLE SETUP PVM SCAN MODE FULL 4 3 Menu Setting VGA Mode PIC...

Page 22: ...mperature options USER Default setting of RED GREEN BLUE is 50 and adjustable from range of 0 to 100 COLOR TEMP SCREEN PIP Activates PIP PBP mode Press the MENU EXIT key to access menu 1 Use the arrow...

Page 23: ...L T SETUP Press the MENU EXIT key to access menu 1 Use the arrow to highlight a selection 2 Press the SELECT to choose an item 3 4 Use the arrow to highlight a selection 5 Use the arrow to adjust the...

Page 24: ...MOVE ADJUST ENTER MENU EXIT VER 100 0 0 0 H POSITION Adjust horizontal position of monitor V POSITION Adjust vertical position of monitor CLOCK Adjust clock of monitor PHASE Adjust phase of monitor AU...

Page 25: ...ON CLOCK PHASE AUTO ADJUST POWER SAVING PICTURE SCREEN SETUP RGB SETUP SETUP CYCLE AUTO REPEAT OFF OFF MOVE ADJUST ENTER MENU EXIT VER 100 0 0 0 RGB SETUP H POSITION V POSITION CLOCK PHASE AUTO ADJUST...

Page 26: ...SETUP Press the MENU EXIT key to access menu 1 Use the arrow to highlight a selection 2 Press the SELECT to choose an item 3 4 Use the arrow to highlight a selection 5 Use the arrow to adjust the sett...

Page 27: ...FF CAMERA MOVE ADJUST ENTER MENU EXIT VER Default setting is OFF and switch to FULL PIP DW1 and DW2 mode options RESOLUTION VERTICAL FREQUENCY Hz VGA MODE 720X400 70 640X480 60 72 75 SVGA 800X600 50 6...

Page 28: ...een TINT Adjust tint of color SHARPNESS Adjust sharpness of screen COLOR TEMP Switch color temperature of screen PICTURE CONTRAST 60 BRIGHTNESS 50 COLOR 50 TINT 50 SHARPNESS 50 COLOR TEMP MEDIUM RED 5...

Page 29: ...VE ADJUST ENTER MENU EXIT VER 50 PICTURE SCREEN SETUP RGB SETUP SETUP CYCLE SETUP PVM SCAN MODE FULL PICTURE CONTRAST 60 BRIGHTNESS 50 COLOR 50 TINT 50 SHARPNESS 50 COLOR TEMP MEDIUM RED 50 GREEN 50 B...

Page 30: ...the arrow to highlight a selection 2 Press the SELECT to choose an item 3 4 Use the arrow to highlight a selection 5 Use the arrow to adjust the setting on a selected item This function of each menu i...

Page 31: ...on 5 Use the arrow to adjust the setting on a selected item PVM SETUP Press the MENU EXIT key to access menu 1 Use the arrow to highlight a selection 2 Press the SELECT to choose an item 3 4 Use the a...

Page 32: ...DISP SYNC BAUDRATE COAXIAL LANGUAGE DEFECT DET START FONT COLOR Selectable EXIT SPECIAL SAVE INITIAL OFF LOW MIDDLE HIGH OFF ON SYSTEM OFF ON Adjustable OFF ON INT L L 2400 4800 9600 57600 115200 SPC...

Page 33: ...Dimension Outline Dimension w Stand 16 54 3 15 15 94 inches 18 03 3 15 16 44 inches 21 97 3 15 15 61 inches 29 61 3 15 20 28 inches Cabinet color Black Cabinet Material Electro Galvanized Steel Power...

Page 34: ...signal right for the connected port Control the BRIGHTNESS The screen doesn t show up When the following troubles are occurred follow the trouble shooting Before contacting a service center The screen...

Page 35: ......

Page 36: ......

Reviews: