background image

5

DSUB Collection™ Manual 

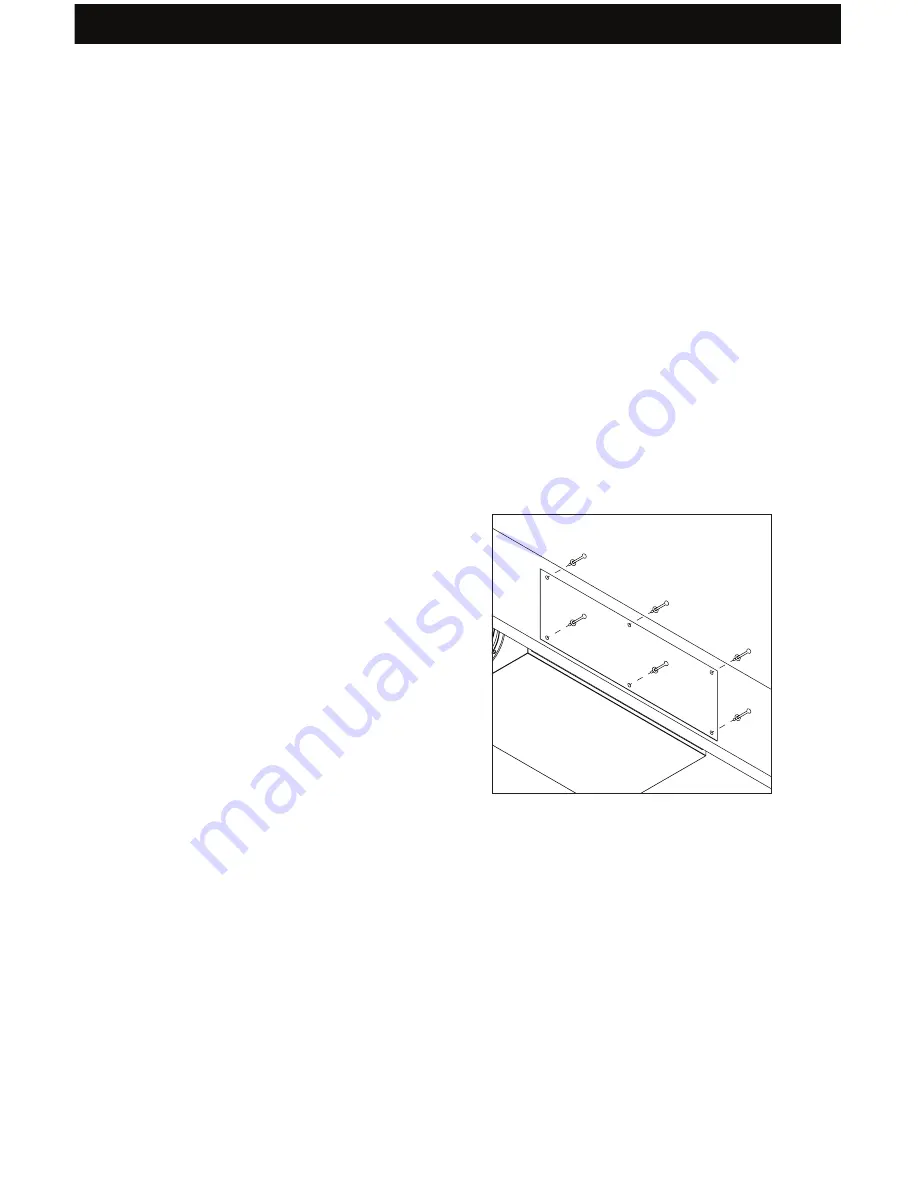
Hold the template to the joist that 

you plan on attaching the subwoofer 

enclosure to. Drill six holes through 

the marked locations on the template 

using a 5/16” (8mm) drill bit. Face 

the enclosure’s rubber damping pad 

towards the joist and secure it in place 

with the supplied lag screws and 

washers. We recommend that one person holds the subwoofer in place while 

another tightens the screws to secure the DSUB to the joist.

1. Installing the Enclosure

colors or patterns are used. You can choose whichever color of wire you want to 

be positive and negative as long as you remain consistent throughout the install. 

On both your amplifier and your speaker the connectors will be identified as red 

for positive and black for negative. It is very important to look carefully at the 

speaker wires and be certain that the same wire that is attached to the positive 

connector in the amplifier is attached to the positive connector in the speaker.

Template

Screws (6)

Enclosure

Summary of Contents for DSUB6F3K

Page 1: ...1 DSUB Collection Manual DSUB COLLECTION DSUB Collection Installation Manual DSUB8F8K DSUB6F68K DSUB6F3K DSUB6F5K...

Page 2: ...ire 4 Installing the Enclosure 5 Installation before Drywall 6 Installation after Drywall 6 Installing the Bayonet Ring 7 Wire Routing 8 Installing the Wire 9 Connecting the Wire 9 Wiring Separate Sub...

Page 3: ...installation process Thisinstructionbookletcoversthenecessaryinformationforasmoothinstallation including the tools you will need step by step instructions for installation troubleshooting tips for any...

Page 4: ...2 201 x 284 x 480mm Frequency Response 33Hz 200Hz Grille Diameter 10 254mm Power Handling 100 250 Watts Cutout Diameter 8 3 4 222mm Mounting Depth 8 203mm Model DSUB6F68K Part DSUB6F680 Model DSUB6F3K...

Page 5: ...d Air Tools Items The gauge of wire used can have an impact on the performance of your speakers Use a multi stranded wiring designed for amplifier to speaker connections Which gauge to select depends...

Page 6: ...conductor wires have some means of identifying which conductor is which but at times this identification may be subtle It s crucial that you keep track of which wire you use for positive and negative...

Page 7: ...tightens the screws to secure the DSUB to the joist 1 Installing the Enclosure colors or patterns are used You can choose whichever color of wire you want to be positive and negative as long as you r...

Page 8: ...the lock icons on the InstaMount the speaker is tightly in place You Use the 8 supplied screws to attach the port tube to the enclosure Test the wired DSUB to see that it s working properly If you ar...

Page 9: ...shing the release tabs or metal buttons on the inside of the rail and pulling the Zip Cliqs to the top of the rails Insert the bayonet ring into the hole in the ceiling by gently bending the Zip Cliqs...

Page 10: ...r concealing wires Behind the Baseboard When available you can route the wire through an attic or crawlspace Attic or Basement When running wires through a wall be sure to avoid all obstacles such as...

Page 11: ...ll be routed to the left speaker right output to right speaker etc 5 Installing the Wire 0 25 0 5 6 12mm Speaker Wire Insert the wires into the connectors making sure that the positive wire is being a...

Page 12: ...Subwoofer Amplifier 3 Ch Subwoofer Amplifier Subwoofer Amplifier Amplifier Insert the channel wire from the 3 Ch amplifier s Subwoofer Channel into the terminals of the DSUB making sure that the posit...

Page 13: ...and most hardware stores will mix a can of paint to match whatever color you need Before painting carefully remove the thin cloth on the underside of the grille Lightly spray the front of the grille...

Page 14: ...er No Sound Check the cord connecting the amplifier with the source The cord may be damaged or plugged into the wrong input or out put No Sound Check the wires connecting the amplifier with the speake...

Page 15: ...echnical trouble please include the model number and briefly explain what steps you took to resolve the problem in your email or be prepared to answer these questions over the phone If you are conside...

Page 16: ...l If this is the case installing the replacement model may require mounting modifications Origin Acoustics will not be responsible for any such related costs Limited Lifetime Warranty This warranty ma...

Page 17: ...Warranty Before making any return attempts it is required that you first contact Origin Acoustics Return product to Origin Acoustics or your dealer either in person or by mail It s preferable if the p...

Page 18: ...16 DSUB Collection Manual Notes...

Page 19: ...17 DSUB Collection Manual Notes...

Page 20: ...5 S Decatur Blvd Las Vegas NV 89118 www originacoustics com 844 674 4461 2018 Origin Acoustics All copyrighted trademarked and patented elements mentioned herein are the sole property of Origin Acoust...

Reviews: