background image

9

РУССКИЙ

 УСТАНОВКА ДАТЫ

•  Не забудьте установить время перед установкой даты.

•  Дату необходимо настраивать в первый день марта и других месяцев, 

следующих за 30-дневными месяцами.

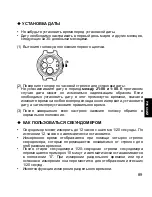
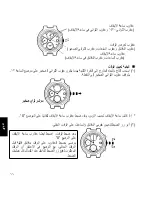
(1) Вытяните головку в положение первого щелчка.

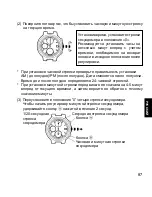
(2) Поверните головку по часовой стрелке для установки даты.

*  Не устанавливайте дату в период 

между 21:00 и 1:00

. В противном 

случае  дата  может  не  измениться  надлежащим  образом.  Если 

необходимо  установить  дату  в  этот  промежуток  времени,  сначала 

измените время на любое вне пределов данного интервала, установите 

дату, а затем переустановите правильное время.

(3) После  завершения  всех  настроек  нажмите  головку  обратно  в 

нормальное положение.

  КАК ПОЛЬЭОВАТЬСЯ СЕКУНДОМЕРОМ

•  Секундомер может измерять до 12 часов с шагом в 1/20 секунды. По 

истечении 12 часов он автоматически остановится.

•  Измеренное  время  отображается  при  помощи  четырех  стрелок 

секундомера,  которые  перемещаются  независимо  от  стрелок  для 

отображения времени.

•  После  старта  секундомера  1/20-секундная  стрелка  секундомера 

перемещается примерно 10 минут и автоматически останавливается 

в  положении  “0”.  При  измерении  раздельного  времени  или  при 

остановке измерения она переместится для отображения истекших 

1/20 секунд.

•  Имеется функция измерения раздельного времени.

Summary of Contents for TT(KFB)

Page 1: ...solutely sure to observe the demarcated contents indicated below to prevent any possible physical danger and property damage to you as well as other people concerned A demarcation with this symbol rep...

Page 2: ...out WATER RESISTANT WATER RESIST Water resistant watches Water resistant for daily life WATER RESISTANT WATER RESIST Reinforced water resistance for daily life I WATER RESISTANT WATER RESIST 50m 5bar...

Page 3: ...ter may enter the interior of the watch and defeat the water resistance 6 If your watch is non water resistant beware of splashes of water during face washing rain etc and sweat If the watch becomes w...

Page 4: ...ttery 1 Depleted batteries that are left sitting in the watch for long periods of time may begin to leak battery acid which could lead to malfunction Be sure to replace depleted batteries as soon as p...

Page 5: ...ch on the floor 5 Magnetism 1 If the watch is left at a location with strong magnetism for an extended period of time the components may be magnetized resulting in malfunction Be careful 2 The watch m...

Page 6: ...ace Discoloration deformation and damage to various resin based component parts may also occur 9 About accessory parts CAUTION Do not attempt to disassemble or modify the watch WARNING Store the brace...

Page 7: ...s when the light is stored such as the shape of the glass the thickness of the paint surrounding brightness level the distance from the watch to the light source and the light absorption level Please...

Page 8: ...Mean monthly rate 20sec 3 Operating temperature range 5 C 50 C 4 Drive system Step motor 4 pieces 5 Display system Time function Hour and minute hands with a small second hand that moves at one secon...

Page 9: ...K Button B L Dial M Stopwatch minute hand Some models may not come with tachymeter scales The position of the date indicator may vary on some models A C D E F G H J L K B 8 I M Normal position First...

Page 10: ...f watch 1 When wanting to use the buttons first turn the button ring to the left and then loosen it until the screw stops The buttons may not be able to be used if the button ring cannot be loosened e...

Page 11: ...the crown to set the hour and minute hands to the current time Small second hand Small second hand After setting the time also set the stopwatch hands to the 0 position It is recommended that the hand...

Page 12: ...watch second hand Button A Button B Stopwatch hour and minute hands Stopwatch 1 20 second hand Stopwatch second hand Button A Button B Stopwatch hour and minute hands Stopwatch 1 20 second hand The st...

Page 13: ...crown to the first click 2 Turn the crown clockwise to set the date Do not set the date between 9 00 p m and 1 00 a m Otherwise the date may not change properly If it is necessary to set the date dur...

Page 14: ...sure to adjust the hands for time display to the current time Notes on the movement of the stopwatch 1 20 second hand After the stopwatch is started the stopwatch 1 20 second hand moves for about 10 m...

Page 15: ...following three stopwatch operations has occurred Reset the stopwatch accordingly The stopwatch was stopped in Standard measurement or Accumulated elapsed time measurement 1 Press button B to reset th...

Page 16: ...Split release Button A Stop Button B Reset Measurement of two competitors Button A Start Button B Finish time of first competitor Button A Second competitor finishes Button B Finish time of second com...

Page 17: ...f production per unit of time per hour measuring range maximum 60 seconds 1 Press button A at the start point or when a product begins to be made 2 Press button A again once 1 km have been passed or t...

Page 18: ...to remind you how long time is still remain for an appointment You cannot turn the bezel reversely since it comes with a protection mechanism for preventing wrong operation by force or shock Figures o...

Page 19: ...nen Bitte bewahren Sie diese Bedienungsanleitung f r sp tere Bezugnahme gut auf SICHERHEITSMA NAHMEN Um zu verhindern dass Sie oder andere Personen sich verletzen oder Sachsch den entstehen lesen Sie...

Page 20: ...st ndige Uhren Wasserbe st ndig f r das t gliche Leben WATER RESISTANT WATER RESIST Verst rkte Wasserbe st ndigkeit I f r das t gliche Leben WATER RESISTANT WATER RESIST 50m 5bar Verst rkte Wasserbe s...

Page 21: ...st ndigkeit Wasser kann in die Uhr eindringen 6 Wenn Ihre Uhr nicht wasserbest ndig ist achten Sie auf Wasserspritzer beim Gesichtwaschen Regen usw und Schwei Wenn die Uhr durch Wasser oder Schwei nas...

Page 22: ...r Batterie ACHTUNG 1 Aus entleerten Batterien die lange in der Uhr verbleiben kann Batteries ure auslaufen was zu Fehlfunktionen f hren kann Tauschen Sie entleerte Batterien so schnell wie m glich aus...

Page 23: ...nen Teile magnetisiert wodurch St rungen verursacht werden k nnen Bitte lassen Sie Vorsicht walten 2 Wenn die Uhr Magnetismus ausgesetzt wird kann sie zeitweilig vor oder nachgehen aber wenn sie nicht...

Page 24: ...Verf rbung Verformung oder Besch digung der verschiedenen auf Harz basierenden Bestandteile kommen 9 ber Zubeh rteile ACHTUNG Versuchen Sie nicht diese Uhr auseinanderzubauen oder zu modifizieren WARN...

Page 25: ...Dauer der Lichtabgabe h ngt von verschiedenen Faktoren bei der Lichtspeicherung ab wie der Form des Glases der Dicke der Farbe der Helligkeit der Umgebung der Entfernung der Uhr zur Lichtquelle und de...

Page 26: ...Durchschnittliche Monatsrate 20 sec 3 Betriebstemperaturbereich 5 C bis 50 C 4 Antriebssystem Schrittmotor 4 St ck 5 Anzeigesystem Zeitfunktion Stunden und Minutenzeiger sowie ein Sekundenzeiger der s...

Page 27: ...Minutenzeiger H Taste A I Datum J Krone K Taste B L Ziffernblatt M Stoppuhr Minutenzeiger Einige Modelle sind eventuell nicht mit einer Tachymeterskala ausgestattet Die Position der Datumsanzeige unt...

Page 28: ...r verschraubt MODELLE MIT VERSCHRAUBBAREM TASTENRING Bei manchen Modellen kann der Tastenring der Ring an der u eren Peripherie in Position fixiert werden indem er fest verschraubt wird Gehen Sie bei...

Page 29: ...e die Krone dann wieder hinein 1 Uhrzeit der normalen Uhr 2 Nullstellung 0 der 4 Stoppuhrzeiger Stoppuhrzeiger Stoppuhr 1 20 Sekunden und Sekundenzeiger Zeiger f r Zeitanzeige Stunden und Minutenzeige...

Page 30: ...k 3 Stellen Sie die vier Zeiger der Stoppuhr auf die Nullstellung 0 zur ck Dr cken Sie die Taste A f r 2 Sekunden um den einzustellenden Minutenzeiger der Stoppuhr zu w hlen Stoppuhr Sekundenzeiger Kn...

Page 31: ...igung aller Einstellungen die Krone beim Zeitzeichen wieder zur Normalposition zur ck Stellen Sie sicher dass der Stunden und der Minutenzeiger die aktuelle Zeit anzeigen und dr cken Sie dann die Kron...

Page 32: ...dieses Bereiches stellen Sie das Datum ein und stellen Sie dann die Uhr wieder auf die aktuelle Zeit 3 Dr cken Sie die Krone nach Beendigung aller Einstellungen wieder zur Normalposition zur ck VERWEN...

Page 33: ...und bei angehaltener Messung bewegt er sich um die verstrichenen 1 20 Sekunden anzuzeigen Nach Freigabe einer Zwischenzeit oder Neustart der Messung bewegt er sich etwa 10 Minuten lang und h lt dann...

Page 34: ...opf B um die Stoppuhr zur ckzustellen Eine Zwischenzeit wurde gemessen und bleibt angezeigt Zwischenzeitmessung 1 Dr cken Sie den Knopf B Die Zwischenzeit wird freigegeben und die Stoppuhrzeiger beweg...

Page 35: ...f A Zweiter teilnehmer am ziel Knopf B Endzeit des zweiten Teilnehmers Knopf B R ckstellung Neustart und Stopp der Stoppuhr k nnen durch Dr cken von Knopf A wiederholt werden Neustart und Stopp der St...

Page 36: ...digen Zeit um eine bestimmte Entfernung 1 km zur ckzulegen Das Tachymeter kann auch zur Berechnung einer Produktionsrate pro Zeiteinheit pro Stunde verwendet werden Messbereich max 60 Sekunden 1 Dr ck...

Page 37: ...die vergangene Zeit am Abstand zwischen dem Minutenzeiger und den Angaben auf der Anzeige L nette messen Sie k nnen auch die Markierung auf eine gew nschte Zeit einstellen um Sie daran zu erinnern wi...

Page 38: ...nel momento di bisogno PRECAUZIONI PER LA SICUREZZA Osservare con la massima attenzione quanto specificato dai contrassegni sotto indicati per evitare qualsiasi pericolo di danneggiare cose e di ferir...

Page 39: ...SIST Orologi resistenti all acqua Resistente all acqua per l uso giornaliero WATER RESISTANT WATER RESIST Resistente all acqua rinforzato per l uso giornaliero I WATER RESISTANT WATER RESIST 50m 5bar...

Page 40: ...e penetrare all interno dell orologio e comprometterne la resistenza all acqua 6 Se il modello non impermeabile fare attenzione agli spruzzi d acqua durante le abluzioni la pioggia ecc e al sudore Se...

Page 41: ...provocare un arrossamento cutaneo Non lasciare batterie esaurite all interno dell orologio per lunghi periodi di tempo 3 Sostituzione della batteria 1 Se si lascia la batteria esaurita all interno de...

Page 42: ...lle ore e lancette per il cronometro 4 Urti 1 Si raccomanda di togliere l orologio dal polso durante la pratica di sport pesanti mentre la pratica di quelli leggeri ad esempio il golf non v influisce...

Page 43: ...rgenti contenenti tali componenti prodotti adesivi vernici medicine profumi cosmetici e cos via In questi casi si potrebbe verificare lo scolorimento della cassa dell orologio del cinturino e del quad...

Page 44: ...i luce emessa e la durata dell emissione dipendono dai vari fattori in atto nel periodo d immagazzinamento tra i quali la forma del vetro lo spessore della vernice stessa il livello di luminosit circo...

Page 45: ...ec 3 Limiti temperatura d uso 5 C 50 C 4 Sistema d azionamento Motore a passo 4 unit 5 Sistema di visualizzazione Funzione tempo lancette di ore e minuti con una lancetta piccola per i secondi che si...

Page 46: ...l cronometro G Lancetta dei minuti H Tasto A I Data J Corona K Tasto B L Quadrante M Lancetta dei minuti del cronografo Alcuni modelli non sono dotati di scala del tachimetro La posizione dell indicat...

Page 47: ...a e allentarlo fino a fine corsa Potrebbe non essere possibile utilizzare i pulsanti se l anello non allentato abbastanza Prestare attenzione a non applicare una forza eccessiva quando si svita l anel...

Page 48: ...onografo Lancette di indicazione dell ora lancette dell ora e dei minuti e piccola lancetta dei secondi Lancette del cronografo lancette dell ora e dei minuti del cronografo Corona Lancette del cronog...

Page 49: ...i posizionarla dapprima 4 o 5 minuti avanti l ora desiderata e poi riportarla indietro sull esatta posizione dei minuti 3 Azzerare le quattro lancette del cronometro sulla posizione 0 Premere il tasto...

Page 50: ...ngere indietro la corona riportandola in posizione normale in accordo con un segnale orario Controllare che le lancette delle ore e dei minuti per la visualizzazione dell ora corrente indichino l ora...

Page 51: ...data e poi regolare di nuovo l orologio sull ora esatta corrente 3 Dopo aver completato tutte le regolazioni spingere indietro la corona nella sua posizione normale COME USARE IL CRONOMETRO Il cronom...

Page 52: ...empo parziale o la misura viene fermata si sposta per indicare i 20simi di secondo trascorsi Dopo il rilascio del tempo parziale o la ripresa della misurazione si muove per circa 10 minuti e si ferma...

Page 53: ...1 Premere il tasto B per inzializzare il cronometro Veniva misurato il tempo parziale e rimane visualizzato Split time measurement Misurazione del tempo parziale 1 Premere il tasto B Il tempo parziale...

Page 54: ...azione del tempo parziale intermedio Tasto A Avvio Tasto B Parziale Tasto B Rilascio parziale Tasto A Arresto Tasto B Reimposta Per misurare e rilasciare il tempo parziale ripetutamente premere il tas...

Page 55: ...n prodotto per unit di tempo per ora Intervallo di misurazione massimo 60 secondi 1 Premere il tasto A nel punto di inizio o quando viene iniziata la fabbricazione di un prodotto 2 Premere di nuovo il...

Page 56: ...sul punto desiderato si pu inoltre ottenere l indicazione del tempo residuo Essendo provvista di un meccanismo di protezione che ne impedisce la rotazione a forza o per impatto la lunetta non pu esser...

Page 57: ...observar los contenidos demarcados indicados abajo para evitar de antemano ocasionar da os materiales o personales a usted u otras personas involucradas ADVERTENCIA Un contenido demarcado con este s...

Page 58: ...SIST Relojes resis tentes al agua Resistente al agua para uso diario normal Con WATER RESISTANT WATER RESIST Resistente al agua reforzado para uso diario normal I Con WATER RESISTANT WATER RESIST 50 m...

Page 59: ...erior del reloj y da ar la resistencia al agua 6 Si su reloj no es resistente al agua cu dese de las salpicaduras de agua durante el lavado de cara lluvia etc y del sudor Si el reloj llegara a mojarse...

Page 60: ...UCI N 1 Si una pila agotada se deja dentro del reloj durante mucho tiempo puede salir de ella cido de bater a provocando aver as Cambie la pila lo antes posible 2 Cambie la pila nicamente por otra del...

Page 61: ...e largo tiempo los componentes del mismo podr n magnetizarse y ocasionar una aver a Tenga cuidado 2 El reloj se podr adelantar o atrasar temporalmente cuando sea expuesto a un campo magn tico El reloj...

Page 62: ...fera Tambi n podr n decolorarse deformarse y da arse varios componentes fabricados a base de resinas 9 Acerca de los accesorios PRECAUCI N No intente desmontar o modificar el reloj ADVERTENCIA Guarde...

Page 63: ...to de la luz por ejemplo la forma del cristal el espesor de la pintura el nivel de brillo circundante la distancia entre el reloj y la fuente de luz y el nivel de absorci n de luz Por favor tenga en c...

Page 64: ...edia mensual 20 seg 3 Gama de temperaturas de funcionamiento 5 a 50 C 4 Sistema de accionamiento Motor paso a paso 4 piezas 5 Sistema de visualizaci n Funci n de hora Manecillas de la hora y los minut...

Page 65: ...s minutos del cron metro Algunos modelos pueden no incluir escalas de taqu metro La posici n del indicador de fecha puede variar en algunos modelos A C D E F G H J L K B 8 I M Posici n normal Primer c...

Page 66: ...siga estas instrucciones 1 Si quiere usar los botones gire el anillo con bot n hacia la izquierda y afl jelo hasta que se detenga Si el anillo no est lo suficientemente desenroscado puede que los bot...

Page 67: ...s y de los segundos del cron metro Manecillas de indicaci n de la hora Manecillas de la hora y los minutos y manecilla peque a de los segundos Manecillas del cron metro manecillas de la hora y los min...

Page 68: ...0 Pulse el bot n A durante dos segundos para seleccionar el minutero que desee ajustar Segundero peque o Bot n A Bot n B Manecillas de la hora y los minutos del cron metro Manecilla de 1 20 segundos d...

Page 69: ...ado el bot n A durante 2 segundos 4 Despu s de haber finalizado todos los ajustes devuelva la corona a su posici n normal al escuchar una se al horaria Compruebe que las manecillas de la las horas y l...

Page 70: ...juste correctamente la hora 3 Despu s de haber finalizado todos los ajustes devuelva la corona a su posici n normal FORMA DE UTILIZAR EL CRON METRO El cron metro podr medir hasta 12 horas en increment...

Page 71: ...del mismo se mover durante unos 10 minutos y se parar autom ticamente en la posici n 0 Cuando mida tiempo parcial o pare la medici n se mover para indicar el transcurso de 1 20 segundos Despu s de hab...

Page 72: ...tro en consecuencia El cron metro se par en la Medici n est ndar o en la Medici n del tiempo transcurrido acumulado 1 Presione el bot n B para reponer el cron metro Se midi tiempo parcial y permanece...

Page 73: ...rimer competidor Bot n A Finalizaci n del segundo competidor Bot n B Tiempo de finalizaci n del segundo competidor Bot n B Reposici n El reinicio y la parada del cron metro podr n repetirse presionand...

Page 74: ...producci n por unidad de tiempo por hora Intervalo de medici n hasta 60 segundos 1 Pulse el bot n A en el punto de inicio o cuando un producto comience a fabricarse 2 Vuelva a pulsar el bot n A cuand...

Page 75: ...r la marca a una hora dada como un recordatorio del tiempo que le falta para un compromiso El bisel no puede girarse en sentido inverso ya que est provisto de un mecanismo de protecci n para prevenir...

Page 76: ...76 TT KFB...

Page 77: ...WATER RESISTANT WATER RESIST WATER RESISTANT WATER RESIST I WATER RESISTANT WATER RESIST 50m 5bar II WATER RESISTANT WATER RESIST 100m 10bar 200m 20bar AIR DIVER S 100m 150m 200m He GAS DIVER S 200m...

Page 78: ...78 1 30 3 2 I 50 5 3 II 100 200 10 20 4 5 6 7 8 9...

Page 79: ...79 2 1 2 ORIENT 3 4 3 1 2 3 ORIENT 4 ORIENT 5 0...

Page 80: ...80 4 1 2 5 1 2 6 7 5 35...

Page 81: ...81 8 9 He B 10 c...

Page 82: ...82 11 12 B 12 1 20 1 20 12...

Page 83: ...83 1 32 768 2 5 C 35 C 20 3 5 C 50 C 4 4 5 1 1 20 1 20 60 60 1 5 12 6 SR927SW 1 7 3 2 8 C MOS 1C 1...

Page 84: ...84 A B 1 20 C D E F G H A I J K B L M A C D E F G H J L K B 8 I M A C D E F G H J L K B 8 I M...

Page 85: ...85 B 1 2 1 2...

Page 86: ...86 0 1 2 0 1 12 0 1 20 1 20...

Page 87: ...87 2 AM PM 24 4 5 3 0 A 2 A B 1 20 0...

Page 88: ...88 B 0 B A 2 1 20 0 A 2 0 A 2 0 A 2 4 1 20 B 0 B 0 B 0...

Page 89: ...89 30 1 2 21 00 1 00 3 12 1 20 12 1 20 10 0 1 20...

Page 90: ...90 1 20 0 1 20 1 20 10 0 1 20 10 10 1 20 1 1 30 10 85 1 20 1 1 30 10 85...

Page 91: ...91 1 A 2 B 1 B 1 B 2 A 3 B 1 B 2 B A B A B...

Page 92: ...92 A A B A A A A B A B B A B A B A B B A A B B...

Page 93: ...93 1 60 1 A 2 A 1 3 80 80 1 1 A A...

Page 94: ...94 1 10 10 20...

Page 95: ...18 u s 20 10 10 20 10 10...

Page 96: ...17 u 1 60 A 1 A 2 3 80 80 A A A A...

Page 97: ...16 A A B A A A A B A A B B A B B A B A B B...

Page 98: ...15 A 1 B 2 B 1 B 1 A 2 B 3 B 1 B 2 A B A B...

Page 99: ...14 1 20 0 u 1 20 10 1 20 0 1 20 10 10 1 20 10 85 30 1 20 10 85 30...

Page 100: ...13 4 u 30 1 2 1 00 9 00 3 u 12 1 20 12 10 1 20 1 20 0...

Page 101: ...12 AM PM 24 5 4 0 3 A 0 B B A 1 20 0 A 0 A 0 A 1 20 B 0 B 0 0 B A B 1 20 A B 1 20...

Page 102: ...11 1 20 12 1 0 2 0...

Page 103: ...10 u 1 2 u 1 2 u 0 1 0 2...

Page 104: ...u A 1 20 B C D E F G A H I J B K L M A C D E F G H J L K B 8 I M A C D E F G H J L K B 8 I M...

Page 105: ...u 1 20 12 1 20 12 u 32768 1 35 5 2 20 50 5 3 4 4 5 1 20 1 20 60 60 12 1 SR927SW 6 3 7 1 C MOS 1C IC 8...

Page 106: ...11 12...

Page 107: ...8 9 10...

Page 108: ...0 4 5 6 7 35...

Page 109: ...2 ORIENT 3 ORIENT ORIENT...

Page 110: ...3 30m 5 50m I 20 10 200m 100m II...

Page 111: ...WATER RESISTANT WATER RESIST WATER RESISTANT WATER RESIST I WATER RESISTANT WATER RESIST 50m 5bar II WATER RESISTANT WATER RESIST 100m 10bar 200m 20bar AIR DIVER S 100m 150m 200m He GAS DIVER S 200m 3...

Page 112: ...TT KFB u...

Reviews: