background image

29

Operations

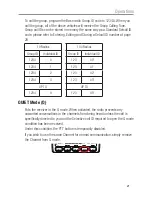
* press the 

PRI/LO

 button, next 2 digits will be blinking for the next frequency digits.

* Rotary channel switch to select which 2 frequency digits you want. 

To store the required frequency, briefly press the 

ID/CAL

 button.

Briefly press the 

F/DPX

 button and Power button to exit.

Automatic programming 

1.   Press the PWR button to turn the radio on.
2.   Briefly press the 

F/DPX

 button and then the Power Button.

  *  The default Band frequency range will be displayed.
3.   Briefly press the 

SC/MEM

 button (OS is displayed).

4.  Briefly press the power or channel knob (channel will flash).
5.  Turn the power or channel knob until you get to an open frequency.
6.   Auto scan will commence in 2 to 3 seconds.
  *  You will need to repeat steps 4 and 5 until the required frequency has been 

located.

7.  To store the required frequency, briefly press the

 ID/CAL

 button.

8.  To exit; repeat step 2.

Factory reset 

If the radio's display locks up or stops functioning properly, you might need to 
reset your UHF radio.
Caution: this procedure clears all the information you have stored in your UHF radio.
Before you reset your UHF radio, try turning it off and on again. If your UHF radio 
is still not functioning correctly you may need to reset the UHF radio! 
While holding the 

F/DPX

 button, turn the UHF radio on. INITI AL will be displayed 

for 1 to 2 seconds, the radio will then return to its original display.

MO / TSQ

ID / CAL

PRI / LO  

SC / MEM  

F/ DPX

MENU

QUIET

ALPHA 

OS / GS  


Summary of Contents for UHF180F

Page 1: ...tructions UHF180F 80 Channel UHF CB Radio Keep this user guide for future reference Always retain your proof of purchase in case of warranty service and register your product on line at AUSTRALIA www...

Page 2: ...ance setting up or using your Oricom product now or in the future call Oricom Support Australia 1300 889 785 or 02 4574 8888 www oricom com au Mon Fri 8am 6pm AEST New Zealand 0800 67 42 66 www oricom...

Page 3: ...llowing operators to use additional narrowband channels and also use narrowband transmissions on some current wideband channels This increased the number of channels up to 80 75 of which are useable v...

Page 4: ...but not always clearly marked They include fueling areas such as below deck on boats fuel or chemical transfer or storage facilities areas where the air contains chemicals or particles such as grain d...

Page 5: ...Contents UHF180F 1 x RF Radio 1 x Standard Microphone 1 x DC Power Cord with inline fuse 1 x Mounting bracket with mounting screws for RF Radio 1 x Microphone Hanger 1 x User Guide Controls and Conne...

Page 6: ...4 Function button by short push Duplex On Off by long push I1 5 Open Scan Memory On Off Priority scan I2 6 Priority Channel On Off Key Lock On Off Alpha numeric display I3 7 ID setting 5 tone SelCall...

Page 7: ...io 1 3 5mm external jack for optional 8 ohm speaker 2 Power Supply connection 3 Antenna connection Standard Microphone 1 Push To Talk PTT button 2 Volume Up Channel Up 3 Volume Down Channel Down 4 Pow...

Page 8: ...iver Indicator 5 Quiet mode 6 Priority On Off 7 Monitor On Off 8 Memory On Off 9 Key Lock 10 Open Scan 11 priority Scan 12 Selelctive call Sending To 13 Selective call Receiving From 14 38 CTCSS Tone...

Page 9: ...If you are unsure about how to install your radio we suggest you have your radio professionally installed by a UHF specialist or Auto electrician When installing the radio avoid mounting it close to h...

Page 10: ...ing bracket in place by screwing through the slots in the bracket 2 Connect the standard microphone to the socket and tighten up the thumb screw Installation Rubber washer should be placed between the...

Page 11: ...e input detection system to warn you if an overvoltage situation occurs Eg If the power supply voltage exceeds 17volts DC the channel display LCD backlight will flash in 3 different colours when the u...

Page 12: ...ve red lead should connect to an accessory point in the vehicle s fuse box via the 2 Amp fuse Antenna information The antenna not supplied is of critical importance to maximize your output power and r...

Page 13: ...volume by rotating the channel knob clock wise or adjust the volume control by pressing the Volume Up or Volume Down buttons on the microphone 200RX CH Channel Selection Briefly press the PWR button S...

Page 14: ...UIET ALPHA OS GS Transmitting NOTE Before transmitting on any channel listen to check the channel is not already in use Transmitting Select the desired channel Press the PTT button on the microphone a...

Page 15: ...priority channel is set MO TSQ ID CAL PRI LO SC MEM F DPX MENU QUIET ALPHA OS GS CTCSS CTCSS Continuous Tone Coded Squelch System CTCSS uses a sub audile tone to open and close the squelch on your rad...

Page 16: ...nel Repeat steps 1 and 2 above Note You will not be able to activate CTCSS if the CTCSS tone is set to OFF SCANNING The radio SCAN function has the ability to allow programmable channels to be scanned...

Page 17: ...D CAL PRI LO SC MEM F DPX MENU QUIET ALPHA OS GS Allows you to monitor a Priority Channel while scanning other channels in the GS memory Instant Channel Scan During Open Scan press and hold SC MEM but...

Page 18: ...number is preset at 12345 You must change this number to your own unique five digit Selcall ID number Selcall Identification Name In addition to the Selcall ID number each Selcall ID can be named usin...

Page 19: ...splay the last ALPHA name or NUMERIC code programmed into that memory 3 With the required memory location displayed enter the required ALPHA name or NUMERIC code as follows a Press and hold the F DPX...

Page 20: ...Identity will be sent to the caller Cancelling the Selcall Alert To cancel the alarm and talk on the channel press the PTT button The alarm will be cancelled and the channel will be open for normal c...

Page 21: ...1234 0 123 00 1234 1 123 01 1234 2 123 02 1234 3 123 03 UP TO UP TO 1234 9 123 99 QUIET Mode Q Puts the receiver in the Q mode When activated the radio prevents any unwanted conversations in the chann...

Page 22: ...wing opeartions Automatically responds to the caller by transmitting Acknowledge tones Informs you that a caller is on the channel by emitting CALL Alarm and displays FROM icon Menu FUNCTIONS The MENU...

Page 23: ...automatically exit the menu mode Please see below menu modes Control Functions STEP Display Default MENU SQ Level adjust off 7 3 OFF CTCSS DCS CTCSS 38 tone DCS 104ch 67Hz Back Light by 3 COLOUR 1 Amb...

Page 24: ...backlight The three options are Amber Red and Green Key Beep On Off The beep tone emits a tone when you press any of the buttons on the Microphone except PTT switch TOT Time Out Timer Australian and N...

Page 25: ...d when enabled will automatically turn the radio off if it has not been used for a preset period of time 1 2 or 4 hours The main purpose of this feature is if the radio is inadvertently left on when d...

Page 26: ...1 to 8 and 41 to 48 used by local repeater stations When activated your radio will receive the Repeater on its specific channel all repeater outputs are on channel 1 to 8 and 41 to 48 but transmits to...

Page 27: ...F DPX button for 2 seconds DPXON should appear on the LCD Push F DPX button to toggle the Duplex function On and Off MO TSQ ID CAL PRI LO SC MEM F DPX MENU QUIET ALPHA OS GS when transmitting Key Lock...

Page 28: ...efault frequency band range Briefly press the power button the frequency number should be blinking you may use the rotary channel switch to select which channel you want example Press and hold the PRI...

Page 29: ...il you get to an open frequency 6 Auto scan will commence in 2 to 3 seconds You will need to repeat steps 4 and 5 until the required frequency has been located 7 To store the required frequency briefl...

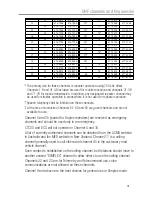
Page 30: ...Table 1 Nominal Carrier Frequency Channel Tx Rx Channel Tx Rx Freq Freq Freq Freq MHZ MHz MHz MHz 01 476 4250 476 4250 21 476 9250 476 9250 41 476 4375 61 02 476 4500 476 4500 22 476 9500 476 9500 42...

Page 31: ...______________________ EMC Technologies NZ Ltd STREET ADDRESS 47 MacKelvie Street Grey Lynn Auckland NZ Phone 64 9 360 0862 Fax 64 9 360 0861 POSTAL ADDRESS PO Box 68 307 Newton Auckland New Zealand E...

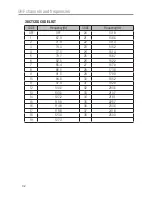
Page 32: ...74 4 23 146 2 4 77 0 24 151 4 5 79 7 25 156 7 6 82 5 26 162 2 7 85 4 27 167 9 8 88 5 28 173 8 9 91 5 29 179 9 10 94 8 30 186 2 11 97 4 31 192 8 12 100 0 32 203 5 13 103 5 33 210 7 14 107 2 34 218 1 1...

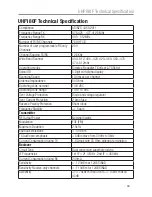
Page 33: ...Range 10 to 15 VDC Over Voltage Protection Diode and voltage regulator Over Current Protection 2 Amp fuse Reverse Polarity Protection Shunt diode Frequency Stability 5ppm Transmitter RF Output Power N...

Page 34: ...Intermodulation Immunity 70dB Spurious Immunity 70dB Audio Output Power 3 Watts Maximum RX Audio de emphasis 6dB octave 300Hz to 3kHz Audio frequency response 300Hz to 3kHz External speaker jacks opti...

Page 35: ...sing the product after reviewing the resources above or would like to purchase replacement parts or accessories please call our Customer Support Team Our dedicated local support team are more likely t...

Page 36: ...modified Oricom limits the remedies available to extent permitted in the relevant legislation The Express Warranty Period will be 3 years from the date of purchase of the product evidenced by your dat...

Page 37: ...xtent permitted by law will not be liable for any defect loss damage or injury arising out of or in connection with a 1 failure by you to adhere to the warnings and follow the instructions set out in...

Page 38: ...our product does not qualify for return this warranty does not apply to your product Products that are authorised to be returned to Oricom in Australia must include all of the following A completed Re...

Page 39: ...ta such as stored telephone numbers text messages and contact information Please ensure that you have made a copy of any data saved on your goods before sending for repair Please also be aware that go...

Page 40: ...56 Australia Email support oricom com au Phone 1300 889 785 or 02 4574 8888 Monday to Friday 8am to 6pm AEST Web www oricom com au Fax 02 4574 8898 Contact details for Oricom Support and Express Warra...

Reviews: