Oricom T1000-1 User Manual Download Page 3

me

Make sure your base is:

Located within reach of a mains power socket and 

telephone socket.

At least 1 metre away from other electrical appliances, to

avoid interference.

Not located in humid or damp conditions, e.g. in a 

bathroom.

1

Connect the base power lead and the telephone line cord

to the back of the base. Plug the power adaptor into the
mains wall socket.

2

For multi-handset packs only: Plug the charger power 

adaptor into the mains power socket.

3

On each handset: Slide the battery cover off and insert

the batteries supplied following the markings shown inside
the battery compartment, then slide the cover back on until
it clicks into place.

4

Place the handsets in the base/charger handset cradle

and charge for 15 hours before use.

5

Plug the telephone line cord into the wall socket.

Attaching the belt clip

With the back of the handset facing you, align the belt clip
with the two slots on the side of the handset and push
securely into place.

Your Oricom Touch phone is now ready for use

ATTENTION

Congratulations on your purchase of the Oricom Touch
Phone with its high tech touch sensitive keypad. The touch
panel is much more sensitive than a normal phone keypad
and provides very fast and responsive keying - however
like most new technology it takes a little getting used to.

To get the best use out of your Touch Phone 

Pick it up from the rear and cradle it in your hand. 

During use, avoid touching the keypad area unnecessarily 

to prevent accidental triggering of the keypad. 

The keypad will automatically disable when you hold 

the receiver to your ear. The idea being, to reduce the risk
of accidental keypad presses while the phone is held
against the side of your face. 
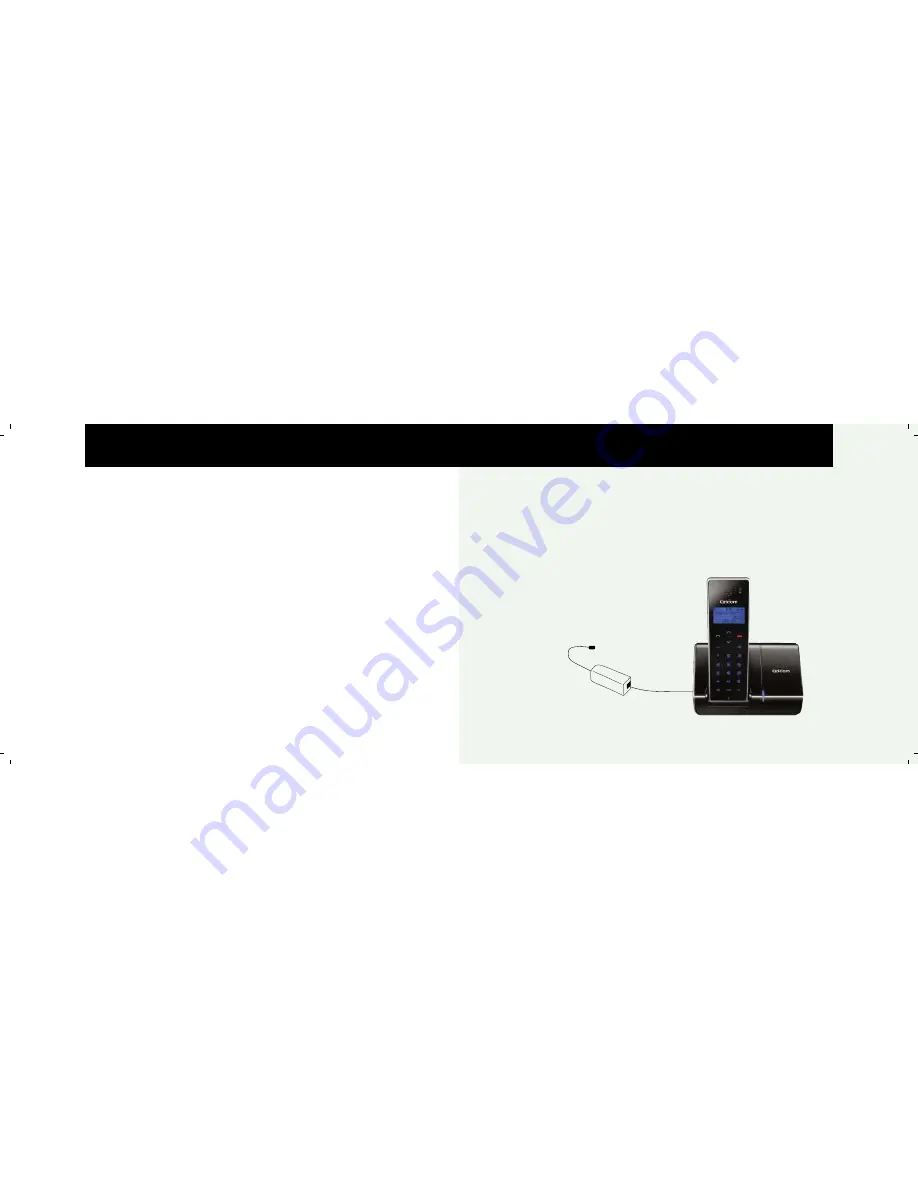
QUICK SET UP

Telephone socket

In-line filter
(not supplied)

DO YOU HAVE BROADBAND?

If you do you must connect a in-line filter (not supplied)
between the telephone socket and your Touch phone base
to ensure that your broadband and Touch phone work
properly. See below.

IMPORTANT NOTE: Ensure all phone sockets in use have
their own in-line filter.

Touch Phone

Summary of Contents for T1000-1

Page 1: ...indsor NSW 2756 Panmure Auckland Customer Support Customer Support Email support oricom com au Email support atlasgentech co nz Web www oricom com au Web www atlasgentech co nz Phone 1300 889 785 Phon...

Page 2: ...that you unplug the phone from the mains supply and telephone socket during an electrical storm Follow the local regulations regarding the disposal of your packing materials exhausted batteries and u...

Page 3: ...ndset and push securely into place Your Oricom Touch phone is now ready for use ATTENTION Congratulations on your purchase of the Oricom Touch Phone with its high tech touch sensitive keypad The touch...

Page 4: ...s to access the menu or confirm a menu setting During a call press to mute the microphone INT Use to call another registered handset Find Handset page Press to page locate a misplaced handset Located...

Page 5: ...decrease the volume End a call Press or place the handset on the base charger Receive a call When the phone rings lift the handset from the base charger and press USING YOUR PHONE 1 Touch Activated K...

Page 6: ...you are talking on the phone New Zealand only 1 To put your current call on hold and talk to the second caller press the key 2 To toggle between calls press the key Page a handset Press on the base H...

Page 7: ...ITALIAN SWEDISH FINNISH DANISH or NORWEGIAN and press to confirm Display contrast 1 Press then scroll or or press to select PHONE SETUP and press 2 Scroll or or press to select SET CONTRAST and press...

Page 8: ...r or press to select SMART KEY LOCK and press 3 Scroll or to select ON or OFF and press to confirm Manual key lock On Off Use the manual key lock to lock the keypad and prevent accidental dialling at...

Page 9: ...displayed instead If you do not subscribe to your network operators Caller ID service your touch phone will still indicate the missed calls The display will indicate the number of missed calls but whe...

Page 10: ...to select SECURITY SET and press 2 Scroll or or press to select DEREGISTRATION and press 3 Scroll or to select the handset you want to de register and press 4 ACCEPTED is displayed when the handset h...

Page 11: ...n the following SIMPLE SOLUTIONS Cannot make a call Is the symbol missing move closer to the base Is symbol displayed if so unlock the keypad see page 6 If you have multi handsets another handset may...

Page 12: ...e only the battery type listed in this user guide Do not use Alkaline or lithium batteries Do not dispose of the batteries in a fire as they can explode Do not open or mutilate the batteries Released...

Page 13: ...ils Make alternative arrangements for access to emergency services a Oricom warrants that the product is free from defects in materials and workmanship for a period of 12 months effective from the dat...

Page 14: ...he fault lies with this unit or with the telephone line If the product is working correctly the fault is on the telephone line Please contact your network operator for assistance To order spare parts...

Reviews: