6
GB
3. Setting the time
Press MODE again, the hour settings will flash. Use the UP(+)
or DOWN(-) button to enter the hours. Holding down either the
up or down position will increase or decrease the value rapidly.
Press MODE again, the minute settings will flash. Again, use the
UP(+) or DOWN(-) button to change the minutes.
Note: When changes are made to the clock settings, the seconds
will start from zero.
4. Setting the calendar
Proceeding for the time display:
Press MODE again, the calendar settings are displayed and the
year is flashing. Use the UP(+) or DOWN(-) button to change the
year.
Press MODE button, the month settings will flash. Enter the
appropriate month using the UP(+) or DOWN(-) button.
Press MODE button, the day settings will flash. Enter the
appropriate day using the UP(+) or DOWN(-) button.
Press MODE again. The day (D) and month (M) symbols will
flash. The unit provides an option that allows either the day or
the month to be indicated first. Using the UP(+) or DOWN (-)
button, select whether the calendar reads as: Day/Month; or
Month/Day.
Day / Month Month / Day
Press MODE again to confirm and exit.
HOW TO MANUALLY SET THE CLOCK
1. Setting the 12hr./24hr. clock display
Press MODE and hold for three seconds. The 12-hr value will
flash. Use the UP(+) or DOWN(-) buttons to make a selection
between a twenty-four hour display and a twelve hour display.
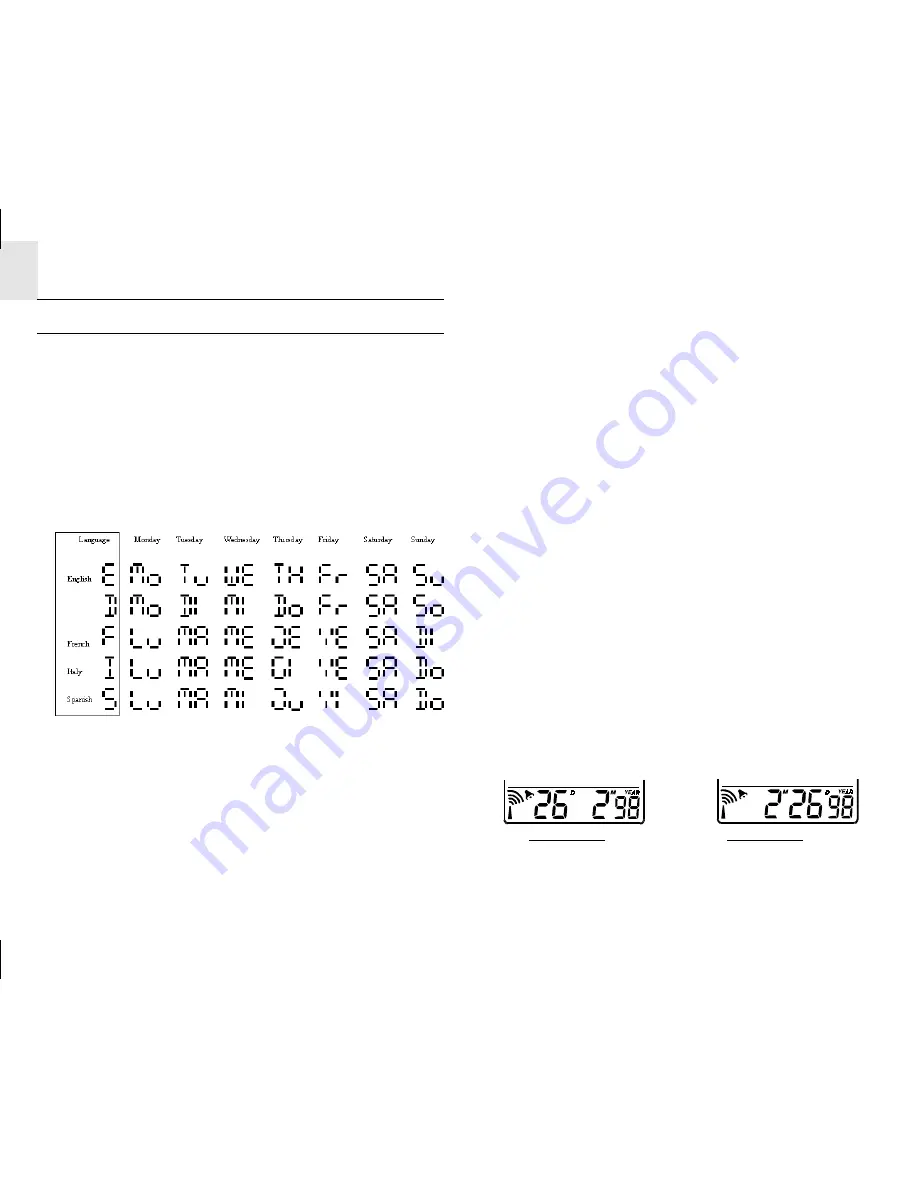
2. Setting the Multilingual Day-Of-The-Week Function
The day-of-the-week can be expressed as an abbreviation in five
different languages. The languages and their selected
abbreviations
for each day of the week are
shown in the language chart below.
Proceeding from the clock display:
Press MODE again and the language setting will flash. Use the
UP(+) or DOWN(-) button to select E for English, I for Italian, D
for German, F for French, or S for Spanish.
German


