


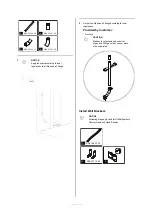


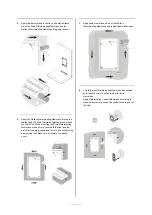


5.
Apply liquid membrane to the floor- and wall surfaces
which the Drain Waterproofing Membrane and the
Wallbox Waterproofing Membrane are going to cover.
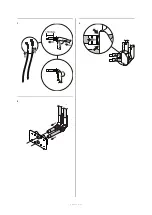
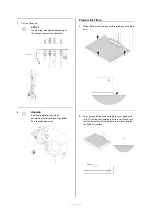
6.
Apply the Wallbox Waterproofing Membrane around the
Wallbox and the Drain Waterproofing Membrane around
the Drain Unit. When mounting the Drain Waterproofing
Membrane, make sure to cover both the floor and the
wall. Firmly apply pressure and remove air pockets using
a smoothing tool. Make sure no blisters or creases
occur.
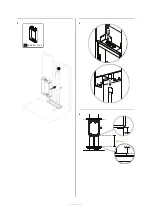
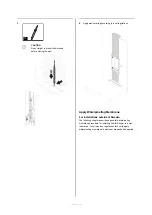
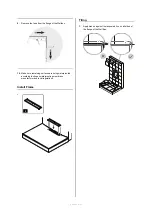
7.
Apply liquid membrane on top of the Wallbox
Waterproofing Membrane and to additional wall surface.
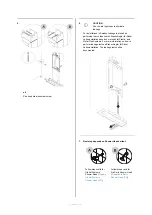
8.
Carefully mount Waterproofing Membrane and overlap
by at least 50 mm. Close the joints with liquid
membrane.
Apply Waterproofing Conduit Membrane according to
chosen manufacturer to seal the conduits coming out of
the wall.
Page 28 of 33
Summary of Contents for OAS Standart R3
Page 1: ...Fixture Installation Orbital Shower Panel R3 5 06 0009 Publication date 2021 08 27 ...
Page 4: ...This page is intentionally left blank Page 4 of 33 ...
Page 9: ...2190 mm 575 mm 150 mm 1265 mm 230 mm 184 mm 145 mm mm 122 mm Page 9 of 33 ...
Page 18: ...1 100mm 2 3 Page 18 of 33 ...
Page 20: ...2 1 RSK 831 41 66 3 4 600mm Page 20 of 33 ...
Page 32: ...This page is intentionally left blank Page 32 of 33 ...
Page 33: ...C E R T I F I E D S P A C E T E C H N O L O G Y ...


