


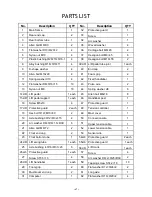


ASSEMBLY INSTRUCTIONS
NOTE:
Most of the listed assembly hardware has been packaged separately, but some hardware
items have been preinstalled in the identified assembly parts. In these instances, simply
remove and reinstall the hardware as assembly is required.
Please reference the individual assembly steps and make note of all preinstalled hardware.
PREPARATION:
Before assembling, make sure that you will have enough space around the item; Use the
present tooling for assembling; before assembling please check whether all needed parts
are available.
It is strongly recommended this machine to be assembled by two or more people to avoid
possible injury.
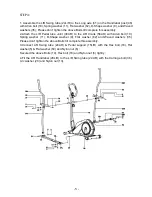
STEP 1:
Tighten the Front bottom tube (23) to the Main frame (1) with Allen bolts (21) and Arc
washers (20); and then attach the Rear bottom tube (3) to the Main frame (1) with Allen
bolts (4) and Arc washers (58) as shown.
STEP 2:
1. Slide the Mast cover (49) onto the Handlebar post (46);
2. Connect the Connection wire (50) to the Sensor wire (53);Connect Upper tension cable
- 3 -
Summary of Contents for OBE8729
Page 1: ...OBE8729...
Page 3: ...EXPLODED DIAGRAM 1...


