background image

28

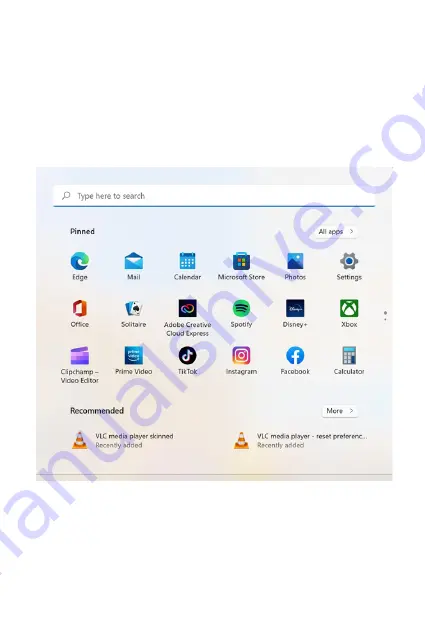
Start Menu


Activate the  Start menu at the bottom left and your most 
frequently used applications appear in the upper left corner  
On the right side of the start menu, live tiles serve as quick 
links to applications  Every tile can be reorganized, resized, 
added, or removed at any time 

Summary of Contents for Airsurf WI-FI

Page 1: ...1 USER MANUAL ...

Page 2: ...ouchpad 14 Touchpad Gestures 15 Set up your Device 16 Charging the Battery 16 Turning the Device ON 17 Connect to a Network 18 Connecting to a Wireless LAN 18 Bluetooth Wireless Connection 20 Send Receive files via Bluetooth 25 Update Management 27 Start 27 Power OFF Reboot 27 Lock the Screen 27 Wi Fi Connection 27 Bluetooth 5 1 27 Select your Language Settings 27 ...

Page 3: ...3 Start Menu 28 Technical Datasheet 29 Troubleshooting 30 Do s 32 Dont s 33 ...

Page 4: ...i Fi This manual provides information about the hardware and soft ware features of your AirSurf Wi Fi We recommend you read the Product Safety and Warranty Infor mation booklet that you have received along with your device for additional safety information ...

Page 5: ...ed in the package 1X Orbic AirSurf Wi Fi PC 1X Power Adapter 1X Quick Start Guide 1X Product Safety and Warranty Information booklet If any of the items are missing or damaged please contact the manufacturer immediately and save the entire package for trans port ...

Page 6: ...6 Getting Started Device Overview Front View A Camera Status LED The indicator will turn blue when the camera is active B Camera High definition infrared camera ...

Page 7: ...s powered OFF or asleep The indicator will turn ON Press once to notify the operating system to power OFF the laptop or enter sleep mode The indicator will turn OFF if powered off or blink for sleep mode G Keyboard This keyboard supports white backlighting by pressing Fn Spacebar simultaneously H Touchpad Clickpad Touch sensitive pointing device which functions like a mouse ...

Page 8: ...8 Left View ...

Page 9: ... devices to these ports such as a USB flash drive keyboard or mouse E USB Type C Connect any USB device to this port such as a flash drive keyboard or mouse This port can also be used as a charging port F LED Indicator Indicates if the device s camera is ON OFF G USB Type C Connect any USB devices to these ports such as a flash drive keyboard or mouse H Camera MIC Switch Turn the camera and MIC au...

Page 10: ...10 Right View ...

Page 11: ...hese ports such as a USB flash drive keyboard or mouse C USB 2 0 Gen 2 Ports Connect any USB devices to these ports such as a USB flash drive keyboard or mouse D Headphone Jack Connect amplified speakers or headphones into this 3 5mm jack E External Storage Supports 512 GB of MicroSD memory cards ...

Page 12: ...udio output B Back Cover Screws You can remove all the back cover screws to install or remove the SO DIMMs and M 2 SSD cards Modification of any other parts or components aside from the SO DIMMs or M 2 SSD cards will void your warranty ...

Page 13: ... The following defines the row of function keys which also contain secondary hotkeys shortcuts which can be accessed by pressing and holding the Function Key Fn while simultaneously pressing the desired hotkey shortcut ...

Page 14: ...e Press the left and right corners on the bottom edge of the touch pad clickpad to make selections and run functions These two buttons are similar to a mouse s left and right buttons Tapping on the touchpad clickpad produces identical results NOTE Use the touchpad only with fingers The touchpad will not recognize the actions of other objects ...

Page 15: ... a double tap or double click Two finger press Lightly tap the touchpad with two fingers to perform a right click In the Start screen this will toggle the app commands Most apps will open a context menu related to the selected item Two finger slide Swiftly scroll through web pages documents and playlists by placing two fingers on the touch pad and moving both in any direction Two finger pinch Zoom...

Page 16: ...the battery completely before using it for the first time Use the AC adapter to charge the battery Warning Use only approved AC adapters batteries and cables Unapproved adapters or cables can cause the battery to explode or damage the device 1 Connect the AC adapter to the USB Type C port of the AirSurf 2 Plug the AC adapter into an electrical socket 3 Unplug the adapter from the electric socket w...

Page 17: ...17 Turning the Device ON Press the Power button to turn ON your notebook computer ...

Page 18: ... or WLAN is a local area network that can link two or more computers without using wires Once connected to WLAN you can access the internet To connect to a wireless network 1 Click the wireless network icon in the system tray 2 Select the Wi Fi icon to see the options ...

Page 19: ...19 3 Select the network you want to connect to from the list and click Connect to build the connection 4 Enter the password and click Next ...

Page 20: ... include computers cell phones tablets wireless headsets and keyboards To use Bluetooth you must ensure the following 1 Bluetooth is enabled on both devices 2 Your devices are paired and connected Enable Bluetooth and Add a Device You must pair every new device with your laptop s Bluetooth adapter Therefore it first needs to be authenticated to be secure When both devices are turned ON the Bluetoo...

Page 21: ...21 To enable the Bluetooth adapter 1 Click the wireless network icon in the system tray 2 Select the Bluetooth icon Go to Settings 3 Select Bluetooth devices and click Add device ...

Page 22: ... 4 Choose the kind of device you want to add Your computer will automatically start searching for devices and make itself visible to other devices NOTE Make sure your device is turned ON and discoverable ...

Page 23: ...23 5 Select a device you wish to pair from the discovered devices list A code is displayed on your Laptop that should match the code displayed on your device ...

Page 24: ...24 6 Click Connect on your laptop and accept the pairing from your device 7 Click Done to complete the pairing setup ...

Page 25: ...25 Send Receive files via Bluetooth 1 Select the Bluetooth icon Go to settings 2 Select Bluetooth devices Send or receive files via Bluetooth ...

Page 26: ...ckbox to ensure that you are sending the file to the correct device NOTE The authentication also protects the file from being viewed by others while it is sent to the other device 6 Click Next to send the file to the selected device 7 Click Browse to choose the files to send and click Next to send the file successfully to the selected device ...

Page 27: ...er button Standby Power OFF Reboot Lock the Screen Press the Power button Wi Fi Connection Select the network icon on the system tray select the desired Wi Fi network Click Connect type the password and follow the instructions Bluetooth 5 1 Your Orbic AirSurf Bluetooth capability allows you to con nect all your wireless devices seamlessly Select your Language Settings From Settings go to Time Lang...

Page 28: ... the bottom left and your most frequently used applications appear in the upper left corner On the right side of the start menu live tiles serve as quick links to applications Every tile can be reorganized resized added or removed at any time ...

Page 29: ... 1GHz Display Display 14 1 FHD Resolution 1920 x 1080 FHD Keyboard Keyboard with touchpad multi touch Operating System Windows 11 Memory RAM LPDDR4 16 GB Storage Inputs Outputs 1 Port USB 2 0 2 Port USB 3 0 1 Port USB Type C full function 1 Port USB Type C data only 1 Earphone output 3 5mm Battery Lithium ploymer battery Dual Cell 4830 mAH Connection Wi Fi 2 4 5GHz Wi Fi6 Bluetooth 5 1 Camera Audi...

Page 30: ...d Click Options Properties select the source from the volume control list The recording function is not working Check software controls for recording sound Start Pro grams Accessories Multimedia or Entertainment Sound Recorder U Disk ROM drive problems If you have just performed an SSD upgrade ensure the hard drive connector is not loose and the SSD drive is also correctly seated Remove and reinse...

Page 31: ...ck the Display icon 3 Under the Settings page set screen resolution to at least 1920 1080 The built in keyboard accepts no input 1 Ensure the system doesn t hang and is still working 2 You may be holding the keys down too long while you re typing 3 Keep the keyboard clean Dust and dirt under the keys could cause them to stick Camera test failure Cannot open the camera Check if the camera device in...

Page 32: ...ery power 3 Delete unwanted files then and there else they may occupy more space 4 When an external storage device is required scan it before use 5 Always lift or hold the Laptop with both hands Handle carefully 6 Place the Laptop on a plain and smooth surface while using 7 Keep the Laptop with proper ventilation 8 Insert the External devices gently into the proper port 9 Open and close the Laptop...

Page 33: ...e Desktop as it may slow down your Laptop processor speed Keep primarily working files applications alone on the Desktop 6 Do not open too many files at a time 7 Do not shut down forcibly by using the Power button Turn OFF the Laptop by proper shutdown method 8 Do not place your finger on the screen 9 Do not press the keys hard and use them gently 10 Do not use the power adapter of other Laptops 1...

Reviews: