background image

English

5

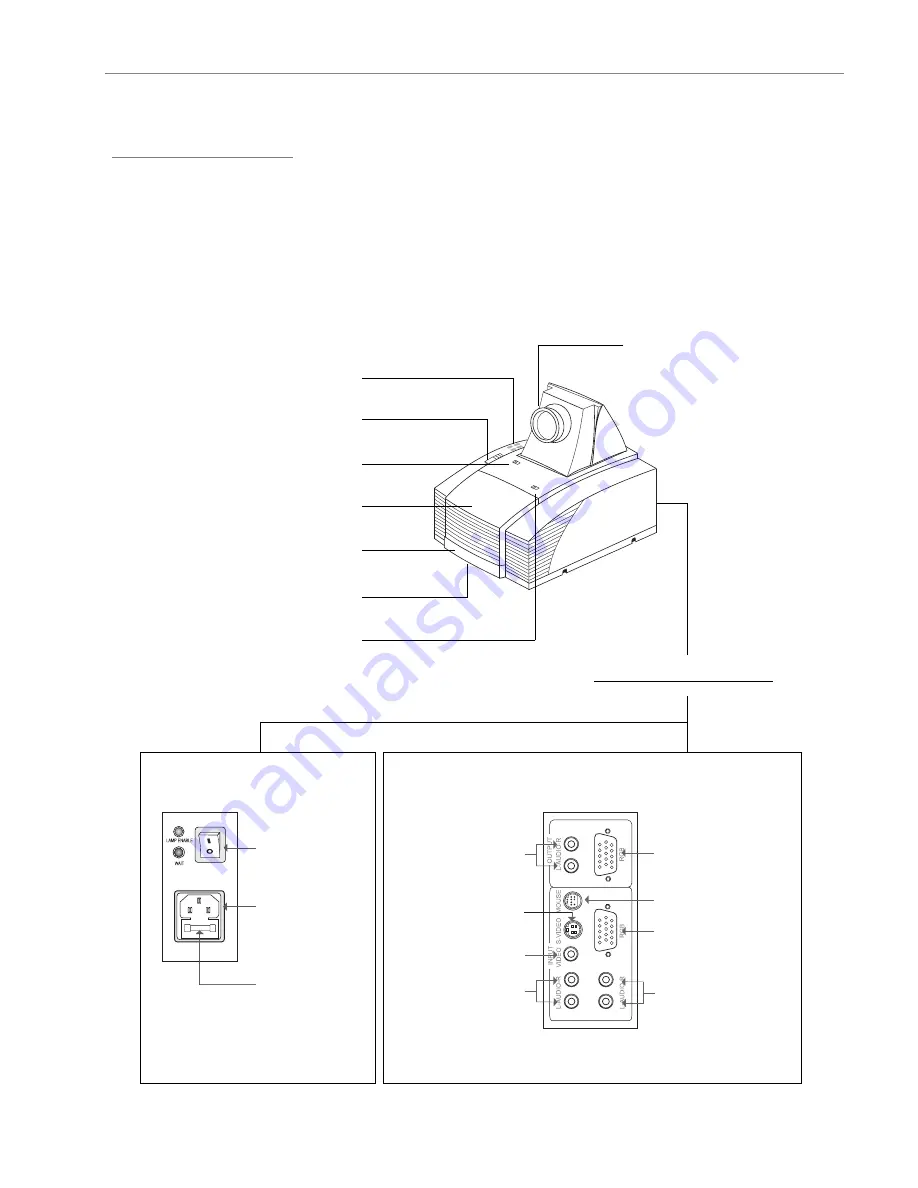
Product Overview

w

Main Unit

Installation

Rear Connection Ports

Panel Control Buttons

Keystone Correction

Lens Latch

Lamp Door

Carrying Handle

Elevator Foot

Lamp Latch

Lens

Power Switch

Power
Connector

Fuse

Monitor Loop-
through Connector

Computer Input
Connector

Audio Inputs for
Computer

Audio Outputs

S-Video Connector

Composite Video

Connector

Audio Inputs

for Video

Remote Receiver
Connector

Summary of Contents for Optoma EP585

Page 1: ...tallation Product Overview 5 Start Your Installation 7 Powering On Off the Projection Display 9 Adjusting the Image Size 10 User Controls User Control Overview 11 Function Descriptions 13 Appendices T...

Page 2: ...sceptible to excessive dust and dirt Near any appliance generating a strong magnetic field Place in direct sunlight Warning Do not look into the lens The bright light may hurt your eyes Warning To red...

Page 3: ...halide lamp q Single panel 6 4 TFT LCD projection system q 800 x 600 addressable pixels q Compression for 1024 x 768 XGA computer image q 16 7M 24 bit displayable colors q XGA SVGA VGA VESA Mac NEC P...

Page 4: ...ur dealer immediately if anything is missing LCD Projection Display Soft Bag S Video Cable RCA Audio Video Cable Audio in Cable for Computer Battery x 3 Remote Mouse Package Remote Receiver Cable Remo...

Page 5: ...e Correction Lens Latch Lamp Door Carrying Handle Elevator Foot Lamp Latch Lens Power Switch Power Connector Fuse Monitor Loop through Connector Computer Input Connector Audio Inputs for Computer Audi...

Page 6: ...tion Descriptions on page 13 Curtain Source Selection Volume Enter Pointer Power on Standby On Screen Menus FREEZE CURTAIN ON STANDBY ZOOMIN ZOOMOUT SOURCE ENTER POINTER MENU MUTE VOLUME DRAG R L Free...

Page 7: ...h 7 StartYour Installation w Connecting the Projection Display Monitor Cable VGA Signal Cable Audio Cable Audio Cable S Video Cable RCA Audio Video Cable Power Cord Remote Receiver Cable Computer Mous...

Page 8: ...y 4 If you need an external mouse connect the mouse with the other end of the receiver cable 5 Turn on your projection display first and then your computer 6 Begin your presentation If you have a Mac...

Page 9: ...ht is in OFF status so that you can press the Power on Standby button to turn on the projection lamp u u u u u Powering Off the Projection Display 4 4 4 4 4 Turn off lamp power first for three minute...

Page 10: ...s to focus the image 2 Slide the keystone correction button to adjust image shape 3 Adjust the elevation 1 Pull out the carrying handle 2 Lift the projection display to the desired angle 3 Press down...

Page 11: ...onal Keys w Remote Control Zoom in Zoom out Source Selection Volume Enter Pointer Power on Standby On Screen Menus Directional Select Keys FREEZE CURTAIN ON STANDBY ZOOMIN ZOOMOUT SOURCE ENTER POINTER...

Page 12: ...ons 4When in computer sources the OSD will be Language Contrast Tracking Frequency Custom Memory Audio Source Rear Projection Ceiling Projection Auto Image Lamp Reset Lamp Warning Exit 4When in video...

Page 13: ...your selection 2 Use 5or6 button to change vertical positioning of the image and 3or4button to change the horizontal positioning of the image Choose Language item to select your choice of English Fren...

Page 14: ...trast Press the Pointer button to show a hand shape pointer Use5 6 3or4button to move pointer around the projected image Press the Freeze button to still the screen image Press Curtain button to cover...

Page 15: ...ings There are six groups of custom memories for your use If you want to come back to RGB standard source go to the RGB Standard mode located before Custom 1 in Custom Memory OSD menus When opening yo...

Page 16: ...djust the contrast or brightness of the image select Contrast Brightness from OSD menus To adjust the color or tint of the image select Color Tint from OSD menus Press the Freeze button to still the s...

Page 17: ...orrectly displayed image 4 If you are using a PC Resolution of your computer is higher than 800x600 Follow the steps outlined below to reset the resolution For Windows 3 x 1 In the Windows Program Man...

Page 18: ...er is not display ing your presentation 4 If you are using Notebook PC Some Notebook PCs may deactivate their own computers screens when a second display device is in use Each of them has different wa...

Page 19: ...isplay has cooled for at least 30 minutes before change the lamp Warning Lamp compartment is hot Allow it to cool before changing lamps We suggest you a Professional Engineer to change the projection...

Page 20: ...ck to its position first and then the head Tighten the screws 3 Unscrew the two screws on the bottom of the lamp module Then release the head screw of the lamp module 4 Take out the used lamp from the...

Page 21: ...e Fuse Fuse Holder the Blown Fuse 1 Switch off the power and unplug the power cord 2 Pull out the fuse holder 3 Remove the blown fuse and then insert a new fuse 4 Put the fuse holder back in position...

Page 22: ...3 PAL SECAMcompatible composite video S Video capability H Frequency 15kHz 60kHz horizontal scan V Frequency 50Hz 85Hz vertical refresh MultimediaAudio two internal speakers with 3 watt output built i...

Page 23: ...SVGA 800 x 600 37 88 60 32 VESA SVGA 800 x 600 48 08 72 19 VESA SVGA 800 x 600 46 88 75 00 VESA SVGA 800 x 600 53 67 85 06 VESA XGA 1024 x 768 48 36 60 00 VESA XGA 1024 x 768 56 48 70 07 VESA XGA 1024...

Reviews: