background image

English

6

Installation

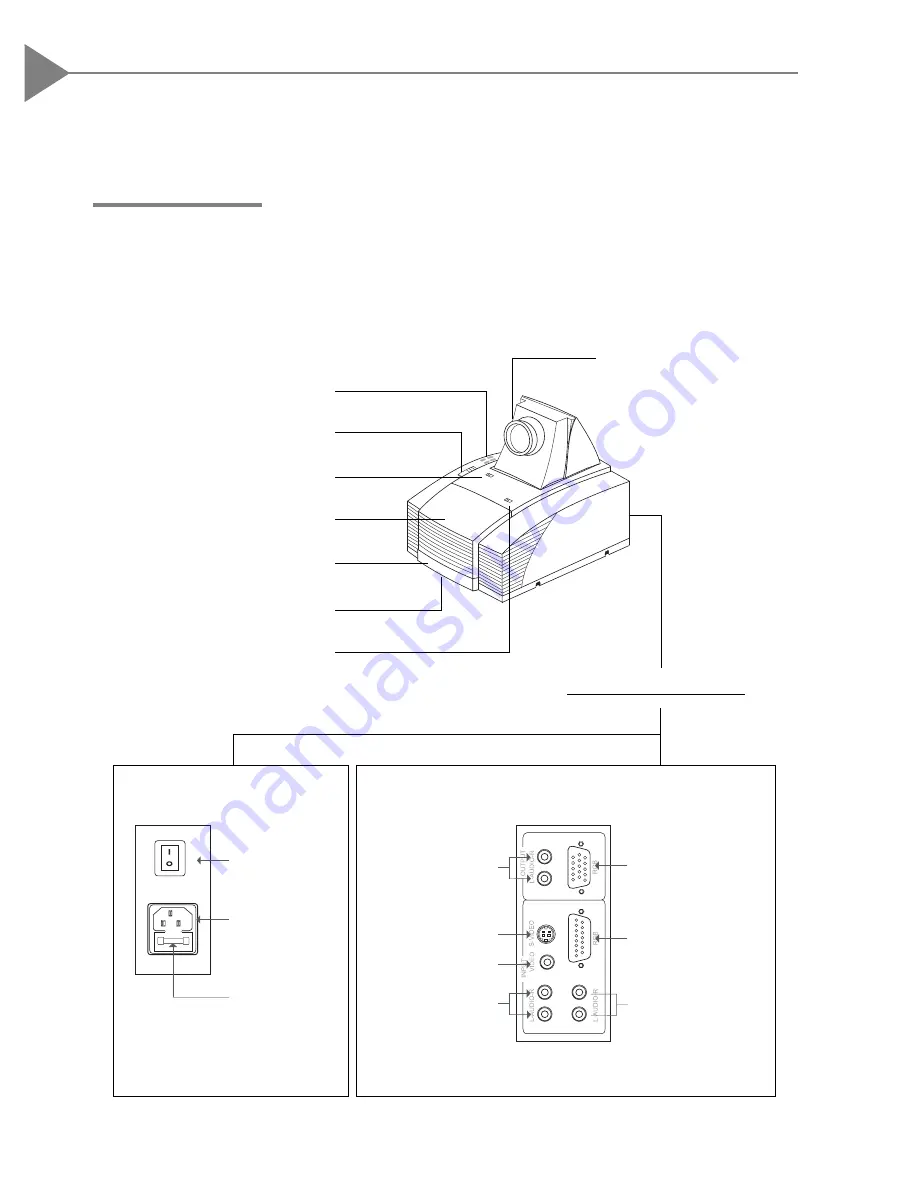
Product Overview

Rear Connection Ports

Panel Control Buttons

Keystone Correction

Lens Latch

Lamp Door

Carrying Handle

Elevator Foot

Lamp Latch

Lens

Power Switch

Power
Connector

Fuse

Monitor Loop-
through Connector

Computer Input
Connector

Audio Inputs for
Computer

Audio Outputs

S-Video

Connector

Composite Video

Connector

Audio Inputs

for Video

w

Main Unit

Summary of Contents for Optoma EP550

Page 1: ...he Product 4 Package Overview 5 Installation Product Overview 6 Start Your Installation 8 User Controls User Control Overview 10 Function Descriptions 13 Appendices Troubleshooting 16 The Apple Macint...

Page 2: ...oduct please keep the cooling fan running for a few minutes Precautions Follow all warnings precautions and maintenance as recommended in this user s manual to maximize the life of your unit Do q Turn...

Page 3: ...D projection system q 800 x 600 SVGA addressable pixels q Compression for 1024 x 768 XGA computer image q 16 7M 24 bit displayable colors q XGA SVGA VGA VESA Mac NEC PC 98 Fujitsu FM Towns compatible...

Page 4: ...wn below Check to make sure your unit is complete Contact your dealer immediately if anything is missing LCD Projection Display User s Manual Warranty Card Battery x 2 EVD Lamps x 2 S Video Cable Comp...

Page 5: ...ne Correction Lens Latch Lamp Door Carrying Handle Elevator Foot Lamp Latch Lens Power Switch Power Connector Fuse Monitor Loop through Connector Computer Input Connector Audio Inputs for Computer Aud...

Page 6: ...IN ZOOM OUT CURTAIN COL TIN POWER ON STANDBY ENTER POINTER TRACK CON BRI VOLUME MUTE _ Power on Standby Curtain Color functions Contrast Brightness Tracking On Screen menus Directional select keys SO...

Page 7: ...than or equal to 800 x 600 resolution and make sure timing of the display mode is compatible with the projection display Refer to Compatibility Modes on page 22 Power Cord Mac Monitor Adapter Monitor...

Page 8: ...rojection lens to focus the image 2 Slide the keystone correction button to adjust image shape 3 Adjust the elevation 1 Pull out the carrying handle 2 Lift the projection display to the desired angle...

Page 9: ...STANDBY RESET MENU ENTER 4 Directional Keys w Remote control Freeze Zoom in Zoom out Source selection Volume Enter Pointer MENU ZOOM IN ZOOM OUT CURTAIN COL TIN POWERON STANDBY ENTER POINTER TRACK CON...

Page 10: ...on for the OSD menu options 4When in computer sources the OSD will be Language Contrast Tracking Frequency Custom Memory Audio Source Rear Projection Ceiling Projection Auto Image Exit 4When in video...

Page 11: ...your selection 2 Use 5or6 button to change vertical positioning of the image and 3or4button to change the horizontal positioning of the image Choose Language item to select your choice of English Fre...

Page 12: ...Curtain button to cover all the screen then use 5or6to pull up or down the curtain Press Zoom In button to enlarge the projected image Zoom Out to resume the image Choose this function from OSD menu t...

Page 13: ...preset settings There are six groups of custom memories for your use If you want to come back to RGB standard source go to the RGB Standard mode located before Custom 1 in Custom Memory OSD menus Whe...

Page 14: ...djust the contrast or brightness of the image select Contrast Brightness from OSD menus To adjust the color or tint of the image select Color Tint from OSD menus Press the Freeze button to still the s...

Page 15: ...ling or incorrectly displayed image 4 If you are using a PC Resolution of your computer is higher than 800x600 Follow the steps outlined below to reset the resolution For Windows 3 x 1 In the Windows...

Page 16: ...Problem The screen of the Notebook or PowerBook computer is not displaying your presentation 4 If you are using Notebook PC Some Notebook PCs may deactivate their own computers screens when asecond di...

Page 17: ...nal cable to the unit 2 Connect the supplied MAC VGA adapter between the VGA signal cable and the Mac external monitor cable of your PowerBook 4For 800 x 600 Resolution 1 Connect the supplied 15 pin V...

Page 18: ...re changing lamps Notice Use only USHIO or OSRAM HLX 64663T EVD 36V 400W lamp Please contact your local supplier or service center Slide the lamp latch open the lamp compartment Move the lamp assembly...

Page 19: ...Changing the fuse 4 Switch off the power and unplug the power cord 4 Pull out the fuse holder 4 Remove the blown fuse and then insert a new fuse 4 Put the fuse holder back in position Fuse Holder the...

Page 20: ...ibility NTSC NTSC4 43 PAL SECAM compatible composite video S Video capability H Frequency 15kHz 60kHz horizontal scan V Frequency 50Hz 85Hz vertical refresh Multimedia Audio two internal speakers with...

Page 21: ...5 16 56 25 VESA SVGA 800 x 600 37 88 60 32 VESA SVGA 800 x 600 48 08 72 19 VESA SVGA 800 x 600 46 88 75 00 VESA XGA 1024 x 768 48 36 60 00 VESA XGA 1024 x 768 56 48 70 07 VESA XGA 1024 x 768 60 02 75...

Reviews: