background image

English

13

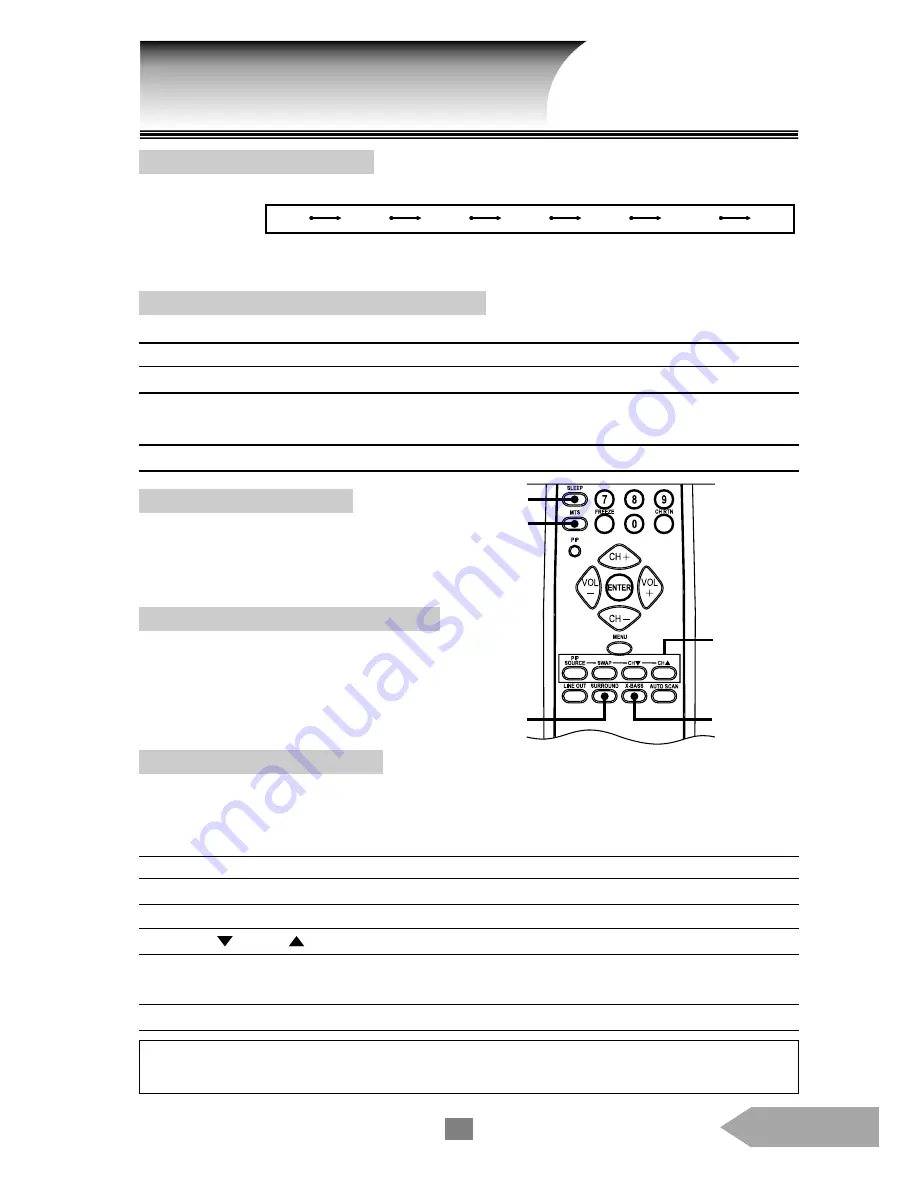
Setting OFF-Timer (Sleep)

Press [ SLEEP ] until the duration you desire appears on the screen. The change of time is as follows each time

you press [ SLEEP ] :

15 M means the TV goes into sleep mode in 15 minutes, and so on for other durations set. But when you pick 0 M, it

means the OFF-timer is off.

Setting Sereo, Mono or SAP Broadcast

Press [ MTS ] until you the menu you desire appears.

Selection

Function

STEREO

You can listen to stereo sound when the TV receives stereo broadcast

SAP

You can listen to a second language when selecting SAP.

 ( second audio program )

The sound will be muted if it is not a SAP program.

MONO

You can receive mono sound (or use MONO to reduce the noise of stereo broadcast).

Watching Picture-In-Picture

Press [ PIP ] allows you to watch two pictures at the same time. The second picture can be a TV broadcast or

come from an external source, such as a VCR. To display a TV broadcast as a second picture: ( [ DATA ] doesn’t

provide this function ).

Steps

1. Turn on the TV and select the program you want to watch.

2. Press [ PIP ] once to display a second picture. Use [ MENU ] to select the size of second picture (P.19).

3. Press [ CH      ] or [ CH      ] to choose the TV program you want to be displayed as a small picture.

4. Press [ PIP SOURCE ] or [ MENU ] , then select the PIP main menu. Under SOURCE, choose the input source

from TV, AV1-S, AV1-C, AV2-YCrCb, AV2-C, AV3-S and AV3-C as a second picture (see P.18).

5. To turn PIP off, press [ PIP ] again.

Setting X-BASS System

Press the [ X-BASS ] button will enhance the

bass effect (even when the volume is very low). To

turn off the X-Bass feature, press [ X-BASS ] again.

Using the Surround Sound Feature

Press the [ SURROUND ] button changes the

stereo mode of TV or video output to surround-

sound. To turn off the surround-sound feature, press

[ SURROUND ] again.

Advanced Operation

Super-bass
button

PIP button

Surround

sound

OFF-Timer

button

Sterto, Mono

or SAP

button

Notes:
Main picture and second picture can not be TV program in the sam time.
If you desire to have both main and second pictures as TV signals, contact your dealer for dual-tuner option upgrade.

1M          15M          30M          60M          90M          120M          0M

Summary of Contents for EP652A

Page 1: ...D and the VCR 7 Connecting the DVD with Component Video and the VCR 8 Connecting the Camcorder or the Game Device 8 Connecting the Computer VGA Input 9 Connecting the Audio System 9 Connecting the VCR...

Page 2: ...urround Sound Feature 13 Watching Picture In Picture 13 Switching the Main and Second Picture 14 Menu 15 Menu Options 15 How to Program the Menus 16 Channel 17 Picture Video 17 Enhanced 17 Picture Dat...

Page 3: ...contact your dealer It is dangerous to leave the TV on under such circumstances l For safety purpose when you see the warning message as below contact your dealer referred servicing to qualified servi...

Page 4: ...becomes less sensitive after a long time of use replace the batteries l If you do not intend to use the remote control for more than one month remove the batteries to prevent acid leak that will dama...

Page 5: ...ON Source selection Menu button Volume control Channel selection Earphone Computer RGB2 input Video Audio inputs 3 Antenna Cable TV Computer RGB1 input Computer DVI input Computer Audio input S Video...

Page 6: ...udio and stereo right channel and white for audio and stereo or mono left channel If you check the rear panel of the TV you will see that the jacks are color coded in the same manner as the cables l S...

Page 7: ...ograms played on VCR Connecting the DVD and the VCR This connection allows you to watch DVD video or TV programs You may record from one channel while watching a program from another channel Connectin...

Page 8: ...R This connection allows you to watch DVD video or TV programs and to record DVD or TV programs You can record from one channel while watching program from another channel Your TV can use Component ca...

Page 9: ...computer can be connected to RGB1 input at the front and RGB2 and DVI inputs at the rear simultaneously Connecting the TV Computer A Computer B Rear Panel Front Panel TV Amplifier Connecting the Audi...

Page 10: ...ing the VCR to Video Output This connection allows the output of the source that is currently on the screen to a VCR Connecting the TV Caution Do not connect one VCR to the output and input jacks on t...

Page 11: ...press CH to select channel in numerical order VOL VOL Press VOL to turn up the volume press VOL to turn down the volume MENU allows menu editing PIP operates picture in picture PIP SOURCE selects the...

Page 12: ...OL or VOLUME on TV to adjust volume Muting the sound Press MUTE to mute the sound Freezing the screen Press FREEZE to freeze the screen Switching between two channels Press CH RTN to return the last v...

Page 13: ...his function Steps 1 Turn on the TV and select the program you want to watch 2 Press PIP once to display a second picture Use MENU to select the size of second picture P 19 3 Press CH or CH to choose...

Page 14: ...Switching the Main and Second Picture Press SWAP while you are using the PIP feature to switch the main and second pictures The main and second pictures are switched each time you press SWAP Advanced...

Page 15: ...ish 15 Menu Options Below are all the menu options MENU Picture Video Setting Enhanced Picture Setting Data Picture Setting Channel Setting PIP Setting Language Setting Miscellaneous Setting Audio Set...

Page 16: ...TV panel to highlight the item desired then press ENTER or to select or adjust a setting 4 To exit the menu mode press MENU again Notices l When an item on the menu is selected by pressing ENTER the...

Page 17: ...scan is done Press ENTER to make selection PICTURE VIDEO Item Function and Operation CONTRAST Controls the scale between brightest and darkest tune Adjusting Contrast can change the amount of black an...

Page 18: ...OSITION Moves the picture to up or down Press to adjust the setting EXPAND Expands the picture to the entire TV screen Press to select ON or OFF AUDIO Item Function and Operation TREBLE Adjusts the tr...

Page 19: ...s to adjust the size LANGUAGE Item Function and Operation ENGLISH Selecting this item means menus and messages will be displayed in English Press ENTER to make selection CHINESE Selecting this item me...

Page 20: ...of the current mode to its factory default settings Press ENTER to make selection LAMPTIME This tells the user the remaining life of lamp Estimated life time of a new lamp is 8000 hours The TV will de...

Page 21: ...s there interference of high voltage line or neon lights Multiple shadow images sound OK The station may have broadcast difficulty Try another channel Poor color or no color The station may have broad...

Page 22: ...SECAM Computer Compatibility IBM VGA 640 x 350 70Hz 640 x 480 60Hz 720 x 400 70Hz VESA VGA 640 x 480 60 72 75Hz VESA SVGA 800 x 600 56 60 72 75 85Hz VESA XGA 1024 x 768 60 70 75Hz MAC LC 13 640 x 480...

Page 23: ...One phone jack for computer audio input Rear output connectors One composite video RCA output One set of audio output Power Supply Automatic switch 100 120 200 240V 50 60Hz AC Power consumption Normal...

Page 24: ...English 24 Compatible Frequency Table Model Resolution Vertical Scan Frequency Hz means optional connector is required Horizontal Scan Frequency kHz...

Page 25: ...all the accessories listed below come with the TV Contact your dealer if any of the accessories is missing or broken TV Display Power Cord Computer VGA Cable Component Video Cable Remote Control Batt...

Reviews: