background image

English 25

USING THE PROJECTOR

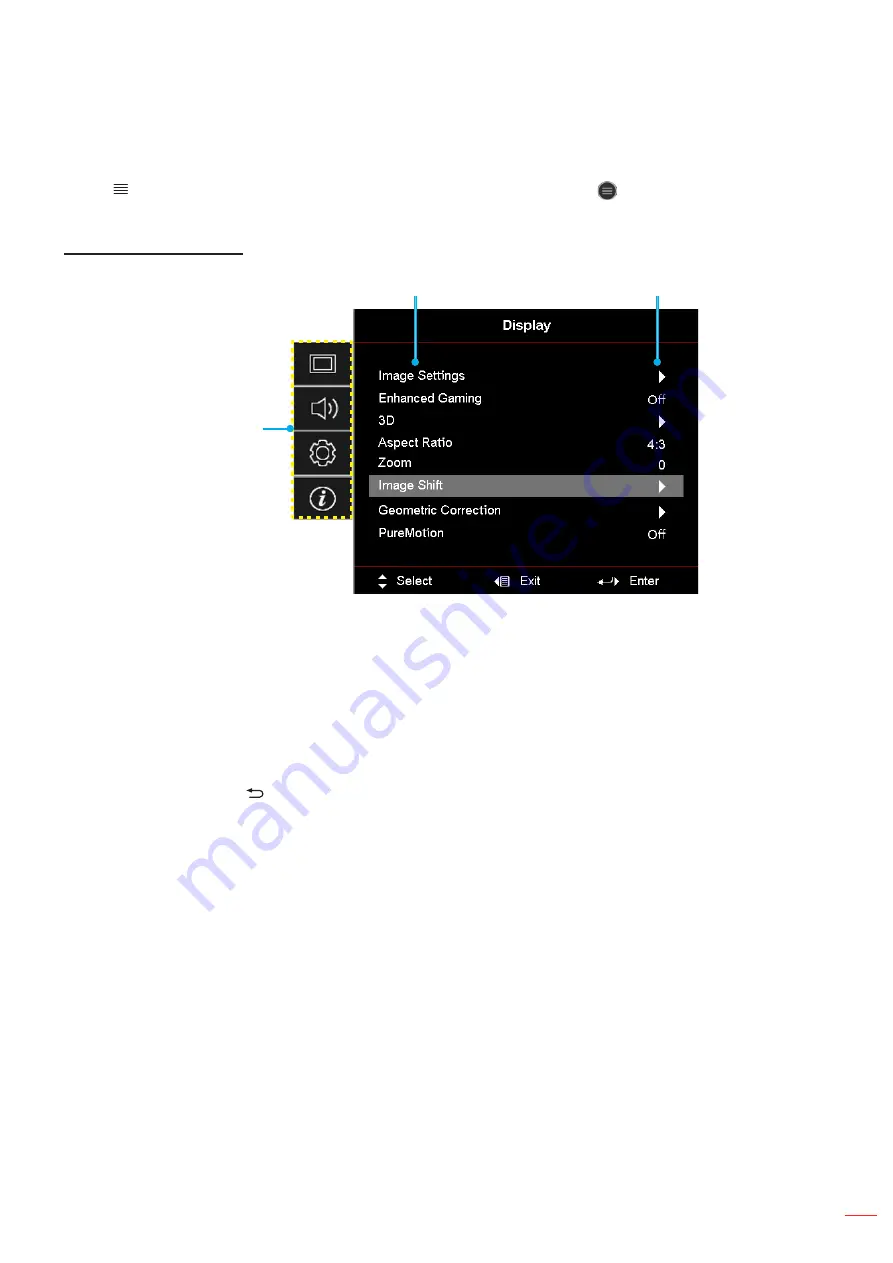
Projector settings menu (OSD)

Press “ ” on the remote control or on the Home screen, select the OSD menu “ ” to review projector information 

or manage various settings related to the image, display, 3D, audio, and setup.

General menu navigation

Main Menu

Sub Menu

Settings

1. 

When OSD is displayed, use the up and down navigation buttons to select any item in the main menu. 

While making a selection on a particular page, press “

OK

” to enter submenu.

2. 

Press the “

Left

” and “

Right

” button to select the desired menu item. Then press “

OK

” to open its sub 

menu.

3. 

Press the “

Up

” and “

Down

” button to select the desired item in the sub menu.

4. 

Press the “

OK

” button to enable or disable a setting or press the “

Left

” and “

Right

” button to adjust a 

value.

5. 

Select the next item to be adjusted in the sub menu and modify as described above.

6. 

To exit, press “ ” (repeatedly if necessary). The OSD menu will close and the projector will 

automatically save the new settings.

Summary of Contents for DLP 11695

Page 1: ...User manual DLP Projector...

Page 2: ...t Overview 10 Connections 11 Keypad 12 Remote control 13 SETUP AND INSTALLATION 14 Installing the projector 14 Connecting sources to the projector 16 Adjusting the projector image 17 Remote setup 18 U...

Page 3: ...ant 59 ADDITIONAL INFORMATION 60 Compatible resolutions 60 Image size and projection distance 65 Projector dimensions and ceiling mount installation 66 IR remote codes 67 Troubleshooting 68 Warning in...

Page 4: ...e the risk of fire and or electric shock do not expose the projector to rain or moisture Do not install near heat sources such as radiators heaters stoves or any other apparatus such as amplifiers tha...

Page 5: ...eing used for a long period of time Do not setup the projector in places where it might be subjected to vibration or shock Do not touch the lens with bare hands Remove battery batteries from remote co...

Page 6: ...ly wipe the lens Do not touch the lens with your fingers Do not use alkaline acid detergents or volatile solvents such as alcohol for cleaning lens If the lens is damaged due to the cleaning process i...

Page 7: ...may cause disorientation for some viewers Accordingly DO NOT place your 3D PROJECTOR near open stairwells cables balconies or other objects that can be tripped over run into knocked down broken or fal...

Page 8: ...ision technician for help Notice Shielded cables All connections to other computing devices must be made using shielded cables to maintain compliance with FCC regulations Caution Changes or modificati...

Page 9: ...purchase Some accessories may vary from region to region The warranty card is only supplied in some specific regions Please consult your dealer for detailed information Standard accessories Optional...

Page 10: ...projector intake and exhaust vents When operating the projector in an enclosed space allow at least 30 cm clearance around the intake and exhaust vents No Item No Item 1 Keypad 7 Input Output 2 Ventil...

Page 11: ...hrough the HDMI 1 connector 9 Audio Out Connector 3 HDMI 3 Connector pass ARC audio format through the HDMI 1 connector PureMotion support 10 S PDIF Connector only 2ch PCM supported Dolby Digital 5 1...

Page 12: ...tem No Item 1 Light Source LED 6 Temp LED 2 Power and Power LED 7 Re Sync 3 Menu 8 Four Directional Select Keys 4 Keystone Correction 9 Source 5 Enter 10 Information Note The keypad does not control t...

Page 13: ...3 Four Directional Select Keys 9 Enter 4 Mute 10 Display Mode 5 Volume 11 APP menu 6 Menu 12 Volume Note Some keys may have no function for models that do not support these features Before using the...

Page 14: ...rface and 90 degrees perpendicular to the screen How to determine projector location for a given screen size please refer to distance table on page 65 How to determine screen size for a given distance...

Page 15: ...vents do not recycle hot air from the exhaust vent When operating the projector in an enclosed space ensure that the surrounding air temperature within the enclosure does not exceed operation temperat...

Page 16: ...IF Out Cable 2 HDMI Dongle 6 12V DC Jack 10 RS 232 Cable 3 USB Power Cable 7 3D Emitter Cable 11 Power Cord 4 USB Disk Drive 8 Audio Out Cable Note To ensure the best image quality and avoid connectio...

Page 17: ...ent Ring Zoom lens shift and focus To adjust the image size and position do the following a To adjust the image size turn the zoom lever clockwise or counterclockwise to increase or decrease the proje...

Page 18: ...control to moisture or heat Do not drop the remote control If the battery has leaked in the remote control carefully wipe the case clean and install new battery Risk of an explosion if battery is repl...

Page 19: ...on the projector that might obstruct the infra red beam Make sure the IR transmitter of the remote control is not being shined by sunlight or fluorescent lamps directly Please keep the remote control...

Page 20: ...Standby LED will turn red 2 Turn on the projector by pressing the button on the projector keypad or the remote control 3 A start up screen will display in approximately 10 seconds and the On Standby L...

Page 21: ...ng the projection orientation preferred language configuring network settings and more Once the Setup Complete screen appears it indicates the projector is ready to use Projection screen Language scre...

Page 22: ...ill continue to operate for about 10 seconds for the cooling cycle and the On Standby LED will flash blue When the On Standby LED turns solid red this indicates the projector has entered standby mode...

Page 23: ...source that you want to display on the screen such as computer notebook video player etc The projector will automatically detect the source If multiple sources are connected press the button on the pr...

Page 24: ...ardless of your position in the user interface System Date and Time Shortcuts Status Bar OSD Menu System Settings Input Sources Apps Note The selected menu or item is highlighted in orange color for e...

Page 25: ...the main menu While making a selection on a particular page press OK to enter submenu 2 Press the Left and Right button to select the desired menu item Then press OK to open its sub menu 3 Press the U...

Page 26: ...Sub Menu 4 Values Display Image Settings Display Mode Video Mode Cinema HDR HLG HDR SIM Game Reference Bright User 3D ISF Day ISF Night ISF 3D Wall Color Off Default Blackboard Light Yellow Light Gree...

Page 27: ...ndard Cool Cold Color Matching Color Red Green Blue Cyan Yellow Magenta White Hue R 50 50 Default 0 Saturation G 50 50 Default 0 Gain B 50 50 Default 0 Reset Cancel Default Yes Exit RGB Gain Bias Red...

Page 28: ...Aspect Ratio 4 3 16 9 21 9 32 9 V Stretch except SVGA XGA model Full screen Auto Zoom 5 25 Default 0 Image Shift H 100 100 Default 0 V 100 100 Default 0 Geometric Correction Four Corner H Keystone 30...

Page 29: ...990 30 min increments Default 0 Always On No Default Yes Power Mode Standby Active SmartHome Eco Default USB Power Standby Off Default On Security Security Off On Security Timer Month Day Hour Change...

Page 30: ...op Left Top Right Center Default Bottom Left Bottom Right Menu Timer Off 5sec 10sec Default Auto Source Off Default On Input Source HDMI1 HDMI2 HDMI3 Home Input Name HDMI1 Default Default Custom HDMI2...

Page 31: ...t for Video Pro AV Blue Default for Data model Red Green Gray Logo Reset Reset OSD Cancel Default Yes Reset to Default Cancel Default Yes Android Reset Cancel Default Yes Info Regulatory Serial Number...

Page 32: ...ontent 720p and 1080p Broadcast Cable TV 1080p Blu ray non HDR Games etc Note This mode can ONLY be used with non HDR content Game Optimises your projector for maximum contrast and vivid colours allow...

Page 33: ...warm and cool tones Film Choose this mode for improved detail and image sharpness Detail The signal comes from OETF conversion to achieve the best color matching and highest level of detail HLG Pictur...

Page 34: ...white to fully saturated color Gain Adjust the image brightness Reset Return the factory default settings for color matching Exit Exit the Color Matching menu RGB Gain Bias This settings allows to con...

Page 35: ...isable the 3D sync invert function Aspect Ratio menu Select the aspect ratio of the displayed image between the following options 4 3 This format is for 4 3 input sources 16 9 21 9 32 9 These formats...

Page 36: ...the displayed resolution depends on the input source Auto If source is 4 3 the screen type will be scaled to 2880 x 2160 If source is 16 9 the screen type will be scaled to 3840 x 2160 If source is 15...

Page 37: ...for use with horizontally on axis applications V Keystone Adjust image distortion vertically and make a squarer image Vertical keystone is used to correct a keystoned image shape in which the top and...

Page 38: ...ff the sound Off Choose Off to turn mute off On Choose On to turn mute on Note Mute function affects both internal and external speaker volume Volume Adjust the volume level Digital Output Format Sele...

Page 39: ...wn has finished in minutes Sleep Timer min Configure the sleep timer Sleep Timer min Sets the countdown timer interval The countdown timer will start with or without a signal being sent to the project...

Page 40: ...e turned on only after the projector is switched on Device PJ The projector will be switched on only after the CEC device is turned on Power Off Link Enable this function to let both HDMI Link and pro...

Page 41: ...high altitude areas where the air is thin Display Mode Lock Choose On or Off to lock or unlock adjusting display mode settings Keypad Lock When the keypad lock function is On the Keypad will be locked...

Page 42: ...ish 42 USING THE PROJECTOR Info menu View the projector information as listed below Regulatory Serial Number Source Resolution Refresh Rate Display Mode Projector ID Brightness Mode FW Version MAC Add...

Page 43: ...2 Press the Left and Right button to select the desired menu item Then press OK to open its sub menu 3 Press the Up and Down button to select the desired item in the sub menu 4 Press the OK or Right...

Page 44: ...iFi On Enter password for Wi Fi name When entering password Pop up dialog Title Enter password for Wi Fi name Subtitle Password Input Input text Checkbox Show password Button Cancel OK Internet Connec...

Page 45: ...ortable Wi Fi Hotspot Off On Network name Pop up dialog Title Rename network Input Input text Button Cancel OK Security Pop up dialog Title Type of security Button None WPA2 PSK Password Pop up dialog...

Page 46: ...45 09 00 09 30 10 00 10 30 11 00 12 00 12 45 13 00 14 00 Daylight Saving Time On Off Default Use 24 hour format On Off Default System Update Internal Storage Legal Terms and Conditions of Use Privacy...

Page 47: ...ember up to six latest apps that have been opened and then will replace app shortcuts so that the latest app will be the first app in the apps list while other apps in the list are shifted by one posi...

Page 48: ...ettings such as Connect via WPS Connect via WPS Enter PIN Add New Network manually enter network name and Portable Hotspot configure the projector to behave as a wireless access point for other device...

Page 49: ...automatically every time the projector is connected to the Internet OTA Internal Storage View the remaining internal storage space Legal Review legal documents including Terms and Conditions of Use P...

Page 50: ...t shortcut Note You can personalize shortcut settings in System Settings menu Personalize Home Shortcut You can also modify the shortcut order on the Home screen If the desired input source is not vis...

Page 51: ...y app directly on the Home screen using an app shortcut Note You can personalize shortcut settings in System Settings menu Personalize Home Shortcut If the desired app is not visible on the Home scree...

Page 52: ...make sure to connect your computer or mobile device to the same Wi Fi as the projector Then follow the on screen instructions to operate the App Note For initial activation of the iOS screen mirrorin...

Page 53: ...OJECTOR Optoma Marketplace With the Optoma Marketplace app you can search and install any App File Manager With the File Manager app you can manage the files stored in the internal storage external st...

Page 54: ...THE PROJECTOR Media With the Media app you can play the multimedia files by connecting a USB storage with multimedia content to the projector Then open the multimedia player app and select the desire...

Page 55: ...les to play The projector supports the following multimedia formats Media Category Decoder Supported File Formats Video H 263 MOV 3GP AVI MKV H 264 FLV MP4 MOV 3GP MPEG transport stream ts trp tp ASF...

Page 56: ...transport stream ts trp tp MPEG program stream DAT VOB MPG MPEG EAC3 MP4 AAC HEAAC AAC MP4 MOV M4A MPEG transport stream ts trp tp LPCM WAV AVI Matroska MKV MKA IMA ADPCM MS ADPM WAV AVI Matroska MKV...

Page 57: ...bled Template dotm XML Files xml OpenDocument Text Works 6 9Document wtf Works 6 0 7 0 wps Excel Kingsoft Spreadsheets Files et Row Limit up to 65 535 Column Limit up to 256 Sheet up to 200 Up to 30MB...

Page 58: ...Word will not be displayed Not support Bold Text in Simplified Chinese font For Microsoft PowerPoint Slide effects not supported Password protected sheets are not protected Powerpoint animation is no...

Page 59: ...nu while selecting the USB status icon results in opening the browser and displaying the content of the connected USB device Wired Network Status USB Connection Status Wireless Network Status Alexa Go...

Page 60: ...1080p 1920 x 1080 24 50 60 240 WQHD 1440p 2560x1440 120 UHD 2160p 3840 x 2160 24 50 60 For 4K UHD Computer compatibility VESA standards Computer Signal Analog RGB compatibility Signal Resolution Refre...

Page 61: ...A N A WXGA 1280 x 768 75 N A N A WXGA 1280 x 768 85 N A N A WXGA 800 1280 x 800 60 N A N A SXGA 1280 x 1024 64 60 N A N A SXGA 1280 x 1024 80 75 N A N A SXGA 1280 x 1024 91 1 85 N A N A SXGA 1400 x 10...

Page 62: ...A N A Note 1920 x 1200 60Hz only supports RB reduced blanking means the resolution is supportred N A means the resolution is not supported Input signal for HDMI Signal Resolution Refresh Rate Hz Note...

Page 63: ...efault 1920 x 1080p 120Hz 16 9 2560 x 1440 120Hz 800 x 600 72Hz 1280 x 800 60Hz 720 x 480p 60Hz 4 3 1920 x 1080 240Hz 800 x 600 75Hz 1280 x 1024 60Hz 1920 x 1080i 60Hz 16 9 832 x 624 75Hz 1920 x 1200...

Page 64: ...MI2 VGA 50 Hz option 1920 x 1080p 23 98 24Hz Frame packing HDMI1 HDMI2 1280 x 720p 50Hz Frame packing HDMI1 HDMI2 1920 x 1080p 23 98 24Hz Top and Bottom HDMI2 VGA 1280 x 720p 50Hz Top and Bottom HDMI2...

Page 65: ...22 2 14 2 82 7 03 9 23 0 05 0 16 0 15 0 49 90 1 99 1 12 78 44 44 12 2 41 3 17 7 91 10 39 0 06 0 18 0 17 0 55 100 2 21 1 25 87 16 49 03 2 68 3 52 8 78 11 54 0 06 0 20 0 19 0 61 120 2 66 1 49 104 59 58...

Page 66: ...ng specifications Screw type M4 for three point mounting Minimum screw length 10mm Lens Unit mm Note Please note that damage resulting from incorrect installation will void the warranty Warning If you...

Page 67: ...F1 32 CD 86 79 Press to return to the previous page Up K7 18 F2 32 CD 11 EE Use to select items or make adjustments to your selection Left K14 02 F2 32 CD 10 EF Right K5 09 F2 32 CD 12 ED Down K2 19 F...

Page 68: ...age is stretched when displaying 16 9 DVD title When you play anamorphic DVD or 16 9 DVD the projector will show the best image in 16 9 format on projector side If you play 4 3 format DVD title please...

Page 69: ...t of the projector Make sure batteries are inserted correctly Replace batteries if they are exhausted Warning indicators When the warning indicators see below light up or flash the projector will auto...

Page 70: ...ashing Steady light Error Fan failure Flashing Flashing Error Over temp Flashing Steady light Standby State Burn in mode Flashing Burn in Warming Flashing Burn in Cooling Flashing Burn in Light source...

Page 71: ...ON Fan failed Warning FAN LOCKED The projector will switch off automatically Please contact a service center for repair Out of display range HDMI Out Of Range Power down warning Power Down Power Down...

Page 72: ...9 pin D SUB RJ 45 Support IoT Internet and OTA functions S PDIF Supports PCM 2 channel Dolby Digital 5 1 12V Trigger 3 5mm jack 3D Sync Colour 1073 4 Million color Scan rate Horizontal scan rate 31 0...

Page 73: ...ard Vaillant 33 1 41 46 94 35 92100 Boulogne Billancourt France savoptoma optoma fr Spain C Jos Hierro 36 Of 1C 34 91 499 06 06 28522 Rivas VaciaMadrid 34 91 670 08 32 Spain Deutschland Am Nordpark 3...

Page 74: ...www optoma com...

Reviews: