8
A13.1005
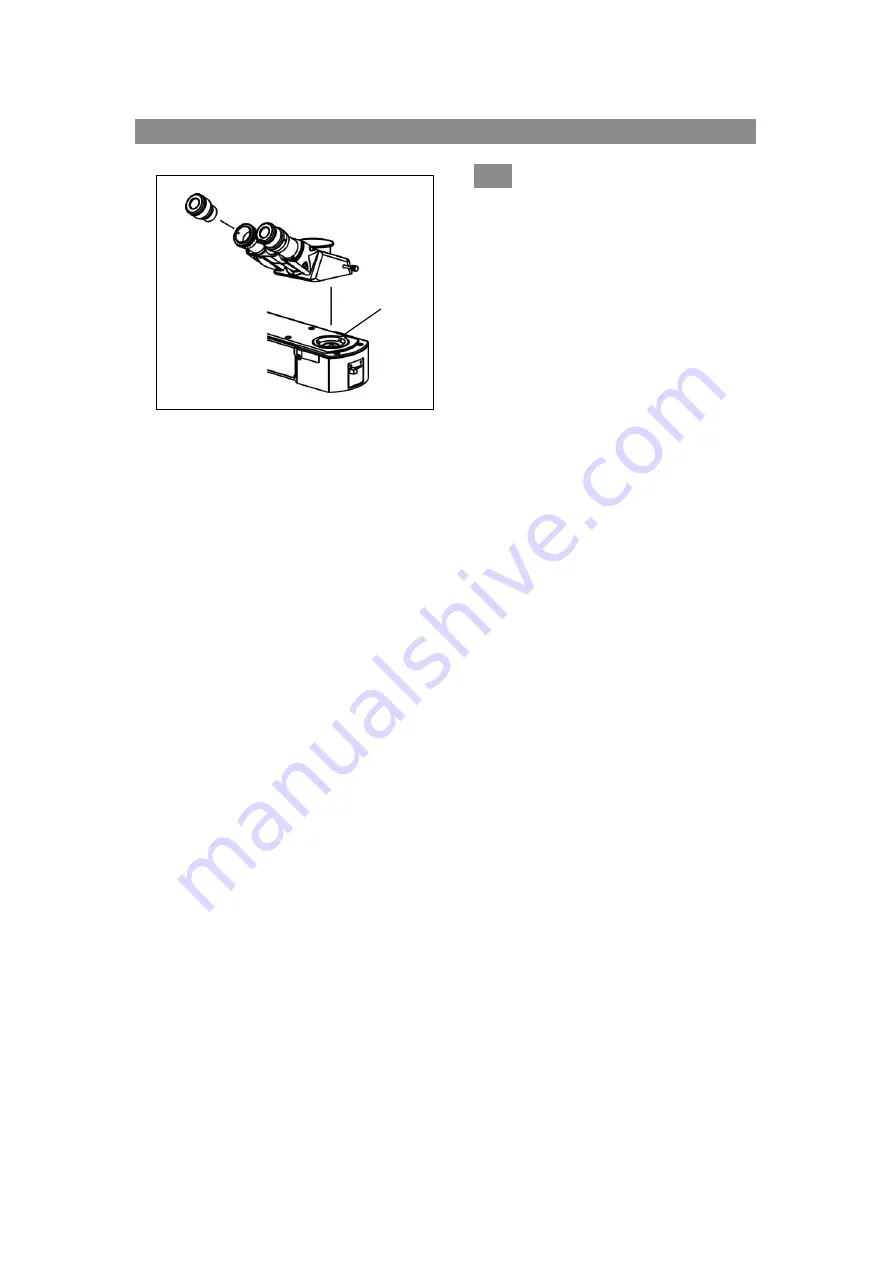
2-2-7 Install viewing head
(
pic.7
)
1. Put trinocular viewing head onto the
swallow-tail of the connecting-plate and
screw bolt
○
1 to fix the viewing head.
2. Insert the eyepiece to the lens cone of the
viewing head.
Pic.7
1
Page 1: ...the safety and obtain satisfactory performance please study this instruction manual thoroughly before start to use your instrument A13 1005 Metallurgical Microscope Bright Field Dark Field Instructio...
Page 2: ...rter and objective 7 2 2 6 Install metallographic device 7 2 2 7Install viewing head 8 3 Adjustment and Operation 3 1 Connect power source and regulate light 9 3 2 Sample placement 9 3 3 Adjustment of...
Page 3: ...orizontal and firm enough 3 When moving the instrument grip two sides of the bottom of the microscope with your two hands DO NOT hold the coarse fine movement hand wheel or the lamp house or the micro...
Page 4: ...pure alcohol or ether Note that the alcohol and ether are highly flammable do keep them away from the fire or potential sources of electrical sparks and use them in a drafty room as possible as you ca...
Page 5: ...4 1 Component Names A13 1005 Power box...
Page 6: ...f the modules in which the number stand for the steps of assemble Before assembling make sure that every module is free of dusts and dirt Do not scratch any modules or glass surfaces Keep the provided...
Page 7: ...to the corresponding holes on the L plate and fix it on the fine coarse movement component by 4 matched bolts and washers 2 2 3 Install fine coarse movement component pic 3 Stack the fine coarse move...
Page 8: ...by path shown in pic 5 and tighten the bolt 1 by a hexagon screwdriver to fix it 2 Screw the objectives to the holes on the converter in sequences 2 2 6 Install metallographic device pic 6 put the swa...
Page 9: ...7 Install viewing head pic 7 1 Put trinocular viewing head onto the swallow tail of the connecting plate and screw bolt 1 to fix the viewing head 2 Insert the eyepiece to the lens cone of the viewing...
Page 10: ...on and toggle the main switch 4 in the front of power box to the position It s only need to plug the adapter to the socket when using LED house 3 Turn the knob 5 to the MAX position to increase the vo...
Page 11: ...f pupil distance pic 5 The range of pupil distance is 47mm 78mm when observing with both eyes hold and rotate the prism table to adjust the pupil distance until the left and right field of view coinci...
Page 12: ...10 eyepiece then turn the fine focusing hand wheel until clearly imaged Convert the objective will not touch and damage the sample because of the par 2 3 focalizition 4 When using cameras totally pus...
Page 13: ...the contrast when observing semiconductors Blue filter Used in normal observe and camera observe Matte filter Smooth light 3 8 Usage of extension function board pic 10 A socket to settle an extension...
Page 14: ...13 4 Main Component Size A13 1005 1 Size of the focusing components 2 Focusing component and L plate...
Page 15: ...trinocular big aperture 30 tilt pupil distance 47 78mm Hinge type trinocular 30 tilt pupil distance 47 78mm 78mm eyepiece Huge FOV eyepiece EW10X 25 lens cone 30 10 18eyepiece Objective converter 5 ho...
Page 16: ...djust it into the right position The sample is in float state Reliably solidify it The image moves when focusing Sample is floated in the surface of platform Place it stable The converter is not locat...
Page 17: ...t Replace with a new bulb The bulb burn out in frequently Not use the specified lamp Use the required lamp If it s still not working contact the repair department The brightness is not enough Not use...