background image


EDC-1000   Versión 2


Página 9 de 16


SERIE EDC-1000


Sistema de Conferencias


4. OPERACIONES 


4.1. Pantalla de monitorización de micrófonos abiertos 

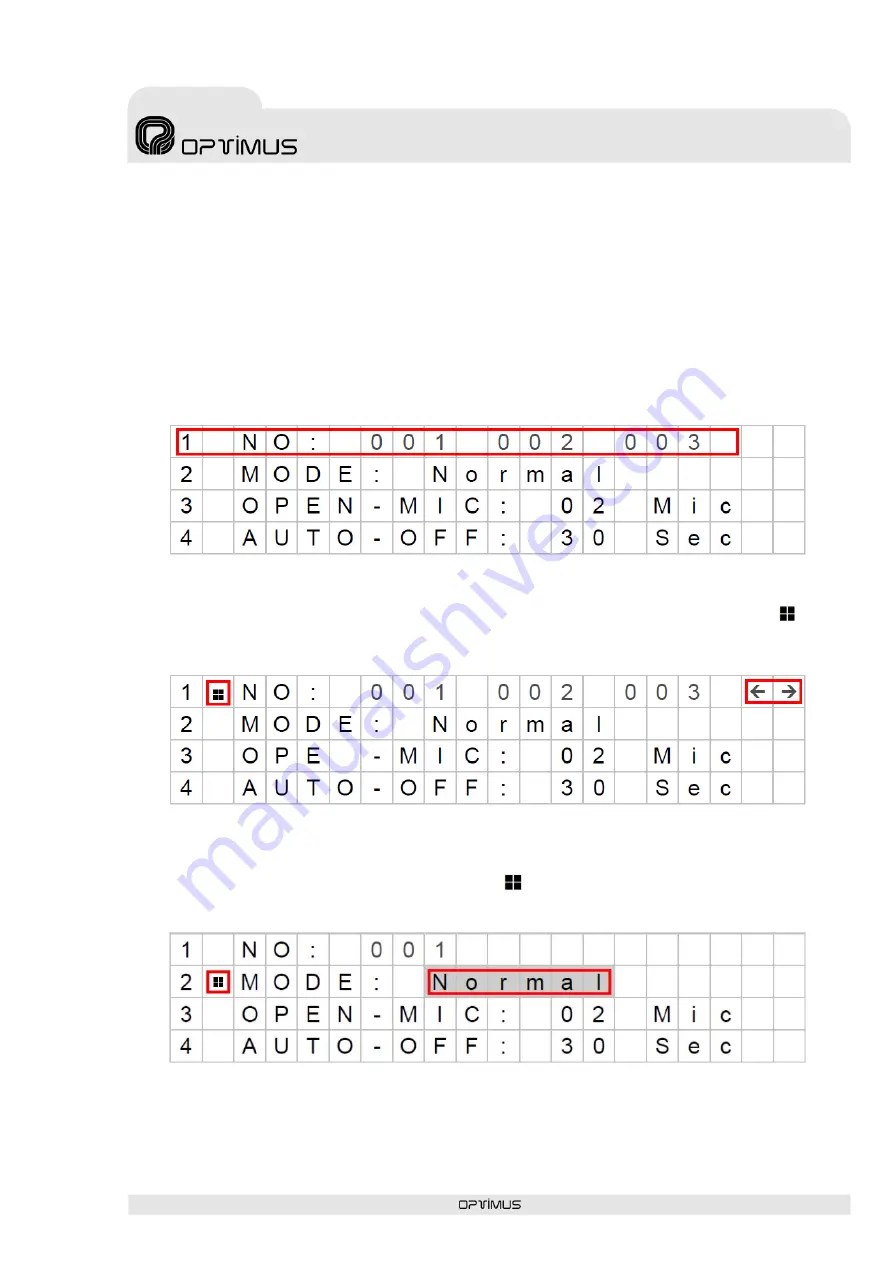
  Cuando se hable por un micrófono, su aro rojo se encenderá. A la vez, su código de 

identificación se mostrará en la pantalla LCD de la unidad de control. 

  La pantalla LCD permite mostrar hasta tres códigos de micrófono simultáneamente. 


  Si hay más de 3 micrófonos en uso, aparecerá el icono “

Å


Æ

” en la parte superior-

derecha de la pantalla LCD. Al pulsar el botón “Mode” se mostrará el icono       al lado 
de la opción NO. Pulse los botones “Up” y “Down” para comprobar los códigos de los 
micrófonos que se están utilizando. 


4.2. Ajustes del modo de conferencia 


Pulse el botón “Mode” para mover el icono       a la posición de MODE. La palabra “Normal” 
empezará a parpadear, pulse los botones de subir o bajar para cambiar el modo de 
conferencias.


  Los Modos de conferencias son los siguientes: 

Normal:

 Las unidades de delegado pueden hablar libremente al pulsar el botón “talk” 

(dentro del límite de micrófonos abiertos). 


Summary of Contents for EDC-1000 SERIES

Page 1: ...SISTEMA DE CONFERENCIAS CONFERENCE SYSTEM EDC 1000 Manual de instrucciones v2 0 Instruction manual v2 0 ...

Page 2: ...males D La unidad ha caído al suelo y se ha dañado el chasis Cuando un elemento o un cable externo está conectado a la unidad la conexión de tierra del cable del sistema debe de ser capaz de soportar cualquier fuga o cortocircuito Tenga cuidado cuando instale la unidad principal de control y sus accesorios Evite los golpes y los movimientos violentos ya que podrían provocar daños en el sistema No ...

Page 3: ... funcionamiento o parada el apagarla y encenderla bruscamente puede provocar un pico de potencia y dañar el circuito interior Nota Se debe garantizar una buena conexión a tierra Nota Antes de conectar la unidad a la fuente de corriente por favor ajuste la tensión de entrada según la tensión de la red De otra forma la unidad puede resultar dañada La forma de ajuste está descrita en el apartado Inst...

Page 4: ...7 3 1 Puesta en marcha 7 3 2 Pantalla LCD 8 4 OPERACIONES 9 4 1 Pantalla de monitorización de micrófonos abiertos 9 4 2 Ajustes del modo de conferencia 9 4 3 Configuración de micros abiertos 10 4 4 Configuración de apagado automático 10 4 5 Configuración de volumen 11 5 CONEXIÓN 12 6 UNIDADES DE CONFERENCIANTE 13 6 1 Unidad de presidente de sobremesa EDC 1011 13 6 2 Unidad de delegado de sobremesa...

Page 5: ...n control de volumen digital Incorpora un módulo para software de control 1 2 Unidad de presidente Formato sobremesa Incorpora funciones de control de conferencia TALK Hablar y CONTROL Prioridad Se puede insertar en cualquier punto de la línea de unidades de conferencia no debe ocupar forzosamente la primera o última posición El sistema admite un máximo de 10 unidades de presidente 1 3 Unidad de d...

Page 6: ...unidad principal 1 Botones de configuración del sistema de conferencias Mode Botón de selección de modo UP Botón de subir parámetro o subir el volumen Down Botón de bajar un parámetro o bajar el volumen 2 Botón de encendido 3 Indicador de nivel Barra de LEDs que indica el nivel de volumen de salida 4 LCD 20x4 Pantalla de control ...

Page 7: ...a de alimentación 18Vcc 6 Fusible de alimentación 7 LINK 1 3 Conexiones de las tres líneas de unidades de conferencias 8 L Speaker Control de volumen principal de los altavoces integrados en las unidades de conferencias 9 Conector de salida de audio auxiliar 10 Puerto RS 232 Pin2 Transmisión de datos Tx Pin3 Recepción de daton Rx Pin5 GND ...

Page 8: ...s micrófonos se mostrará la siguiente información Nota Al encender el equipo el sistema va a escanear todos los micrófonos automáticamente Si el aro led rojo se queda encendido fijo significa que los micrófonos funcionan con normalidad pero si se queda parpadeando significa error de conexión En ese caso apague el equipo y compruebe la conexión del micrófono Después vuelva a encender el equipo para...

Page 9: ...e Normal Override o Chairman 3 Æ Open Mic Número máximo de micrófonos abiertos simultáneamente del 1 al 9 o todos 4 Æ Auto Off Tiempo máximo de intervención 30 45 segundos o manual 5 Æ Volumen del sistema Ajuste el volumen pulsando las teclas Up para subirlo y Down para bajarlo Si no se pulsa ningún botón durante 30 segundos el sistema guardará la configuración automáticamente y volverá a mostrar ...

Page 10: ...recerá el icono Å Æ en la parte superior derecha de la pantalla LCD Al pulsar el botón Mode se mostrará el icono al lado de la opción NO Pulse los botones Up y Down para comprobar los códigos de los micrófonos que se están utilizando 4 2 Ajustes del modo de conferencia Pulse el botón Mode para mover el icono a la posición de MODE La palabra Normal empezará a parpadear pulse los botones de subir o ...

Page 11: ...aso a la unidad presidente 4 3 Configuración de micros abiertos Pulse el botón Mode para mover el icono a la posición OPEN MIC El número 03 Mic empezará a parpadear pulse los botones de subir o bajar para cambiar el número Cantidad límite de micrófonos de delegado abiertos 1 9 OPEN MIC 1 Mic Æ Sólo puede hablar un micrófono delegado a la vez OPEN MIC 9 Mic Æ Pueden hablar a la vez hasta 9 micrófon...

Page 12: ...rá automáticamente AUTO OFF 30 Sec Æ El micrófono delegado se apagará después de 30 segundos AUTO OFF 45 Sec Æ El micrófono delegado se apagará después de 45 segundos 4 5 Configuración de volumen Para ajustar el volumen del sistema por favor pulse los botones Up o Down del control principal El display LCD mostrará la siguiente información ...

Page 13: ...ades de conferencias a la unidad principal No hay ninguna prioridad entre ellos El micrófono de presidente se puede colocar en cualquier posición de la línea sin que el orden afecte para nada al sistema Antes de desconectar cualquier unidad de conferencias de la línea es indispensable cortar la alimentación de la unidad de control ...

Page 14: ...nicaciones Funcionamiento 1 Presione la tecla TALK para activar la unidad La indicación luminosa interior de la tecla y el aro luminoso de color rojo del micrófono indican que la unidad está activa 2 Al activarse el pupitre se desconectará automáticamente el altavoz para evitar el eco 3 Presione la tecla CONTROL para silenciar los micrófonos de delegados Los delegados deberán presionar la tecla TA...

Page 15: ...uriculares 5 Conector de comunicaciones Funcionamiento 1 Presione la tecla TALK para activar la unidad La indicación luminosa interior de la tecla y el aro luminoso de color rojo del micrófono indican que la unidad está activa 2 Al activarse el pupitre se desconectará automáticamente el altavoz para evitar el eco 3 El micrófono y la base están diseñados por separado Lo que facilita la instalación ...

Page 16: ...S N 90 dB Conexión micrófonos de conferencias 3 x Sub D 9 pines Visualizador de nivel 5 LEDs Alimentación 110 220 Vca 50 60 Hz a 18Vcc LED alimentación DATOS FÍSICOS EDC 1051 Dimensiones Alto x Ancho x Profundo 100 x 430 x 230 mm Peso 4 4 kg Accesorios Escuadras montaje rack 19 incluidas F A Acabado Negro pintura antioxidante FUENTE DE ALIMENTACIÓN SUMINISTRADA EDC 1051 Dimensiones Alto x Ancho x ...

Page 17: ...dor Respuesta en frecuencia 100 Hz 16 kHz Sensibilidad 23 dBv Pa máximo SPL 126 dB 3 THD Relación S N 20 dB 1 kHz Dimensiones flexo cápsula 43 cm Consumo 0 5 W RMS Alimentación 12 18 V CC Conectores DIN8 DIN8 Tipo Y Conector auricular grabación Mini Jack ø 3 5 estéreo EDC 1011 EDC 1012 Dimensiones base Ancho x Alto x Prf 140 x 48 x 150 mm Tipo Sobremesa Peso Neto 0 82 kg micro incluido ...

Page 18: ...nected into this unit the grounding of cable system must be reliable to avoid lightening attack Please take care when installing the main control unit and its surrounding facilities Avoid strike fierce swing which may damage the main conference unit and its surrounding facilities Please do not disassemble the main control unit and its surrounding facilities A There are high voltage and sensitive e...

Page 19: ...tly to ensure the sensitive electronic circuit inside not being damaged by abrupt power wave Note When the printed circuit board was going through electric static treatment correct ESD safety precaution and grounding should be guaranteed Note Before connecting the unit to the power supply please adjust the power input according to the local power specification Otherwise it can damage the unit The ...

Page 20: ...unit s rear panel 6 3 SYSTEM SETTINGS 7 3 1 Start up 7 3 2 LCD display 8 4 OPERATIONS 9 4 1 Talking microphones display 9 4 2 Conference mode settings 9 4 3 Open microphones number setup 10 4 4 Auto off Setting 10 4 5 Volume settings 11 5 CONECTION 12 6 CONFERENCE UNITS 13 6 1 Table top chairman unit EDC 1011 13 6 2 Table top Delegate s unit EDC 1012 14 7 SYSTEM SPECIFICATIONS 15 7 1 EDC 1051 Main...

Page 21: ...een and 3 setting buttons MODE UP DN Built in digital volume control module Built in software control module 1 2 Chairman unit Desktop unit Conference control functions TALK On Off and CONTROL are available It can be placed at any position within the system A maximum of 10 chairman microphone can be installed 1 3 Delegate unit Desktop unit Speech control function such as TALK On Off is available A...

Page 22: ...it s front panel 1 Conference system configuration buttons Mode Mode selection button UP Setting up a parameter or increase the volume Down Setting down a parameter or decrease the volume 2 Power switch 3 Output volume LED indicator LED bar indicates the volume of the output level 4 Display Control LCD 20x4 ...

Page 23: ... unit s rear panel 5 18VDC Power input 6 Power Fuse 7 LINK 1 3 Connections for the three lines of conference units 8 L Speaker Master volume control integrated in the conference speakers units 9 Aux output connector 10 RS 232 connector Pin2 Data Transmission Tx Pin3 Data Reception Rx Pin5 GND ...

Page 24: ... microphones the following information will be displayed default page Note When the main controller is turned on the system will automatically scan all microphones Red LED ring on indicates that microphone is working correctly while blinking one indicates connection failure In this case turn off the unit and check the microphone connection Then turn on the unit to scan again the microphones To fin...

Page 25: ...27 2 Æ Mode Normal Override or Chairman 3 Æ Open Mic It s the limit of simultaneous open microphones 1 to 9 or all 4 Æ Auto Off It s the communication time limit 30 45 seconds or manual 5 Æ System Level Adjust the volume by pressing the Up button to increase it and Down button to decrease it If no button is pressed within 30 seconds the system automatically saves the settings and returns to the de...

Page 26: ...n will be displayed on the up right part of the LCD screen Pressing Mode button icon next to the NO option will be displayed Press the Up and Down buttons to check the codes of used microphones 4 2 Conference mode settings Press the Mode button to move the icon to the position MODE The word Normal will start blinking Press up or down buttons to change the conference mode Conference modes are the f...

Page 27: ... case 4 3 Open microphones number setup Press Mode button to move the icon to the OPEN MIC position The number 03 Mic will start blinking Press up or down buttons to change the number Limit of opened delegate microphones 1 9 OPEN MIC 1 Mic Æ Only 1 delegate microphone can be opened OPEN MIC 9 Mic Æ Up to 9 delegate microphones can be opened simultaneously OPEN MIC ALL Mic Æ All delegate microphone...

Page 28: ...utomatically turned off AUTO OFF 30 Sec Æ The delegate microphone will be turned off after 30 seconds AUTO OFF 45 Sec Æ The delegate microphone will be turned off after 45 seconds 4 5 Volume settings To adjust the system volume please press Up or Down main control buttons The LCD display will show the following information ...

Page 29: ...e 3 ports for connecting conference units to the main unit There is no priority between them The chairman microphone can be placed anywhere on the line The order does not affect its functionality Before disconnecting any conference unit it is essential to switch off the main control unit ...

Page 30: ...e 5 Earphone output plug 6 Wire plug Operation 1 Press TALK button to start talking TALK button back light and red ring will light up 2 When microphone is activated its build in speaker will be muted to prevent echo 3 Press CONTROL button to clear and turn off all delegates The delegate can press TALK button again to continue talking 4 Microphone and stand are designed by separated It makes easier...

Page 31: ...eration 1 Press TALK button to start talking TALK button back light and red ring will light up 2 When microphone is activated its build in speaker will be muted to prevent echo 3 Press CONTROL button to clear and turn off all delegates The delegate can press TALK button again to continue talking 4 Microphone and stand are designed by separated It makes easier its installation reparation maintenanc...

Page 32: ... S N ratio 90 dB Conference microphone connection Sub D 9 port x 3 Level display 5 LEDs Power supply AC 110 220 V 50 60 Hz to 18VDC Power LED EDC 1051 PHYSICAL DATA Dimensions Height x Width x Depth 100 x 430 x 230 mm Weight 4 4 kg Accessories 19 brackets included Power Supply Finishing Black against rusty paint EDC 1051 POWER SUPPLY Dimensions Height x Width x Depth 55 x 95 x 200 mm Weight 1 3 kg...

Page 33: ...y response 100 Hz 16 kHz Sensibility 23 dBv Pa maximum SPL 126 dB 3 THD S N ratio 20 dB 1 kHz Dimensions gooseneck capsule 43 cm Rated input 0 5 W RMS Power supply 12 18 V CC Connectors DIN8 DIN8 Y type Earphone REC plug Mini Jack ø 3 5 stereo EDC 1011 EDC 1012 Dimensions Width x Height x Depth 140 x 48 x 150 mm Type Table top Net weight 0 82 kg microphone included ...

Reviews: