background image


DA-4PM/0F2 versión 1.0 

Chasis para 4 etapas de 

potencia series F2 y F2DC 

DA-4PM/0F2 

ATENCIÓN: SÓLO PERSONAL CUALIFICADO 

1.   

DESCONECTE  EL  CABLE 

DE  ALIMENTACIÓN  DE  RED 
100-240V AC 50/60 Hz, Y LAS 
REGLETAS  DE  24VDC  DE 
ALIMENTACIÓN 
SECUNDARIA. 

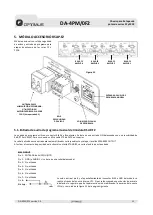
2.  Retire  la  tapa  del  equipo 
para  acceder  a  los  puentes 
de configuración. 

3.  Para  cada  amplificador, 
configure  los  puentes 

JP1

  y 

JP2

4.  Coloque  la  tapa  del 
equipo y conecte de nuevo la 
alimentación. 


CONFIGURACIONES 
AMPLIFICADOR 4 

CONFIGURACIONES 
AMPLIFICADOR 3 

CONFIGURACIONES 
AMPLIFICADOR 2 

CONFIGURACIONES 
AMPLIFICADOR 1 

UNIÓN DE LA PANTALLA  

Y PIN 8 DEL CONECTOR RJ45 

A GND DEL AMPLIFICADOR 

UNIÓN DE MASA DEL 

AMPLIFICADOR  

AL CHASIS DEL DA-4PM/0F2 

UNIDO 

SEPARADO 

UNIDO 

SEPARADO 

(CONFIGURACIÓN DE FÁBRICA) 

(CONFIGURACIÓN DE FÁBRICA) 

Figura 7 

Summary of Contents for DA-4PM/0F2

Page 1: ...DA 4PM 0F2 version 1 0 1 Chassis for 4 power amplifiers F2 and F2DC series DA 4PM 0F2 0 31 05 2022 V10 ...

Page 2: ...re replacing the fuse Before switching on the appliance make sure that the earth connection is connected Do not use the appliance in damp places or near liquids Do not install the appliance near heat sources Do not block the ventilation openings When necessary remove dust with a dry cloth Do not use solvents such as alcohol Keep the device clean and dust free Qualified personnel are required to ca...

Page 3: ... 5 24VDC secondary power supply only F2DC series amplifiers 10 5 ACCESSORY MODULE RSAP F2 11 5 1 RSAP F2 module music program audio input 11 5 2 Surety paging relay of module RSAP F2 13 6 TECHNICAL CHARACTERISTICS 14 6 1 DA 4PM 0F2 14 6 2 RSAP F2 14 6 3 Amplifier modules 15 7 DOCUMENT VERSION TRACKING 15 8 CERTIFICATE OF GUARANTEE 16 WARNING This is a Class A unit In a domestic environment this un...

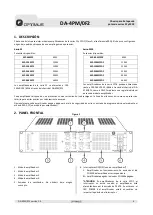
Page 4: ...F2 chassis or at 24VDC via an individual power strip for each amplifier module Each amplifier is equipped with a short circuit overload protection on the speaker line as well as a thermal protection to prevent malfunctions due to overheating Optionally each amplifier can be equipped with a surety paging relay and additional music program input via the RSAP F2 module one module per amplifier 2 FRON...

Page 5: ...e AMPLIFIER 1 auxiliary program input 6 Slot for AMPLIFIER 2 auxiliary function module 7 Slot for AMPLIFIER 3 auxiliary function module 8 Slot for AMPLIFIER auxiliary function module 4 9 Mains connection 100 240V AC 50 60 Hz AC 10 Mains fuse 15A A spare fuse is supplied with the appliance ATTENTION Turn ALL 4 FRONT SWITCHES OFF AND DISCONNECT THE POWER CORD FROM THE 100 240V AC 50 60 Hz INPUT IF F...

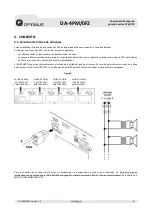
Page 6: ...wer of the amplifier The DA 4PM 0F2 constantly monitors the status of the speaker line output If a short circuit is detected on the speaker line the front LED PROTECT and the yellow LED on the rear RJ45 of the corresponding amplifier flash For the connection of the loudspeaker line in installations with surety paging relay please follow section 5 2 For this type of installation it is necessary tha...

Page 7: ...ignal applied to the INPUT will not attack the corresponding amplifier until the INPUT PRIORITY contact is activated connecting contacts 6 and 8 of the RJ45 INPUT connector The connector has two LEDs a green PRIORITY LED which lights up when the input priority contact is activated and a yellow LED indicating STANDBY steady LED or ALARM flashing LED The ALARM indication can mean an overload or shor...

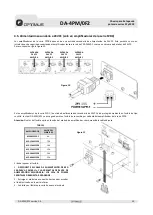
Page 8: ...ccess to the configuration jumpers 3 For each amplifier set jumper JP1 and JP2 4 Replace the equipment cover and reconnect the power supply CONFIGURATIONS AMPLIFIER 4 CONFIGURATIONS AMPLIFIER 3 CONFIGURATIONS AMPLIFIER 2 CONFIGURATIONS AMPLIFIER 1 CONNECTION OF THE SHIELD AND PIN 8 OF THE RJ45 CONNECTOR TO GND OF THE AMPLIFIER AMPLIFIER GROUND CONNECTION TO DA 4PM 0F2 CHASSIS CONNECTED SEPARATE CO...

Page 9: ...tion of the priority contact by connecting pin 6 to pin 8 of the RJ45 connector of the INPUT input deactivates the STANDBY mode When priority is deactivated the amplifier returns to STANDBY mode 4 4 Mains connection The DA 4PM 0F2 has a 100 240VAC power input Use the power cable supplied with the equipment to connect it to the mains Before connecting make sure that the mains voltage matches the re...

Page 10: ...ed with a spare fuse for each amplifier module of the F2DC series Attention The fuse value varies depending on the amplifier model as shown in the table below If you need to replace the fuse 1 DISCONNECT THE 100 240V AC 50 60 Hz MAINS POWER CORD AND THE 24VDC SECONDARY SUPPLIES TERMINAL STRIPS THE FRONT POWER LEDs MUST BE OFF 2 Pull out the connection module until you can access the fuse located a...

Page 11: ... RSAP F2 Optional module with surety paging relay and program input for F2 and F2DC series power amplifiers 5 1 RSAP F2 module music program audio input The program input uses an 8 pin RJ45 connector It is a NON balanced input with a sensitivity of 0dB 775 mV RMS For connection use FTP CAT5e or higher cable The signal applied to this input attacks the corresponding amplifier and is output through ...

Page 12: ...60 Hz AND THE 24VDC POWER SUPPLY TERMINAL STRIPS 2 Remove the two screws holding the RSAP F2 module and pull the module out until the jumper JP1 is visible 3 Configure jumper JP1 4 Re insert the module and connect the power supply JP1 CONNECTION OF THE SHIELD AND PIN 8 OF THE RJ45 CONNECTOR TO GND OF THE AMPLIFIER SEPARATE CONNECTED CONFIGURATION FACTORY Figure 13 JP1 ...

Page 13: ...speech preference This allows in installations with volume attenuators and 3 or 4 wire loudspeaker lines to ensure that messages with priority are broadcast regardless of the position of the volume selector of the attenuator Figure 14 shows an example of AV series attenuators connection with surety paging 3 wire speaker lines and figure 15 with CV series attenuators 4 wire speaker lines Figure 14 ...

Page 14: ...Front LEDs for POWER STANDBY PROTECT CLIP and SIGNAL independent for each amplifier Rear LED indicators for PRIORITY and ALARM STANDBY indicating overload or short circuit on the speaker line or excessive power amplifier temperature Audio input Audio input via RJ45 connector separate for each amplifier Sensitivity 0dB 775mV RMS Speaker line output 100V via power strip independent for each amplifie...

Page 15: ...P 460WF2 460W Ø 0 5 4W Standby 7 2W Idle 520W Max MP 60WF2DC 60W 0 5 3 5W Standby 6W Idle 70W Max MP 120WF2DC 120W 0 5 3 5W Standby 6 5W Idle 134W Max MP 150WF2DC 150W 0 5 4W Standby 7 2W Idle 165W Max MP 250WF2DC 250W 0 5 4W Standby 7W Idle 276W Max MP 300WF2DC 300W 0 5 4W Standby 7 2W Idle 339W Max MP 460WF2DC 460W 0 5 4W Standby 7 2W Idle 520W Max 7 DOCUMENT VERSION TRACKING Reference system Ty...

Page 16: ...the equipment including lack of maintenance 5 The guarantee shall not be valid whenever the following is observed Amendments or corrections made to the details of the guarantee certificate or purchase invoice Failure to produce the original invoice or the absence of a date on this Absence of the serial or batch number on the equipment 6 In the case of personal computers the guarantee will not cove...

Page 17: ......

Page 18: ...31 05 2022 V1 0 ...

Page 19: ...DA 4PM 0F2 versión 1 0 1 Chasis para 4 etapas de potencia series F2 y F2DC DA 4PM 0F2 0 31 05 2022 V1 0 ...

Page 20: ...antes de cambiarlo Antes de encender el aparato asegúrese de que la toma de tierra está conectada No use el aparato en lugares húmedos o cerca de líquidos No instale el aparato cerca de fuentes de calor No bloquee los orificios de ventilación Cuando sea necesario retire el polvo con un paño seco No use disolventes como el alcohol Mantenga el aparato limpio y sin polvo Se requiere personal cualific...

Page 21: ...tación secundaria a 24VCC sólo en amplificadores de la serie F2DC 10 5 MÓDULO ACCESORIO RSAP F2 11 5 1 Entrada de audio de programa musical del módulo RSAP F2 11 5 2 Relé de seguridad de avisos del módulo RSAP F2 13 6 CARACTERÍSTICAS TÉCNICAS 14 6 1 DA 4PM 0F2 14 6 2 RSAP F2 14 6 3 Módulos amplificadores 15 7 DOCUMENT VERSION TRACKING 15 8 CERTIFICADO DE GARANTÍA 16 ATENCIÓN Este es un equipo de C...

Page 22: ...regleta individual para cada módulo amplificador Cada amplificador dispone de una protección contra cortocircuito sobrecarga en la línea de altavoces así como una protección térmica para evitar averías por calentamiento excesivo Opcionalmente cada amplificador pueden disponer de relé de seguridad de avisos y entrada de programa adicional mediante el módulo RSAP F2 un módulo por amplificador 2 PANE...

Page 23: ...el AMPLIFICADOR 1 6 Espacio para módulo de funciones auxiliares del AMPLIFICADOR 2 7 Espacio para módulo de funciones auxiliares del AMPLIFICADOR 3 8 Espacio para módulo de funciones auxiliares del AMPLIFICADOR 4 9 Conexión a la red de 100 240V AC 50 60 Hz AC 10 Fusible de alimentación de red 15A Junto al aparato se suministra un fusible de recambio ATENCIÓN SITUE LOS 4 INTERRUPTORES FRONTALES EN ...

Page 24: ... nominal del amplificador El DA 4PM 0F2 supervisa constantemente el estado de la salida de línea de altavoces En caso de detectar cortocircuito en la línea de altavoces el LED frontal PROTECT y el led amarillo del RJ45 posterior del amplificador correspondiente parpadean Para la conexión de la línea de altavoces en instalaciones con seguridad de avisos siga el apartado 5 2 Para este tipo de instal...

Page 25: ...spondiente hasta activar el contacto de PRIORIDAD de ENTRADA uniendo los contactos 6 y 8 del conector RJ45 INPUT El conector dispone de dos LEDs un LED verde de PRIORITY que se enciende al activar de contacto de prioridad de entrada y otro LED amarillo indicador de STANDBY led encendido fijo o ALARM led encendido intermitente La indicación de ALARM puede significar una sobrecarga o cortocircuito e...

Page 26: ... puentes de configuración 3 Para cada amplificador configure los puentes JP1 y JP2 4 Coloque la tapa del equipo y conecte de nuevo la alimentación CONFIGURACIONES AMPLIFICADOR 4 CONFIGURACIONES AMPLIFICADOR 3 CONFIGURACIONES AMPLIFICADOR 2 CONFIGURACIONES AMPLIFICADOR 1 UNIÓN DE LA PANTALLA Y PIN 8 DEL CONECTOR RJ45 A GND DEL AMPLIFICADOR UNIÓN DE MASA DEL AMPLIFICADOR AL CHASIS DEL DA 4PM 0F2 UNI...

Page 27: ... pin 6 con el pin 8 del conector RJ45 de la entrada INPUT desactiva el modo STANDBY Al desactivar la prioridad el amplificador vuelve al modo STANDBY 4 4 Conexión a la red eléctrica El DA 4PM 0F2 dispone de una entrada de alimentación de 100 240VAC Utilice el cable de alimentación suministrado junto al equipo para conectarlo a la red eléctrica Antes de conectarlo asegúrese de que la tensión de red...

Page 28: ...A 4PM 0F2 se entrega además un fusible de recambio por cada módulo amplificador de la serie F2DC Atención El valor del fusible varía en función del modelo de amplificador como muestra la tabla adjunta Si debe reponer el fusible 1 DESCONECTE EL CABLE DE ALIMENTACIÓN DE RED 100 240V AC 50 60 Hz Y LAS REGLETAS DE 24VDC DE ALIMENTACIÓN SECUNDARIA LOS LEDs DE POWER FRONTALES DEBEN ESTAR APAGADOS 2 Extr...

Page 29: ... de seguridad de avisos y entrada de programa para etapas de potencia de las series F2 y F2DC 5 1 Entrada de audio de programa musical del módulo RSAP F2 La entrada de programa utiliza un conector RJ45 de 8 contactos Se trata de una entrada NO balanceada con una sensibilidad de 0dB 775 mV RMS Para su conexión utilice cable FTP de CAT5e o superior La señal aplicada a esta entrada ataca el amplifica...

Page 30: ... 60 Hz Y LAS REGLETAS DE 24VDC DE ALIMENTACIÓN SECUNDARIA 2 Retire los dos tornillos que sujetan el módulo RSAP F2 y extraiga el módulo hasta visualizar el puente JP1 3 Configure el puente JP1 4 Inserte de nuevo el módulo y conecte la alimentación PUENTE JP1 UNIÓN DE LA PANTALLA Y PIN 8 DEL CONECTOR RJ45 A GND DEL AMPLIFICADOR SEPARADO UNIDO CONFIGURACIÓN DE FÁBRICA Figura 13 JP1 ...

Page 31: ...ite en instalaciones con atenuadores de volumen y líneas de altavoces con 3 o 4 hilos asegurar la difusión de los mensajes con prioridad independientemente de la posición del selector de volumen del atenuador La figura 14 muestra un ejemplo de conexión con seguridad de avisos de las atenuadoras de la serie AV líneas de altavoces de tres hilos y la figura 15 con atenuadoras de la serie CV líneas de...

Page 32: ...ores LEDs frontales de POWER STANDBY PROTECT CLIP y SIGNAL independiente para cada amplificador LEDs posteriores indicadores de PRIORITY y ALARM STANDBY indicando sobrecarga o cortocircuito en la línea de altavoces o temperatura excesiva de la etapa de potencia Entrada de audio Audio de entrada a través de conector RJ45 independiente para cada amplificador Sensibilidad 0dB 775mV RMS Salida línea d...

Page 33: ...x MP 460WF2 460W Ø 0 5 4W Standby 7 2W Idle 520W Max MP 60WF2DC 60W 0 5 3 5W Standby 6W Idle 70W Max MP 120WF2DC 120W 0 5 3 5W Standby 6 5W Idle 134W Max MP 150WF2DC 150W 0 5 4W Standby 7 2W Idle 165W Max MP 250WF2DC 250W 0 5 4W Standby 7W Idle 276W Max MP 300WF2DC 300W 0 5 4W Standby 7 2W Idle 339W Max MP 460WF2DC 460W 0 5 4W Standby 7 2W Idle 520W Max 7 DOCUMENT VERSION TRACKING Reference system...

Page 34: ...ales o a la propiedad que pudieran causar el uso indebido del equipo incluyendo la falta de mantenimiento 5 La garantía carecerá de validez cuando se observe Enmiendas o tachaduras en los datos del certificado de garantía o factura de compra Falta de factura original o falta de fecha en la misma Falta de número de serie o lote en el equipo 6 En el caso de ordenadores P C la garantía no cubrirá la ...

Page 35: ......

Page 36: ...31 05 2022 V1 0 ...

Reviews: