Optimus 31-3039 Owner'S Manual Download Page 23

23

Using the Remote Control

The remote control works up to a distance of about 23 feet, and within a 30-de-
gree angle on either side of the receiver. Point the control at the receiver’s front 
panel and press the desired button(s).

Many buttons on the remote control work the same as buttons on the receiver’s 
front panel. Use these buttons exactly as you would use the corresponding but-
tons on the receiver.

AUDIO/SURROUND Switch

Some buttons on the remote control have two functions. Set the 

AUDIO/SUR-

ROUND

 switch to 

AUDIO

 to activate the function printed in green on the remote 

control’s panel. Set the switch to 

SURROUND

 to use the function printed in gold.

For example, the button marked 

C. MODE

 and 

TEST TONE

 operates as the center 

mode adjust when you set the switch to 

SURROUND

 and as the test tone function 

when you set the switch to 

AUDIO

.

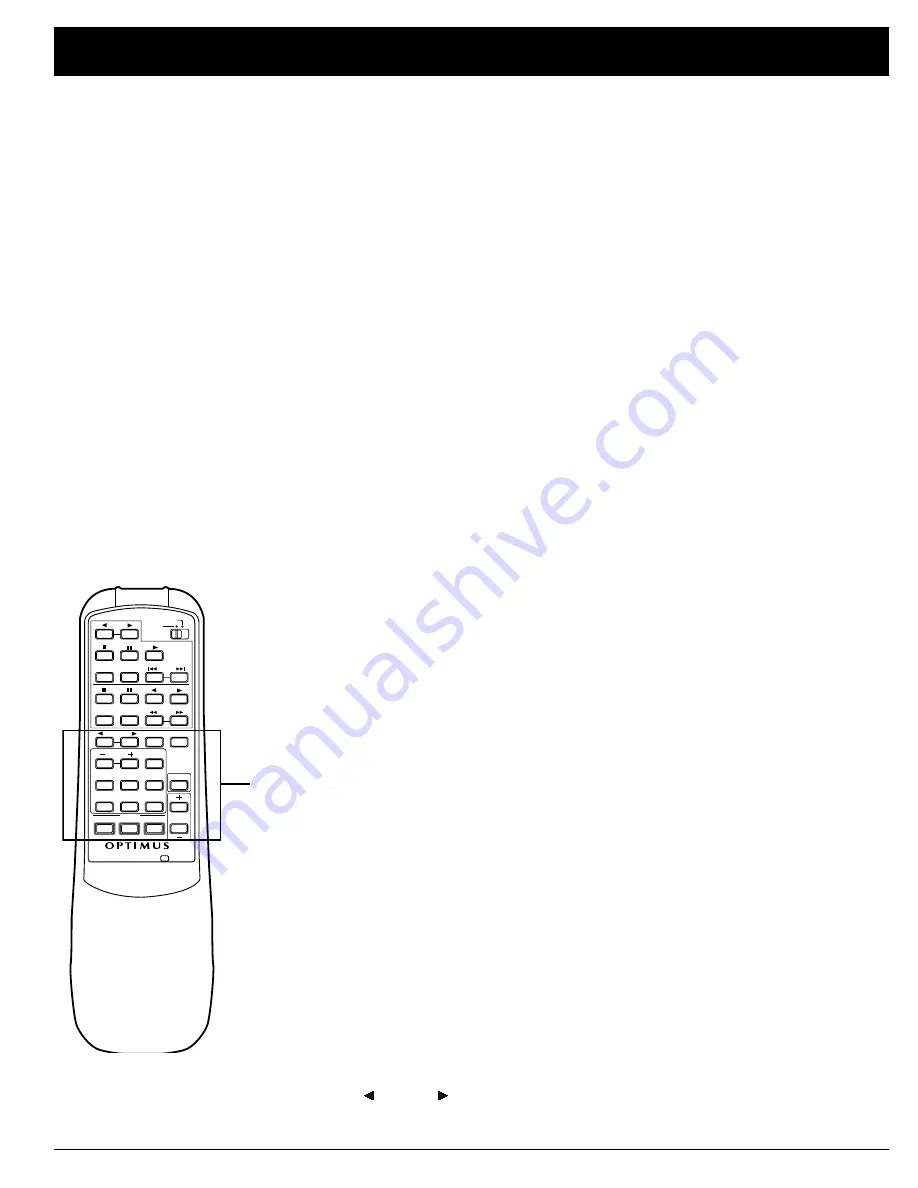
Receiver/Amplifier Section

+ MASTER VOLUME – 

Adjusts the system’s volume. See Page 14.

C. MODE

Selects among the four center mode settings with 

AUDIO

/

SURROUND

 set to 

SURROUND

. See Page 21.

TEST TONE

Sounds test tones from each speaker with 

AUDIO

/

SURROUND 

set to 

AUDIO

. See Page 21.

– 

Controls the relative volume of the center speaker with 

AU-

DIO

/

SURROUND 

set to 

AUDIO

. See Page 21.

– REAR +

Controls the relative volume of the rear speakers with 

AUDIO

/

SURROUND 

set to 

SURROUND

. See Page 21.

SFC MODE

Selects between Studio Effect or Arena Effect, or turns the 
SFC mode off. See Page 20.

5-D THEATER

Selects between 5-D Pro Logic or 5-D Surround, or turns the 
5-D function off. See Page 20.

PRO LOGIC

Turns the Dolby Pro Logic Surround on and off. See Page 20.

LOUD.

Boosts/cuts high and low frequency sounds at low listening 
levels. See Page 15. 

TAPE 2 MONITOR

Switches the receiver to monitor the source connected to the 

TAPE 2 MONITOR

 jacks. See Page 18.

FUNCTION

Selects a program source (VCR/Tape 1, DVD/TV, LD/SAT, 
CD, tuner, or phono). Repeatedly press 

FUNCTION

 until the 

display shows your desired program source. See Page 14.

RECEIVER POWER

Turns the receiver on and off. See Page 14.

MUTING

Silences the receiver. Press again to restore the sound to its 
previous level. See Page 15.

CLASS

Selects the receiver’s memory class with 

AUDIO/SURROUND


set to 

AUDIO

. See Page 16.

FM MONO

Selects the FM reception mode with 

AUDIO/SURROUND

 set to 

AUDIO

. See Page 17.

 STATION 

Press to tune to the next higher or lower memory location 
with 

AUDIO/SURROUND

 set to 

AUDIO

. See Page 16.

CD

SURROUND

ASMS

TAPE

POEWR

RECEIVER

CD

TAPE

MASTER
VOLUME

RANDOM

DISC

BEST

AUDIO

DECK1

DECK2

STATION

FM MONO

FUNCTION

REAR

CENTER

LEVEL

CLASS

TAPE2

MONITOR

PRO

LOGIC

MUTINTG

C.MODE

TEST

TONE

STAV-3680 AUDIO/VIDEO

   SYSTEM REMOTE       

OSR

LOUD

5-D

THEATER

SFC

MODE

Ρεχειϖερ/

Αµπλιφιερ

Σεχτιον

Summary of Contents for 31-3039

Page 1: ...MODE DOLBY PRO LOGIC 5 D THEATER LOUDNESS VCR TAPE 1 TAPE 2 MONITOR DVD TV LD SAT CD TUNER PHONO VOLUME MAX MIN MULTI JOG SELECT CLASS FM MONO RETURN BALANCE TREBLE BASS SPEAKERS MEMORY FM AM ENTER R...

Page 2: ...ivers the very low fre quency bass sounds bringing out the richness and depth of music plus the full impact of motion picture special effects for sound you can actually feel Tape Monitoring Lets you l...

Page 3: ...eration and protect from overheating Do not block or cover these open ings and do not place the product on a bed sofa rug or other similar surface Do not place the product in a built in bookcase or ra...

Page 4: ...ntrol 16 Muting the Receiver 16 Using Headphones 16 Tuning the Radio 17 Using FM Mono 18 Cassette Deck VCR Features 19 Using the VCR TAPE 1 and TAPE 2 Monitor Buttons 19 Recording a Program Source 19...

Page 5: ...in the middle of the sound Most speakers have a tweeter dispersion angle of about 60 degrees Ideally your listening position should be just inside the overlap area of the tweeter dis persion You can...

Page 6: ...is leave the IMPED ANCE SELECTOR switch set to 8W 16W SPEAKER If your speaker system has 6W impedance set the switch to 6 16 SPEAKER Follow these guidelines when you select and connect speakers Be sur...

Page 7: ...t speaker s positive terminal 4 Connect the remaining loose conductor to the right speaker s negative terminal Repeat Steps 1 through 4 to connect the left speaker to the receiver s left FRONT SPEAKER...

Page 8: ...l s output power you can connect an amplifier to the CENTER jack Then connect the center channel speaker to the amplifier Your receiver includes a line level subwoofer output Connecting a subwoofer to...

Page 9: ...APE 2 OUT REC jacks You can connect a third cassette deck for playback only to the LD SAT IN au dio jacks Connecting a CD Player To connect a CD player to the receiver connect the CD player s left and...

Page 10: ...the DVD TV IN jacks Connect the source s video output to the receiver s DVD TV VIDEO IN jack and the source s au dio outputs to the receiver s DVD TV IN audio jacks Connecting a Video Monitor The moni...

Page 11: ...computer or a TV set If the wire between your AM loop antenna and receiver is too short you can add extra wire available at your local RadioShack store You can also use a RadioShack shortwave antenna...

Page 12: ...de Connect the center wire to the receiver s FM UNBAL 75 terminal Twist the shielding to secure any loose wire strands and connect it to the ground terminal Note Grounding is not necessary for recepti...

Page 13: ...he CONTROL OUT and CONTROL IN connections as shown Installing the Remote Control s Batteries The remote control uses two AA batteries not included For the longest battery life we recommend alkaline ba...

Page 14: ...0W MAX 0 8A MAX CAUTION SEE INSTRUCT MANUAL 6 16 8 16 SPEAKER SPEAKER CAUTION SPEAKER IMPEADANCE 8 16 SPEAKER IMPEDANCE SELECTOR CENTER PRE OUT AC OUTLET MAFUFACTURED UNDER LICENSE FROM DOLBY LABORATO...

Page 15: ...isplay To listen to a source other than one connected to TAPE 2 MONITOR be sure TAPE 2 does not show on the display If necessary press TAPE 2 MONI TOR so TAPE 2 disappears Then press VCR TAPE 1 DVD TV...

Page 16: ...l press LOUDNESS LOUD on the remote control so LOUDNESS ap pears on the display Press LOUDNESS again to turn off this feature Muting the Receiver To temporarily mute the sound press MUTING on the remo...

Page 17: ...select the station you want to store If desired press FM MONO for FM monaural sound see Using FM Mono on Page 18 This setting is also stored in memory 3 Press MEMORY MEMORY appears for 5 seconds 4 Wh...

Page 18: ...ppears from the display STEREO appears on the display when the tuner receives an FM broad cast in stereo You can improve the reception of weak FM stations by pressing FM MONO so MONO appears This redu...

Page 19: ...TOR when the cassette deck is neither playing nor recording the receiver mutes the current audio source To hear the audio source press TAPE 2 MONITOR so TAPE 2 disappears from the display Do not press...

Page 20: ...view the program on that monitor Copying a Video Cassette Tape Follow these steps to copy a video tape from one VCR to another 1 Load the tape you want to copy into a VCR connected to LD SAT 2 Load a...

Page 21: ...ou are really there You can find hun dreds of movies television shows and compact discs produced with Dolby Surround Dolby 3CH Logic Dolby 3CH Logic produces a more spacious sound field than is possib...

Page 22: ...des a test tone that lets you balance the signal levels between all your speakers See Center Level and Rear Level To activate the test tone select one of the surround sound modes except PHANTOM and se...

Page 23: ...REAR Controls the relative volume of the rear speakers with AUDIO SURROUND set to SURROUND See Page 21 SFC MODE Selects between Studio Effect or Arena Effect or turns the SFC mode off See Page 20 5 D...

Page 24: ...tracks later Tape Section Before operation Select the desired equipment VCR TAPE 1 or TAPE 2 MONITOR Set AUDIO SURROUND to AUDIO For a dual cassette deck select DECK 1 or DECK 2 If you use a single ca...

Page 25: ...when you select a video source The selected video source is not set correctly Correct the problem with the selected video source Incorrect connections Correct the connections High noise level Station...

Page 26: ...of electronic devices damage batteries and distort or melt plastic parts Keep the receiver away from dust and dirt which can cause premature wear of parts Wipe the receiver with a damp cloth occasiona...

Page 27: ...receiver If the interference goes away your receiver is causing it Try to eliminate the interference by Moving your radio or TV away from the receiver Connecting your receiver to an outlet that is on...

Page 28: ...hono Overload Level 0 1 THD 1 kHz 100 mV Frequency Response Phono 20 Hz to 20 000 Hz 0 3 dB CD LD VCR TAPE 1 TAPE 2 Monitor 5 Hz to 100 000 Hz 0 3 dB Output Level Impedance VCR TAPE 1 REC Tape 2 Monit...

Page 29: ...dB 1 kHz Frequency Response 30 Hz to 15 kHz 1 dB Antenna Input 75 Ohms Unbalanced AM Tuner Frequency Range 530 to 1700 kHz Sensitivity IHF Loop Antenna 350 V m Selectivity 25 dB Signal to Noise Ratio...

Page 30: ...ption for the buttons on the remote control see Using the Remote Control on Page 23 Control See Page 5 D THEATER 21 BALANCE 16 BASS 15 CD 15 CLASS 17 DOLBY PRO LOGIC 21 DVD TV 15 FM AM 17 FM MONO 18 L...

Page 31: ...31 Notes...

Page 32: ...f a product defect during the warranty period take the product and the RadioShack sales receipt as proof of purchase date to any RadioShack store RadioShack will at its option un less otherwise provid...

Reviews: