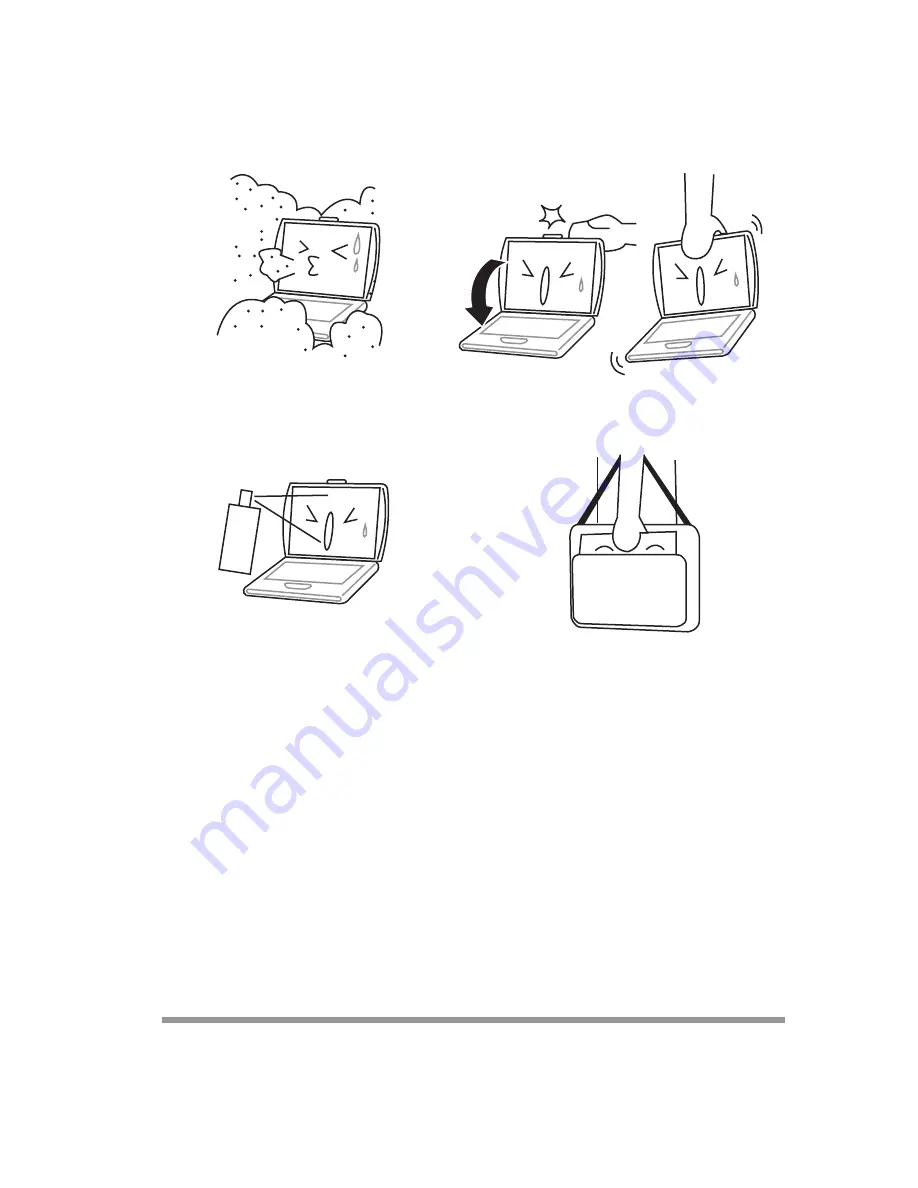
background image

7

DO NOT

 expose to dust and/or corrosive chemicals.

DO NOT

 slam your notebook shut and never pick up

or hold your notebook by the display.

DO NOT

 spray water or any other cleaning fluids

directly on the display.

If you are traveling with your computer, remember to
carry it as hand luggage. Do not check it in as bag-
gage.

Summary of Contents for Centoris G200N

Page 1: ...G200N SERIES NOTEBOOK PC USER S GUIDE March 2004...

Page 2: ...2 Thispageisintentionallyleftblank...

Page 3: ...wer Sources 17 2 2 Display Panel 20 2 3 Starting Your Notebook PC 22 2 4 Status Display Indicators 24 2 5 Using the Keyboard 27 2 6 Volume Control 29 2 7 Power Management 30 3 USING YOUR NOTEBOOK PC 3...

Page 4: ...4 Thispageisintentionallyleftblank...

Page 5: ...makesureyoudon t blocktheopeningspro videdforventilation DONOTplaceordropobjectsonthecomputerand DONOTapplyheavypressureonit DONOTsubjectthecomputertomagneticfields DONOTplaceonunevenorunstableworksur...

Page 6: ...t DONOTtamperwiththebatteries Keepthemaway fromchildren DONOTexposetodirectsunlight DONOTuseorstoreinextremetemperatures Avoidsuddenchangesintemperatureorhumidityby keepingitawayfromA Candheatingvents...

Page 7: ...echemicals DONOTslamyournotebookshutandneverpickup orholdyournotebookbythedisplay DONOTspraywateroranyothercleaningfluids directlyonthedisplay Ifyouaretravelingwithyourcomputer rememberto carryitashan...

Page 8: ...8 Thispageisintentionallyleftblank...

Page 9: ...ry pre installed AC adapter withAC power cord Phone Modem RJ 11 telephone cable DriverandApplicationsCD UserGuide thisdocument Dependingupontheconfigurationofyournotebook youmayalsoneedthefollowing it...

Page 10: ...the display backwards being careful not to touch the screen until it is at a comfortableviewingangle 1 2 2 TOP AND FRONT COMPONENTS The following is a brief description of your notebook s top and fro...

Page 11: ...k activity without powering off resume your notebook from suspend mode and power on your notebook when it has been shut down from Win dows See Suspend Resume Power On Button in 2 3 1 Power On for more...

Page 12: ...Card Slot allows you to install one Type II or Type III PC Card Memory Card Reader The memory card reader offers the fastest and most convenient method to transfer pictures music and data between you...

Page 13: ...cal drive allows you to play back a media disc See 3 2 OpticalDrive for more information Optical Drive Eject Button The OpticalDrive Eject Button allows you to open the optical drive tray to remove or...

Page 14: ...ternal Lithium ion battery PS 2 Port The PS 2 port allows you to connect an external PS 2 keyboard mouse or numeric keypad IEEE 1394 Port The 1394 port is used to connect between your and a peripheral...

Page 15: ...igurationlabelshowsthemodelnumberandotherinformationaboutyour notebook Inaddition theconfigurationportionofthelabelhastheserialnumberand manufacturerinformationthatyouwillneedtogiveyoursupportrepresen...

Page 16: ...of the battery when stored over a long period of time or for swapping a dis charged battery with a charged Lithium ion battery See 2 1 3 Replacing the Battery for more information Memory Compartment T...

Page 17: ...DAPTERS TheAC adapter provides power for operating your notebook PC and charging the batteries Connecting the AC Adapter 1 Plug theDC output cable into theDC power jack of your notebook PC 2 Plug theA...

Page 18: ...There is no guarantee that your data will be saved once the notebook reaches thispoint To protect your notebook PC from damage use only the power adapter that came with the notebook PC because each p...

Page 19: ...nect theAC adapter 3 Slidethebatteryreleaselatchwhilepullingthebatteryfromthebay 4 Remove the battery from the bay 5 Slidethenewbatteryintothebay Thepinswillautomaticallyalignwiththeconnec tor 6 Press...

Page 20: ...instopresolutionthroughtheuseofactive matrixtechnology 2 2 1 OPENING THE DISPLAY PANEL 1 Slide the latch located at the top of the display panel to the right This releases the lockingmechanismandraise...

Page 21: ...lowalevelas possible Keyboard Adjustingthebrightnessusingthekeyboardchangesthesettingonlytemporarily FN F6 Pressingrepeatedlywilllowerthebrightnessofyourdisplay FN F7 Pressingrepeatedlywillincreasethe...

Page 22: ...2 Suspend Mode for more information or turn it off directly See 2 7 6 Power Off for more information Do not carry your notebook around with the power on or subject it to shocks or vibration as you ris...

Page 23: ...on the power to your notebook You restart your notebook from the Windows ShutDown dialog box Thesoftwareinitiatesasystemrestart Example Whenyouinstallanewapplication 2 3 3 BIOS SETUP UTILITY The BIOS...

Page 24: ...tebook s operating mode Steady On This means that there is power to your notebook and that it is ready for use Flashing ThismeansthatyournotebookisinSuspendmode SteadyOff notvisible Thismeansthatyours...

Page 25: ...dicatorwillflashperiodi callywhenyoursystemischeckingtheopticaldrivedrive IftheAutoInsertNotification functionisnotactive theindicatorwillonlyflashwhenyouaccesstheopticaldrive drive The default settin...

Page 26: ...rnalnumericalkeypad pressing the NumLk keywillactivatetheexternalkeypad Theindicator willcomeon howeveritwillnotchangeanyofthefunctionalityof your keyboard keys 2 4 7 CAPSLOCK INDICATOR The CapsLock i...

Page 27: ...wingkeys Numerickeypad Cursor keys Functionkeys Windowskeys 2 5 1 NUMERIC KEYPAD Certain keys on the keyboard perform dual functions as both standard character keys and numeric keypad keys NumLk can b...

Page 28: ...se keys are used The FN key provides extended functions for the notebook and is always used in conjunctionwithanotherkey FN F3 Pressing F3 while holding FN will toggle theAudio Mute on and off FN F5 P...

Page 29: ...ntrolledinseveraldifferentways Volume can be set from within theVolume Control on theTaskbar Volume can be controlled with the F8 and F9 functions keys Pressing F8 repeatedlywhileholding Fn willdecrea...

Page 30: ...andnotflashing yournotebookisfullyoperational Ifthe indicatorisbothvisibleandflashing yournotebookisinSuspendmode Iftheindicator is not visible at all the power is off or your notebook is in Hibernati...

Page 31: ...tab Select the box to enableor disable this feature Using the Hibernation Feature 1 From the Start menu select Settings then select Control Panel 2 From the Control Panel selectPower Options 3 Select...

Page 32: ...FF Before turning off the power by choosingShutDownfromWindows check that the HardDrive optical drive drive PC Card and FloppyDiskDriveAccess indicators are all Off If you turn off the power while acc...

Page 33: ...crolling button The cursor control works the same way a mouse does and moves the cursor around the display It onlyrequireslightpressurewiththetipofyourfinger Theleftandrightbuttonsfunction thesameasmo...

Page 34: ...2 DOUBLE CLICKING Double clickingmeanspushingandreleasingtheleftbuttontwiceinrapidsuccession This procedure does not function with the right button To double click move the cursor to the item you wish...

Page 35: ...the Touchpad First tap theTouchpad twice over the item you wish to move making sure to leave your finger on the pad after the final tap Next move the object to its new locationbymovingyourfingeracros...

Page 36: ...36 3 Using Your Notebook PC Thispageisintentionallyleftblank...

Page 37: ...advantage of the features of aDVDmovie as well as standard features such as fast forward fast reverse pause etc DVD CD RW Model only In addition to theDVDcapabilities noted above with this optical dri...

Page 38: ...these steps 1 Push and release the eject button on the front of the optical drive drive to open the holder tray The tray will come out of the notebook PC a short distance 2 Gently pull the tray out u...

Page 39: ...icalDrive Eject button it may be necessary to use the emergency tray release button 3 2 5 USING THE OPTICAL DRIVE SOFTWARE Dependinguponitsconfiguration yoursystemmaynothavethe opticaldrivesoftwarepre...

Page 40: ...vailableintheDVDplayersoftware Media discs which do not have theDolby Surround 5 1 symbol willnotsupportDolbyHeadphone After making changes to theDolby Headphone feature and clicking OK wait at least...

Page 41: ...ed to swap in an additional charged battery or attachACpowerduringthemovietoviewitinitsentirety Anadditionalfully chargedbatteryishighlyrecommendedifyou willbewatchingDVDmoviesonbatterypower To Watch...

Page 42: ...nsertNotificationfunction followtheseeasysteps 1 Save all data and close all open applications 2 From the Start menu select Settings and then select Control Panel 3 Double click theSystem icon This wi...

Page 43: ...d slot To install a PC Card s follow these easy steps Installing or removing a PC Card s during your notebook PC s shutdown or bootup process may damage the card and or your notebook PC Do not insert...

Page 44: ...ng a card Please review your operating systemmanual for the correct procedure If the dialog box states that the device cannot be removed you must save all of your open files close any open application...

Page 45: ...andremovingthememoryupgrademodule 3 4 1 INSTALLING A MEMORY UPGRADE MODULE Toinstallamemoryupgrademodulefollowthesesteps Youmustturnoffpowerbeforeinstallingthememoryupgrade module 1 Turn off power to...

Page 46: ...lessyouwanttoincreasesystemmemory capacity 3 4 2 REMOVING A MEMORY UPGRADE MODULE 1 Perform steps 1 through 4 of 3 4 1 Installing a Memory Upgrade Module 2 Pull the clips sideways away from each side...

Page 47: ...47 3 Using Your Notebook PC...

Page 48: ...h 2 Allow the system to start booting and press the F2 key once the flash screen appears on the screen This will open the main menu of the BIOS setup with the current settings displayed See 2 3 3 BIOS...

Page 49: ...eAC power source 3 Make sure that any card installed in the PC Card slot is seated properly You can alsoremovethecardfromtheslot thuseliminatingitasapossiblecause offailure 4 Make sure that any device...

Page 50: ...50 Appendix Any error messages that have occurred Hardwareconfiguration Type of device connected if any SeetheConfigurationLabelonthebottomofyournotebookforconfigurationandserial numbers...

Page 51: ...IEEE 1394 2Audio jacks Microphone in Speaker out 1 external monitor port MiniD sub 15 pin for external monitor 5 USB ports v2 0 1 RJ11 connector for Modem 1 RJ45 connector for Ethernet 1 PS 2 port 1DC...

Page 52: ...bps 1Mbps Transmit output power 16 7dBm Voltage 3 3V IEEE 802 11b g standard technology 124 pin SO DIMM edge connector 2 4GHz support Data rate up to 11Mbps 5 5Mbps 2Mbps 1Mbps for 802 11b Data rate u...

Reviews: