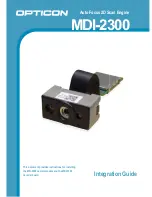
Opticon MDI-2300 Integration Manual Download Page 8

MDI-2300 

Integration Guide 


3. Installation   


z

  When installing a camera module, use the crew holes on the bottom surface. 

z

  Do not screw down further than the specified depth. 

z

  When installing a camera module, only the bottom surface of the camera module should be 

attached to a chassis for installation.  

z

  Keep enough clearance to avoid damage to the camera module in case the host device is 

dropped and damaged.  

z

  Shock / impact resistance of the camera module to the acceleration applied via the bottom 

surface is guaranteed. In case of direct shock, the camera module will almost certainly be 
damaged since it consists of precise optical elements. 

z

  Use the mounting hole with screw clamp to install the decoder board.  

z

  The size of the screw head must not exceed the diameter of the mounting land (

φ

3.8). 

 
Installation conditions - camera module side: 


Recommended screw 

: M2x0.4 (depth max 2.7) 

Tightening torque   

: 12N_cm or less 

Do not screw down further than 3.3mm from the mounting surface of the camera module. 
 
Installation conditions - decoder board side: 


Recommended screw 

: M2 (Do not use a countersunk screw) 

Tightening torque   

: 12N_cm or less 


4. EMC measures 

From a regulatory point of view this device is considered to be a component. Therefore 
requirements of EMC directive 89/336/EEC do not apply. To the end product in which this 
module will be incorporated this directive is however applicable.  

In order to achieve compliance to EN 55022 (class B ITE equipment) following measured are 
recommended for integration: 

z

  Apply a metal chassis as ground plane to mount-on both the camera module and the 

decoder board. 

z

  Apply two ferrite cores on the flat-cable between camera module and decoder board (see 

picture below).  


Recommended type ferrite cores: Murata FSSA101005RNN00S 


Summary of Contents for MDI-2300

Page 1: ...Auto Focus 2D Scan Engine MDI 2300 This document provides instructions for installing the MSI 2300 camera module and the MDI 2300 decoder board Integration Guide ...

Page 2: ...at are defective in materials or workmanship with proper use during the warranty period Opticon is not liable for damages caused by modifications made by a customer In such cases standard repair charges will apply If a product is returned under warranty and no defect is found standard repair charges will apply Opticon assumes no liability for any direct indirect consequential or incidental damages...

Page 3: ...ecification No SS10031 Product name MDI 2300 Edition Date Page Section Description of Changes 1st 2010 08 10 Initial release 2nd 2010 11 01 13 7 3 FPC Added the description Do not bend here to the drawing 3rd 2011 12 15 8 4 EMC measures Section added ...

Page 4: ...acement 5 3 Installation 8 4 EMC measures 8 5 Cable Specifications 9 5 1 Connection between Camera Module and Decoder Board 9 5 2 Connection between Decoder Board and Host System 10 6 Handling Requirements 11 7 Mechanical Drawings 12 7 1 Camera Module 12 7 2 Decoder Board 13 7 3 FPC 13 ...

Page 5: ... mm thick and have an anti reflective AR coating applied to both sides of the exit window z It is recommended to apply an anti scratch coating to the surface of the exit window to protect it from scratches during operation z Hard coated acrylic plates are readily available Such a coating greatly enhances anti scratch properties without degrading the optical characteristics of the acrylic material ...

Page 6: ...9 5 20 25 25 30 30 25 25 When installing the exit window most closely to the scan engine take the following range including the tolerance L 1 6 θcw and θccw 6 deg The Maximum exit window inclination is up to 40 degrees in both directions θcw and θccw Image eclipse caused by insufficient exit window size and LED illumination entering the central part due to improper angle settings should be checked...

Page 7: ...uide 7 z Window size and optical path clearance With respect to the optical path depicted below provide an exit window with sufficient clearance Install the window with sufficient clearance for FOV Illumination Laser Aiming ...

Page 8: ... the mounting land φ3 8 Installation conditions camera module side Recommended screw M2x0 4 depth max 2 7 Tightening torque 12N_cm or less Do not screw down further than 3 3mm from the mounting surface of the camera module Installation conditions decoder board side Recommended screw M2 Do not use a countersunk screw Tightening torque 12N_cm or less 4 EMC measures From a regulatory point of view th...

Page 9: ... Decoder Board Recommended Connector Camera module side HIROSE FH29B 34S 0 2SHW 05 Decoder board side HIROSE FH35 33S 0 3SH Note These drawings are subject to change For details please obtain the most recent drawings from the connector manufacturer Hirose Camera module side Decoder board side ...

Page 10: ...MDI 2300 Integration Guide 10 5 2 Connection between Decoder Board and Host System Recommended connector HIROSE FH19SC 17S 0 5SH 17 pin Recommended cable length 70mm max ...

Page 11: ...discharge Hold the scan engine only by the metal case Do not touch the circuit board or the front side of the scan engine when handling it Do not touch the electronic components or the terminals on the circuit board Installation in a clean environment is recommended in order to protect the imaging lens from dust Operators should wear gloves to avoid contaminating the optical elements Do not drop t...

Page 12: ...MDI 2300 Integration Guide 12 7 Mechanical Drawings 7 1 Camera Module ...

Page 13: ...MDI 2300 Integration Guide 13 7 2 Decoder Board 7 3 FPC ...

Reviews: