Opticon IRU 4100 User Manual Download Page 20

20 - OPTICON   PHL4100/IRU4100

4 READING BAR CODES

TAKE CARE OF THE 'HANDLING 
INSTRUCTIONS' AND 'GET STARTED' 
PRECAUTIONS.

Instructions

• The scanning sequence is defined by the user’s 

application. A typical sequence is described 
below:

• Press the [PW] key to turn power on.

Check the display for the message: READ BAR 
CODE
Point the terminal to the bar code and press the 
trigger key. 

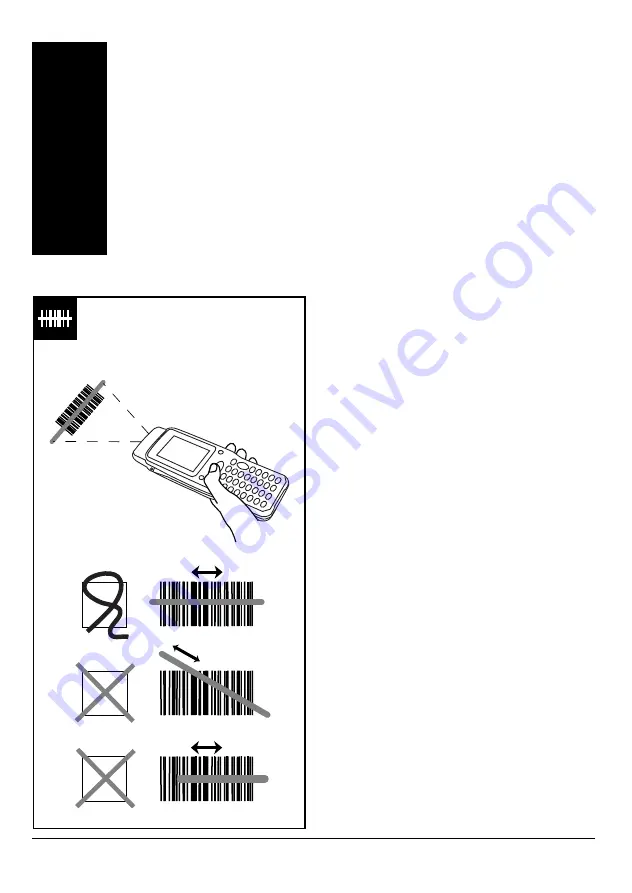
• Fit the bar code in the laser beam from margin to 

margin and pass the scanner to the bar code, as 
shown in the scan position illustration.

• The bar code will be read and the reading results 

will be indicated.

A "Good Read" means that the scanner has 
effectively recognised and decoded the bar code. 
In most cases, the application program will provide 
an indicator signal or a buzzer signal to indicate a 
good read to the user.

The bar code collector is a Class I laser product 
conforming to the strictest laser safety standards. 
However, we recommend that you avoid looking 
directly into the laser beam emitter, or pointing the 
laser beam directly into someone's eyes.

Barcode reading problems

When the barcode can not be read, try the 
following:
• Check that the width of the bar code label does 

not exceed the width of the light beam.

• Change the angle between the bar code and the 

product.

• Change the distance between the bar code and 

the product.

4

X

X

X

X

X

X

Summary of Contents for IRU 4100

Page 1: ...PHL4100 IRU4100 OPTICON 1 PHL 4100 IRU 4100 USER S MANUAL Opticon Article Code O0220000140...

Page 2: ...case the standard repair charge will be applicable The standard charge for repair will also be applicable in cases where no defect is found at all These rules also apply for products that are still u...

Page 3: ...5 How to re place main battery in terminal 14 2 2 6 When to replace backup battery 15 2 2 7 How to re place backup battery 15 2 3 Working with stylus 16 2 4 Using a PCMCIA card 17 2 4 1 Insert PCMCIA...

Page 4: ...rated laser scanner for barcode scanning For communication the terminal is provided with an IrDA and a PCMCIA interface By inserting the appropriate PC card in the PCMCIA slot the terminal can exchang...

Page 5: ...please contact your supplier PHL 4100 contents Terminal A Hand strap B Rechargeable battery LBP 4100 C Backup battery D PHL 4100 accessories Rechargeable battery LBP 4300 E Battery cover for LBP 4300...

Page 6: ...ing status of communication 4 Touch screen LCD Display Operate by stylus to tap through menus Take notice of the following Contrast of LCD Display To increase contrast of display press FN To decrease...

Page 7: ...CLR Cancel input Back space FN define by user application scroll up backwards scroll down forward EN Enter to confirm input Each character key has 3 appearances in combination with the Modus M key ALP...

Page 8: ...ost through Opticon RS232 cable 3 Electrical contacts If the PHL4100 terminal is inserted the battery will automatically be charged 4 Optical window Optical communication interface for data transmissi...

Page 9: ...place any objects on top of the terminal Do not lay the terminal face down Doing so can cause accidental operation of the key s C Use of the products Use the terminal always with the cap mounted in o...

Page 10: ...first Read instructions in this manual If required Insert PCMCIA card For PCMCIA data exchange the appropriate card needs to be inserted Read instructions in this manual Place the cradle in normal off...

Page 11: ...ns Fix the small thin cord of the strap around the pillar of the terminal ref 1 Insert the handle cord of the strap into the thin loop ref 2 TO AVOID DROP HOLD THE HAND STRAP AROUND THE WRIST WHEN CAR...

Page 12: ...he rechargeable Opticon battery as supplied with the terminal The main battery can be a standard type LBP 4100 or a larger type with more capacity LBP 4300 See also product ordering information In thi...

Page 13: ...be charged The charging procedure is fully automated Charging in IRU 4100 cradle Place the cradle in normal office conditions Make sure the power supply is connected to the cradle The battery needs to...

Page 14: ...FICIENT CAPACITY TO AVOID DATA LOSS Unlock main battery case cover ref 1 Unlock the case cover by use of a coin by turning the latch screw a quarter counter clockwise Remove old battery by simply taki...

Page 15: ...minal faced down The adapter is now positioned on the right side Loosen the 2 screws of the adapter by use of a small crosshead screwdriver or swatch screwdriver Slide the adapter to the outside Remov...

Page 16: ...terminal face up the stylus is located at the right lower corner Release stylus ref 1 Hold your fingernail in the saving of the stylus Pull the stylus outwards with some force Storing stylus The stylu...

Page 17: ...PCMCIA connector into the terminal When a small card is inserted gently push with the stylus to connect into the slot Place cap Place the cap back on the terminal Fix the cap by screwing the two cap...

Page 18: ...able is used take notice of the pin out specifications further in this manual Start Switch off the power supply of the host computer Choose proper place ref 1 Place the cradle in normal office conditi...

Page 19: ...oring the terminal Make sure all data is safely stored If you have data stored on the terminal make sure the data is transmitted to the host system Remove main battery Remove backup battery Keep the c...

Page 20: ...ill be indicated A Good Read means that the scanner has effectively recognised and decoded the bar code In most cases the application program will provide an indicator signal or a buzzer signal to ind...

Page 21: ...T DO NOT CHANGE PIN OUT OF CABLES AS SUPPLIED FROM OPTICON RS232 cable pin out Serial plug DB 9 M Signal DB 9 M Serial plug DB 9 F Signal DB 9 F 3 TxD 2 RxD 2 RxD 3 TxD 6 1 DSR 4 DTR 5 GND 5 GND 4 DTR...

Page 22: ...e product clean Are the bar code labels damaged Check if the error also occurs with other bar code labels Product does not operate Check if the battery requires charging Check if the power key respond...

Page 23: ...rminal The type of the bar code label is not enabled If applicable enable the bar code symbology in the application program The error occurs consistently with a certain batch of labels Verify the barc...

Page 24: ...the LED should turn red If the cradle LED is red and the battery is not properly charged clean the charging contacts of the charger The terminal application uses a lot of power Depending on the type...

Page 25: ...IP 54 Display 240 x 160 Pixels touchscreen Main battery pack Li Ion Pack 1cell UF 1011 7V 1700mAh Backup battery Lithium CR2032 Light source 650 nm visible laser diode Scan rate 100 scans sec Decode r...

Page 26: ...2 supported by cradle Interface IrDA supported on terminal Interface PCMCIA PCMCIA 16 Bit Wireless LAN Cisco Aironet 350 series 2 4 GHz Spread Spectrum Wi Fi IEEE 802 11b GSM GPRS Option Globetrotter...

Page 27: ...55022 EN 55024 Voltage requirement 6 V DC Battery charging time automatically determined Parity Odd Even None Stop bit 1 or 2 Interface RS232 supported Transmission speed baud rate 2400 115200 bps Tr...

Page 28: ...evelopment kit DEVELOPMENT KIT FOR PHL4100 D0000000040 Product description Article name Article code Charger for 1 battery of PHL 4100 4300 CHARGER PHL4100 PHL4300 X1 OC100000010 Power supply for char...

Reviews: