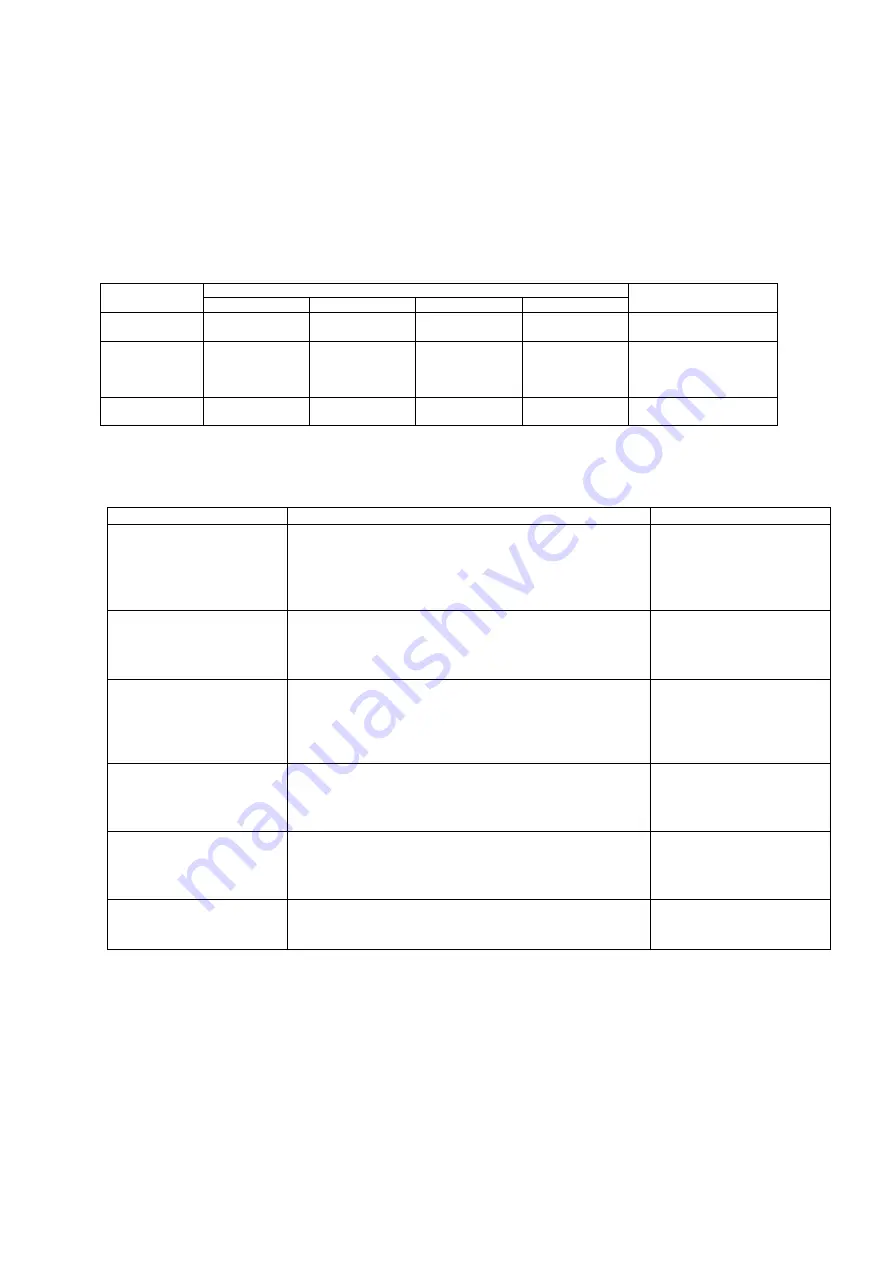
opticis HDWX-10-TR User Manual Download Page 15

- 15 - 


5GHz Wi-Fi Channels 


Because of wireless signal regulations, HDWX-100-TR is managed by two different firmwares 

according to the shipment locations (US version and Europe version).   

- US Version: US, Korea and others. 

- Europe Version: Europe, Japan, and others. 


Troubleshooting 


Problem 

Solution 

Causes 

No video on the display 

- Wait several seconds for the system booting. After the power is 

applied, Power status and Wireless status LED will turn on 
(Blue).     

- Check the connection of all cables.   
- Reset the power of all TX and RXs by re-plugging the power 

adaptor. 

Cables are connected 
incorrectly. 

  "Wi-Fi time out" or "Off" 
message on the display 

- Check the environment of your room and re-plug the power 

adaptor.   

- Check the distance between RX and TX and avoid a metallic 

obstacle. 

- Check and retry connections in the GUI connectivity menu.     

A failure of wireless network 
and/or necessity of pairing 
between TX and RX. 

Video quality:   

- Freezing or collapse 
- Mosaic pattern 
- Jitter 

- Check network connectivity. 
- Check the distance between RX and TX, and avoid a metalic 

obstacle. 

- Change the position of antennas. 
- Change wireless channel. Follow instructions in this user 

manual (Step 4-2). 

Network connectivity issues 
Wireless channel interference 

After changing source 
resolution, no video on display 

- Wait several seconds for the EDID negotiation. 

It takes several seconds for 
the EDID negotiation between 
display and source. 

Abnormal operation occurs in 
playing audio/video or USB 
KVM. 

- Reset the power of all TXs and RXs again by re-plugging the 

power adaptor. 


After changing input source, 
the video clip does not play. 

- Execute window media player again. 


Band 

Available Channels 

DFS (US &Japan) 

US 

Europe 

JAPAN 

Korea 

Band A 

(5150~5250) 

36,40,44,48 

36,40,44,48 

36,40,44,48 

36,40,44,48 


Band B 

(5250~5725) 

52,56,60,64,100,
104,108,112,116

,132,136 

52,56,60,64,100,
104,108,112,116
,120,124,128132

,136 

52,56,60,64,100,
104,108,112,116

,120,124,128,13

2,136 

52,56,60,64,100,
104,108,112,116

,120,128 

52,56,60,64,100,104,108

,112,116,132,136 


Band C 

(5725~5875) 

149,153,157,161 

NA 


149,153,157,161 


Summary of Contents for HDWX-10-TR

Page 1: ...1 Wireless HDMI Extender HDWX 100 TR User s Manual Doc No OE HW130903 Rev1 2 WWW OPTICIS COM Ver 1 2...

Page 2: ...oup 3 Supporting Resolutions 3 Applications 4 Systems Requirements for Setup 4 Installation 5 LED Indication 6 SW Factory Reset 6 GUI Setting 6 Product Specifications 14 5GHz Wi Fi Channels 15 Trouble...

Page 3: ...e via transmitter module HDWX 100 T if it is connected to the source by USB interface The HDWX 100 TR supports the digital video data of full HD up to 1920x1080p at 60Hz and 7 1ch surround audio and t...

Page 4: ...nnected No special requirements for memory size CPU speed and chipsets if you ve already properly installed your HDMI graphic controllers or cards Software requirements No special restrictions if you...

Page 5: ...onnect HDWX 100 T to the HDMI source by supplied HDMI cable Step 3 Turn on the HDMI source and display Step 4 Option for remote keyboard and mouse control Connect mini USB port in HDWX 100 T to USB po...

Page 6: ...the Factory setting press and hold the Reset switch on the front side until the LED is turned off after blinking approx 10sec Note If the number of TXs information is more than 10 please delete inform...

Page 7: ...nking during connection between transmitter and receiver press PBC button in transmitter and button in receiver within 60sec 2 Access to GUI MENU Press and hold the M button for 2 3sec to enter GUI me...

Page 8: ...pleted Note When the connection is completed it exits from GUI menu automatically Step 3 1 2 PBC method for connectivity If user want to use PBC method for connectivity user can setup in General setti...

Page 9: ...sec If user press M button all the transmitter information will be deleted In order to connect new transmitter execute the Step 3 1 1 or 3 1 2 again To exit from GUI menu press and hold M button for 2...

Page 10: ...o select it Then press Complete to save the name To exit from GUI menu press and hold M button for 2 3sec To return to the previous page press and hold button for 2 3sec Step 4 General Setting menu Pr...

Page 11: ...heater mode or Game mode Game mode has lower latency than Theater mode To exit from GUI menu press and hold M button for 2 3sec To move to next menu press and hold button Step 4 2 Select Wi Fi Channel...

Page 12: ...PBC button on the TX side for pairing To exit from GUI menu press and hold M button for 2 3sec To move to next menu press and hold button Step 5 System Info menu Press and hold the M button for 2 3sec...

Page 13: ...Signal Strength and System Information as below Step 5 1 User can monitor the current Signal Strength of the receiver as below Step 5 2 User can check the information of transmitter and receiver such...

Page 14: ...of Sight up to 80meters NLOS up to 30meters typically 20meters Indoor Multi cast up to 1 4 Video streaming from 1 transmitter to 4 receivers at 1080p 60 simultaneously KVM function extends PC control...

Page 15: ...or collapse Mosaic pattern Jitter Check network connectivity Check the distance between RX and TX and avoid a metalic obstacle Change the position of antennas Change wireless channel Follow instructio...

Page 16: ...red on or integrated with any products returned to Opticis for repair under warranty or not Warranty Limitation and Exclusion Opticis shall have no further obligation under the foregoing limited warra...

Page 17: ...rated in a residential installation This equipment generates uses and can radiate radio frequency energy and if not installed and used in accordance with the instruction guide may cause harmful interf...

Page 18: ...s Tower Jeongja 331 8 Sungnam daero Bundang gu Sungnam si Gyunggi do 463 782 South Korea Te l 82 31 719 8033 Fax 82 31 719 8032 www opticis com tosales opticis com For order support please contact you...

Reviews: