Optibox tscx pvr ready User Manual Download Page 15

Guide  of  Main  Menu

-   

60 

  -

-    61    -

Guide  of  Main  Menu

3.3  Recording  Option 

Recording  Stop  Message

  : 


Set  ‘On’

  :  When  you  press 

STOP

  button  in  recording,  confirm  window  is 

                                    displayed. 


Set  ‘Off’

  :  When  you  press 

STOP

  button  in  recording,  STB  will  stop 

                                          recording  immediately  with  no  message. 

Time  Shift(USB)

  : 

You  can  adjust  the  time  such  as  30  Min  /  60  Min  /  120  Min  /  150  Min  /  180  Min. 

In  this  case,  time  shifting  function  works  automatically  up  to  time  you  set,  if 

external  USB  device  have  enough  space.  If  you  set ‘off’ this  option,  time  shifting  function  never  works. 

5. 

Service  List

5

.

1

  Service  List  Manager

q


Lock  Services  : 


All  service  lists  will  be  shown  on  left  side  of  window,  right  side  will 

          show  make  service  to  be  lock.  By  using 

ARROW

  and 

OK

  button  you 

          may  move  the  chosen  service  to  right  side  window  to  lock  service. 

Service  List  Manager  menu  will  be  appeared  when  press 

OK

  button. 

You  can  select  Edit  Mode  by  press 

YELLOW

  button.

w


Move  Services  :


All  Service  Lists  will  be  shown  on  left  window,  Service  Lists  for  moving 


will  be  shown  on  right  Window.  Move  the  Service  to  Right  window  by 


using 

ARROW 

and 

OK

  button,  then  right  window  services  will  be  moved 


to  related  location  when  select  desired  location  from  the  left  window.

e


Delete  Services  : 


All  service  lists  will  be  shown  on  left  side  of  window.  By  using 

ARROW


          and 

OK

  button  you  may  select  services  to  be  delete.  And  press 

GREEN


          button  to  delete  the  selected  services.

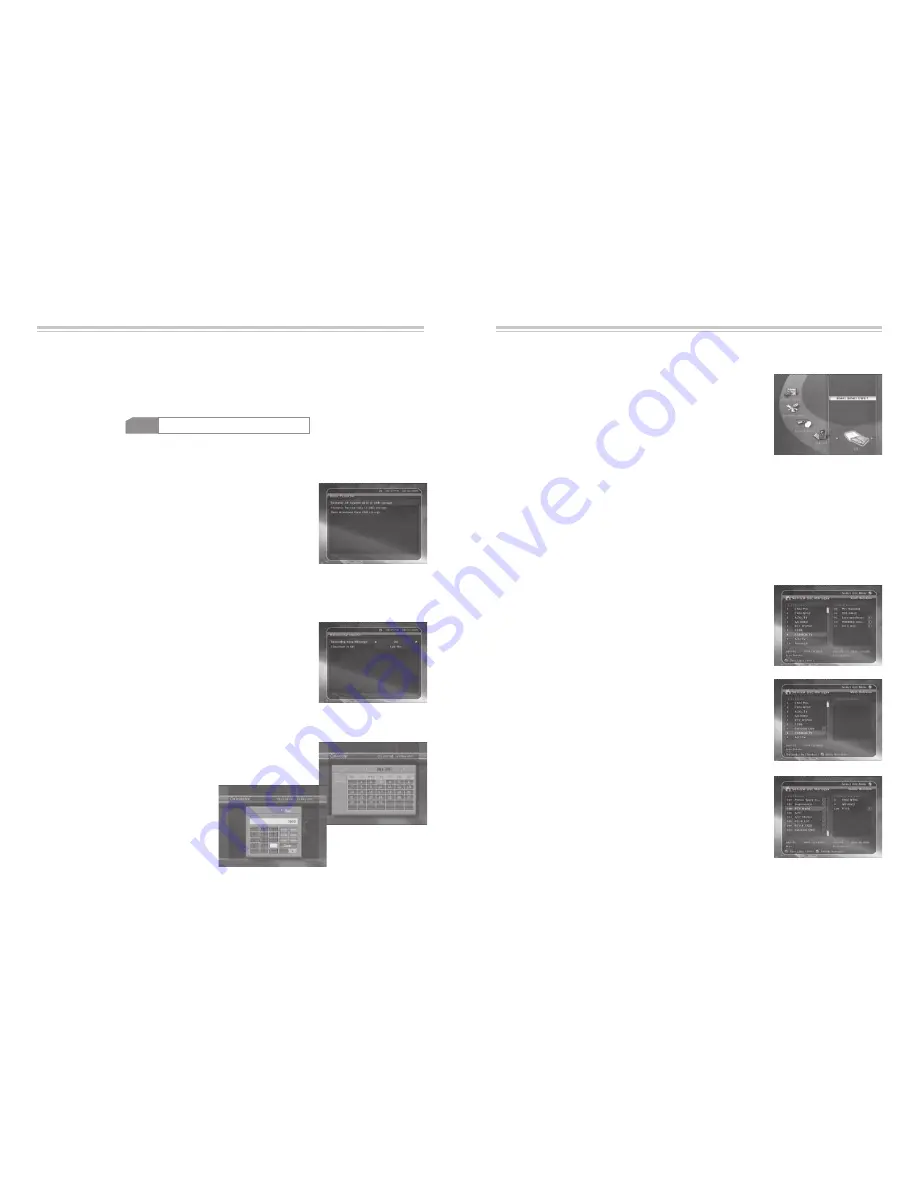
4.2  Smart  card  information

You  can  view  the  current  status  of  smart  card.

Select  the  slot  what  you  want  to  view  using 

ARROW

  buttons.  And  press 

OK

  button.

4. 

CA

4.

1

  Conax  smart  card  menu

To  watch  scrambled  services,  you  need  to  have  a  appropriate  Conax 

smart  card  from  the  service  providers.  Insert  a  valid  smart  card  into 

smart  card  slot.    The  message  of  ‘Smart  card  Initializing…’  will  appear 

on  the  screen.  After  message  disappear,  you  can  watch  the  service 

you  want. 


w


Transfer  Service  data  to  USB  storage  : 

          If  you  want  to  use  service  data  in  the  future,  this  menu  allows  you  to 

          store  current  service  data.  Press

  OK

  button  to  store  current  service 

          data  to  external  USB  storage.

e


Data  download  from  USB  storage  :


          This  menu  allows  you  to  download  the  stored  data  from  external  USB 

          storage.  Press 

OK

  button  to  download  data.

3.2  Data  Transfer

q


Transfer  all  System  data  to  USB  storage  :


          If  you  want  to  use  system  parameters  and  service  data  in  the  future, 

          this  menu  allows  you  to  store  current  state.  Press 

OK

  button  to  store 

          current  state  to  external  USB  storage.

3.4  Calendar

To  display  calendar,  press 

OK 

button.  Utilize 

ARROW

  buttons  to  choose 

the  date,  button 

UP/DOWN

  will  switch  from  past/next  month.

3.5  Calculator

To  use  a  calculator,  press 

OK

  button.

Format(USB)

  : 


Before  you  use  your  USB  external  device,  we  recommend  for  you  to  format  it  by  Format(USB)  menu

.


NOTE

If  you  execute  format,  all  data  will  be  deleted.

r


Playlist  :   


Press  the  OK  button  to  activate  the  Play  List  screen.  (Refer  to  Playback) 

Summary of Contents for tscx pvr ready

Page 1: ...eti csatorna TV Standard Beállított csatorna 75Ω IEC 169 2 Male Female 470 860MHz CH 21 69 Remodulátorhoz PAL G I K menüben beállítható CH 36 vagy TBD Menüben változtatható szoftver Előlap Nyílás Vezérlés Kijelző 1 USB Host nyílás 1 Smart Card nyílás 7 Gomb VFD Vacuum Fluorescent Display Méretek Méret Sz x M x M Súly Netó Működési hőmérséklet Tárolási hőmérséklet 340mm X 60mm X 230mm 1 6Kg 0 C 45 ...

Page 2: ...enna 2 Receiver to TV with RF 3 Receiver to TV and VCR 4 Receiver to Digital Audio Equipment Guide of Functions 47 1 Select Service 2 Information Window 3 Multi Picture Display 4 Electronic Program Guide EPG 5 Satellite List 6 Favorite Group 7 Volume Control 8 PAUSE 9 Sub Title 10 Audio Track 11 Time shifting Recording and Playback Guide of Main Menu 54 1 Configuration 2 Installation 3 Utilities 4...

Page 3: ...ed for long periods of time Refer all servicing to qualified service personnel Servicing is required when the apparatus has been damaged in any way such as power supply cord or plug is damaged liquid has been spilled or objects have fallen into the apparatus the apparatus has been exposed to rain or moisture does not operate normally or has been dropped WARNING TO PREVENT FIRE OR SHOCK HAZARD DO N...

Page 4: ......

Page 5: ...B USB HDD AUDIO VIDEO 2 POWER Button Press to switch between STANDBY and POWER ON modes 5 CH Up Down Button Press to change services in normal mode to move the highlighted bar UP DOWN in menu mode 3 MENU Button Press to enter the main menu or to move to the previous menu 4 OK Button Press to display the service list in non menu mode and to select an item or confirm in menu mode 6 VOL Up Down Butto...

Page 6: ...to the next or previous page if more than one page are available PAGE UP key is also used as hot key to move to Timer Manager menu Refer to 1 2 Timer Manager And PAGE DOWN key is also used as hot key to move to Picture Adjust window Refer to 1 6 A V Output Setting 15 RECALL Moves to previous service 16 SAT To change the satellite groups 17 FAV To change the favorite groups 18 COLOR Keys Used for s...

Page 7: ... Connect the TV SCART to SCART of TV AUDIO R AUDIO L VIDEO SCART RF IN 1 Connecting to Antenna 1 Connect the aerial antenna cable to ANT IN 2 Connect the Satellite antenna cable to LNB IN Aerial ANTENNA SATELLITE Antenna 3 Receiver to TV and VCR RF OUT RF IN 1 Connect antenna cable to receiver refer to above section 1 Connecting to Antenna SCART SCART 2 Connect the RF OUT to RF IN of VCR 3 Connect...

Page 8: ...u know the service number enter the number directly using NUMERIC buttons 1 3 Using Service List To select the desired service in the service list you should firstly display the service list using OK button Use ARROW buttons to select a desired service and press OK button In the Service List window you can also use additional functions with COLOR buttons Press RED button you can sort the services ...

Page 9: ...gh the various satellites using the ARROW buttons and select the appropriate satellite by pressing OK 6 Favorite Group Select the FAV favorite button to view all favorite groups Scroll through the various favorite group using the ARROW buttons and select the appropriate satellite by pressing OK 7 Volume Control 1 To control audio volume while you are watching a service press LEFT RIGHT button to c...

Page 10: ...ernal memory When you set an event for recording in EPG It automatically set in theTimer Event in Main Menu Configuration Timer Manager w Instant Recording At anytime you may press RECORD button to start you recoding instantly e Recording Edit During recording you may press RECORD button to edit recording duration time As it defaulted to 2 hours but you may increase or decrease as you desire r Lon...

Page 11: ...STOP button during timeshift screen will be changed to live TV You may press PREV FILE button to move to start location in recorded time 11 3 Playback q Press the PLAY LIST button to activate the Play List screen w In Play List you may choose any of pre recorded event s and play it by pressing OK button e In Play List screen you may press RED button to choose the event you wish to view in order li...

Page 12: ...it NOTE The default PIN code is 0000 q Censorship Set the parental guidance rating of highlighted censorship classification The parental level is given as age based numbers w Change Pin code To change your PIN code input the new PIN code using NUMERIC buttons To verify the new PIN code input the new PIN code again e System Set the accessibility of system r Installation Set the accessibility of Ins...

Page 13: ... o 0 12v Select the 12v on off Press the LEFT RIGHT button to select the satellite Select the wanted satellite name If the desired satellite name is not listed then select User Defined Move To move the dish press LEFT RIGHT button Positioner Command To use various positioner command press OK button Then available positioner commands will appear Using DiSEqC 1 2 Move To move the dish press LEFT RIG...

Page 14: ...which is connected to external USB device automatically Rear Activate rear USB port In this case front USB port is not available w MP3 Player Stick the external USB memory into the provided USB port on front panel Once inserted press OK button to read external USB memory stick and choose the MP3 file from the window you want to play Press Info Button to show the ID3 tag information 2 4 Terrestrial...

Page 15: ... And press GREEN button to delete the selected services 4 2 Smart card information You can view the current status of smart card Select the slot what you want to view using ARROW buttons And press OK button 4 CA 4 1 Conax smart card menu To watch scrambled services you need to have a appropriate Conax smart card from the service providers Insert a valid smart card into smart card slot The message ...

Page 16: ... OK button Then you can see the virtual keyboard Using ARROW and OK buttons you can edit the service name 5 2 Service List Option q Service List Preview Setting ON If you change service using ARROW buttons and press OK in the Service List service will be played which you want But Service List still remains To remove Service List on screen press OK one more time Setting OFF If you change service an...

Page 17: ...ish realign dish if necessary Check the connection of Aerial or CATV line If you are using a DiSEqC 1 0 switch check that you have connected the LNBs to the correct connections on the switch Check the Signal Level and the Signal Quality Specifications Tuner Channel Decoder Satellite Input Connector Loop through out Frequency Range Input Impedance Signal Level LNB Power 22KHz Tone DISEqC Control De...

Page 18: ...cation Size W x H x D Weight Net Operating Temp Storage Temp 340mm X 60mm X 230mm 1 6 Kg 0 C 45 C 10 C 70 C Power Supply Input Voltage Type Power Consumption Standby Power Protection AC 100 250V 50 60Hz SMPS Max 25W Max 8W Separate Internal Fuse Lighting protection Audio Video Data IN OUT TV SCART VCR SCART RCA OPTIC RS 232C USB RGB CVBS Video Audio L R Output CVBS Video Audio L R Output RGB CVBS ...

Reviews: