background image

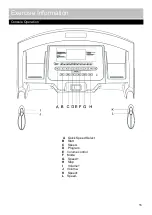
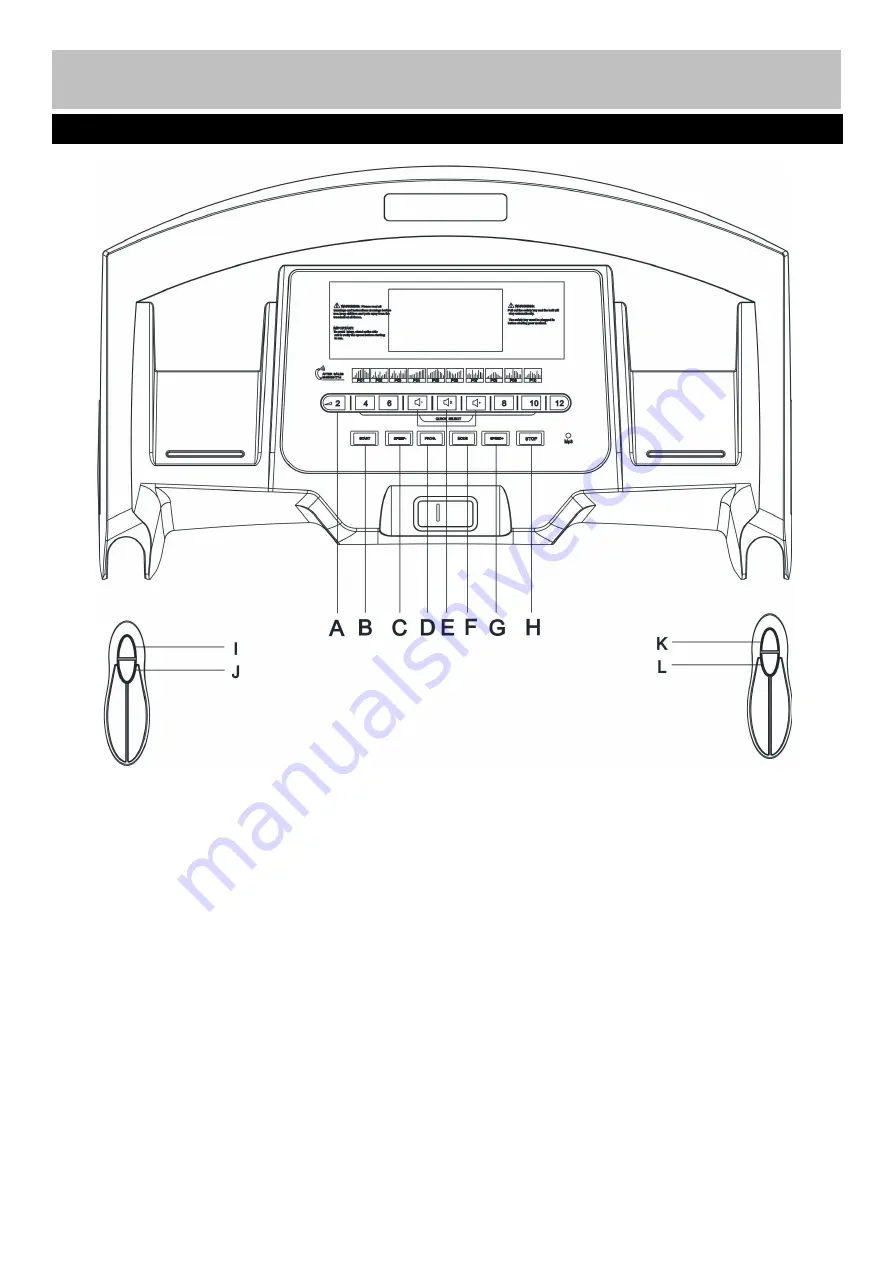
A

Quick Speed Select

B

Start

C

Speed-

D

Program

E

Volume control

F

Mode

G

Speed+

H

Stop

I

J

Volume-

K

Speed+

L

Speed-

Exercise Information

16

Front view of the Computer

Console Operation

Summary of Contents for 606/2334

Page 1: ... use Treadmill W Speaker These Instructions contain important information which will help you get best from your equipment and ensure safe and correct assembly use and maintenance If you need help or have damaged or missing parts call the Customer Helpline 0345 6001714 or visit www argos support co uk 606 2334 Issue 1 10 4 18 ...

Page 2: ...structions 6 9 Workout Area 10 Exercise Information 11 23 Before starting 11 Muscle Chart 12 Warming up and Cooling down 13 14 Getting Started 15 Console Operation 16 22 Folding mechanism and incline adjustment 23 Care and Maintenance 24 29 Exploded Parts Diagram 30 Parts List 31 32 1 ...

Page 3: ... the equipment only for intended use as described in this manual Do not use attachments not recommended by the manufacturer Keep this equipment indoors away from moisture and dust Do not put the equipment in a garage outbuilding covered patio or near water Your product is intended for use in clean dry conditions You should avoid storage in excessively cold or damp places as this may lead to corros...

Page 4: ...ne that you are comfortable with The treadmill is capable of high speeds Adjust the speed in small increments to avoid sudden changes in speed Never leave the treadmill unattended while it is running Always remove the safety key when the treadmill is not in use Always examine your treadmill before use to ensure all parts are in working order Never insert any object or body parts into any opening S...

Page 5: ...os regarding any missing components 4 Components Parts If you have damaged or missing parts please calll the Customer Service 0345 600 1714 Please check you have all parts listing below Lubricating Oil 57 Mp3 Link 45 Safety Key 4 3 Left Console Mast 4 Right Console Mast Main Frame Hardware pack 15 Console 52 Power cord ...

Page 6: ... hardware may be supplied than are required Some of the fixings are pre fitted to the larger components Please check carefully before contacting Argos regarding any missing fixings Components Fixings Please check you have all parts listing below Please check you have all parts listing below 5 ...

Page 7: ...Total mass of the product is 51 kg Total size of the equipment is width 73 cm depth 158 5 cm height 130 4 cm Assembly Instructions 6 ...

Page 8: ...inforcing Tube Step 1 a Befor you start assembly please remove the carton reinforcing tube as show in above diagram Note The screws removed from the reinforcing tube need to be used for assembly Please don t throw them away Reinforcing Tube ...

Page 9: ...t 3 4 to the Base Frame 1 using 6 x 50mm Allen Bolts 66 4 x 15mm Allen Bolts 68 10 x 8mm Spring Washers 87 and 10 x 8mm Washers 84 Note Please don t fastened the bolts above There should be a space of 2 3 mm left Assembly Instructions Step 2 4 3 66 87 84 Main wire Main wire 66 87 84 1 84 87 68 84 87 68 8 ...

Page 10: ...les b Fix each side of the Console to the two Console Mast 3 4 by using 4 x 15mm Allen Bolts 68 4 x 8mm Spring Washes 87 and 4 x8mm Washers 84 Note Please tightly fasten all the bolts including that in Step 1 9 Console C 3 4 Step 3 A A C Assembly Instructions B B 87 84 68 68 87 84 ...

Page 11: ... obstruction in case of an emergency Where two pieces of equipment are positioned adjacent to each other the free area may be shared The free area behind the treadmill should be 2m in length and double the width of the product Only one person should be within the training area when the equipment is in use Workout Area 10 ...

Page 12: ...evel can be found by using your heart rate as a guide For effective aerobic exercise your heart rate should be maintained at a level between 65 and 85 of your maximum heart rate as you exercise This is known as your target zone You can find your target zone in the table below 200 180 160 140 120 100 80 25 30 35 40 45 50 55 60 70 Age During the first few months of your exercise program keep your he...

Page 13: ...of and keep off the excess fat that our bodies can store weight training is an essential part of an exercise routine Weight training helps tone build and strengthen muscle If you are working above your target zone you may want to do a lower number of reps Targeted Muscle Groups The exercise routine that is performed on the treadmill will develop the lower body muscle groups These muscle groups are...

Page 14: ...ach week with at least one day of rest between workouts After a few months of regular exercise you may complete up to five workouts each week if desired Remember the key to success is to make exercise a regular and enjoyable part of your everyday life Toe touch stretch Stand with your knees bent slightly and slowly bend forward from your hips Allow your back and shoulders to relax as you reach dow...

Page 15: ...es Tendons and Ankles Quadriceps stretch With one hand against the wall for balance reach back and grasp one foot with your other hand Keeping your bent knee pointing directly downward towards the floor gently pull your heel towards your buttock until you feel a gentle stretch in the target area Hold for 15 counts and then relax Repeat 3 times for each leg Stretches Quadriceps and Hip muscles Sit ...

Page 16: ...mergency dismount hold the left or right handlebar then jump onto the side rail or the floor Plug in the mains power and turn on the switch 1 You will hear a signal tone and the screen of the Computer will light up OVER CURRENT PROTECTOR There is an over current protector 2 located on the right side of the switch 1 see above picture in case of short circuit or over current the Button of the over c...

Page 17: ...A Quick Speed Select B Start C Speed D Program E Volume control F Mode G Speed H Stop I Volume J Volume K Speed L Speed Exercise Information 16 Front view of the Computer Console Operation ...

Page 18: ...lly reducing the speed all display window will be cleaned to zero QUICK SPEED SELECT Press to select your desired running speed with 2 4 6 8 10 12km h SPEED UP DOWN Press to increase decrease exercise speed by 0 1km h Press to select training time under program workout model Press to choose the desired training target Time Distance Calorie under training target control workout model PROGRAME Press...

Page 19: ...lue of 0 Note If the Safety Key is not placed correctly or is faulty the Speed window will display E00 which indicates that the treadmill will not operate If the Safety Key falls off during exercise the console will give an audible signal and Speed window will display E00 and the treadmill will stop To stop the treadmill in an emergency simply pull the safety key off its mount in the console front...

Page 20: ...he treadmill will stop automatically when the Time window displays 0 00 TRAINING DISTANCE CONTROL WORKOUT MODEL 1 Turn on the treadmill press the Mode key two times and the DIS window flashes and displays 1 00 which is the pre set training distance of the treadmill 2 Press Speed Speed button to select your desired training distance the range is 0 50 99 9 3 Press Start button to start your workout ...

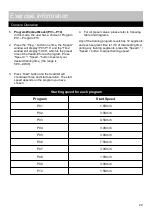
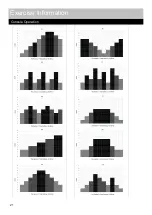
Page 21: ...he treadmill will countdown three and start operation The start speed depends on the program you have chosen 4 For all preset values please refer to following table and diagrams Any of the training program levels has 10 segments and each segment time is 1 10 of total setting time during any training segments press the Speed Speed button to adjust training speed Starting speed for each program Prog...

Page 22: ...Exercise Information Console Operation 21 ...

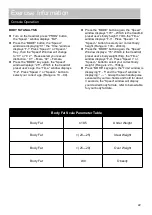
Page 23: ...y height 170cm the Time window displays F 3 Press Speed or Speed button to select your correct body height Range is 100 200cm Press the MODE button again the Speed Window displays 70 Which is the treadmill preset user s body weight 70kg the Time window displays F 4 Press Speed or Speed buttonto select your correct body weight Range is 20 150kg Press MODE key again the Time window is displaying F 5...

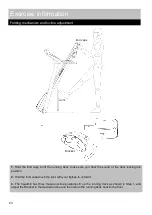
Page 24: ...the sound of the deck locking into position 2 Hold the End caps touch the joint with your tiptoes to unfold it 3 The treadmill has three manual incline positions Lift up the running deck as shown in Step 1 and adjust the Bracket to the desired incline and then return the running deck back to the floor End caps Joint Bracket 23 ...

Page 25: ...ny difficulty with assembly operation or use of your exercise product or if you think that you may have parts missing contact the manufacturer their approved service agent or the Customer Helpline 0345 600 1714 www argos support co uk Guarantee For guarantee purposes please retain your purchase receipt Care and Maintenance Information for Users on Disposal of old Equipment and Batteries European U...

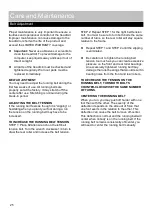
Page 26: ...Turn the wrench clockwise 1 4 turn to draw the rear roller and increase the belt tension STEP 2 Repeat STEP 1 for the right belt tension bolt You must be sure to turn both bolts the same number of turns so the rear roller will stay square relative to the frame Repeat STEP 1 and STEP 2 until the slipping is eliminated Be careful not to tighten the running belt tension too much as you can create exc...

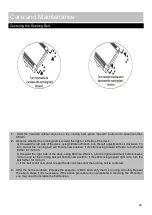
Page 27: ...rn the bolt further for 1 4 turn b If toward the right side of the deck using 6 Allen Wrench turn the right adjustment bolt clockwise 1 4 turn and let the running belt will find its new position if it s still moving toward right side turn the bolt further for 1 4 turn c If the belt is still not center repeat the above steps until the running belt is centered 3 After the belt is centered increase t...

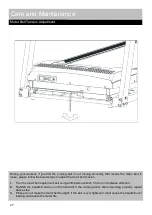
Page 28: ...otor belt adjustment bolt using an M8 Allen wrench 1 4 turn in clockwise direction 2 Re Start the treadmill and run on the treadmill if the running belt is still not working properly repeat above step 3 Please do not make the motor belt too tight if the belt is over tightened it will cause the treadmill over loading and reduce the motor life Motor Belt Tension Adjustment 27 Motor Belt Tension Adju...

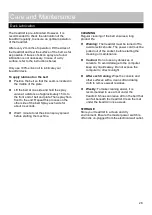
Page 29: ...e for about 4 seconds Wait 1 minute to let the silicon spray spread before starting the machine CLEANING Regular cleaning of the belt ensures a long product life Warning The treadmill must be turned off to avoid electric shocks The power cord must be pulled out of the socket before starting the cleaning or maintenance Caution Do not use any abrasives or solvents To avoid damage to the computer kee...

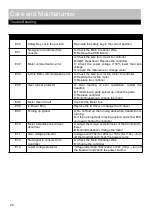
Page 30: ...rts C Replace controller D Motor breakdown change the motor E06 Motor Open Circuit Connect the Motor link E08 IC Driver Error Replace the IC driver or change the IC driver E09 Folding up protect A Do not fold up the running deck when treadmill in is running B If the running deck in laying position and show E09 you need change the contoller E10 Motor instantaneous current abnormal A Adjust the tors...

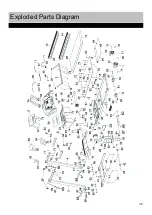
Page 31: ...Exploded Parts Diagram 30 ...

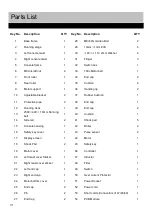
Page 32: ...ctive pipe 2 38 End cap 1 12 Running deck 1 39 End cap 2 13 2580 420 1 6mm Running belt 1 40 Cushion 1 14 Side rail 2 41 Shock pad 5 15 Console housing 1 42 Roller 2 16 Safety key cover 1 43 Pulse sensor 2 17 Display screen 1 44 Motor 1 18 Shock Pad 2 45 Safety key 1 19 Motor cover 1 46 Controller 1 20 Left mast cover Sticker 1 47 Inductor 1 21 Right mast cover sticker 1 48 Filter 1 22 Left end ca...

Page 33: ...5 Ф3mm Washer 2 64 M10 20mm Philips Screw 4 86 Ф10mm Spring Washer 4 65 M8 60mm Allen Bolt 4 87 Ф8mm Spring Washer 16 66 M8 75mm Allen Bolt 2 88 Safety key plug 1 67 M8 30mm Allen Bolt 1 89 Main wire Console MCB cables 1 68 M8 15mm Allen Bolt 8 90 M8 45mm Allen Bolt 1 69 M8 45mm Allen Bolt 1 91 M8 15mm Allen bolt 2 70 ST4 8 15mm Philips Screw 12 92 MP3 Module 1 71 ST4 8 15mm Dome Head Philips Scre...

Page 34: ... or consumable items The product must be correctly installed and operated in accordance with the instructions contained in this manual It must be used solely for domestic purpose The guarantee will rendered invalided if the products is re sold or has been damaged by inexpert repair Specifications are subject to change without notice The manufacturer disclaims any liability for the incidental or co...

Reviews: