background image


TCCS Plus


copyright © 2021 Operative Experience 

10001_B


   16 

All rights reserved


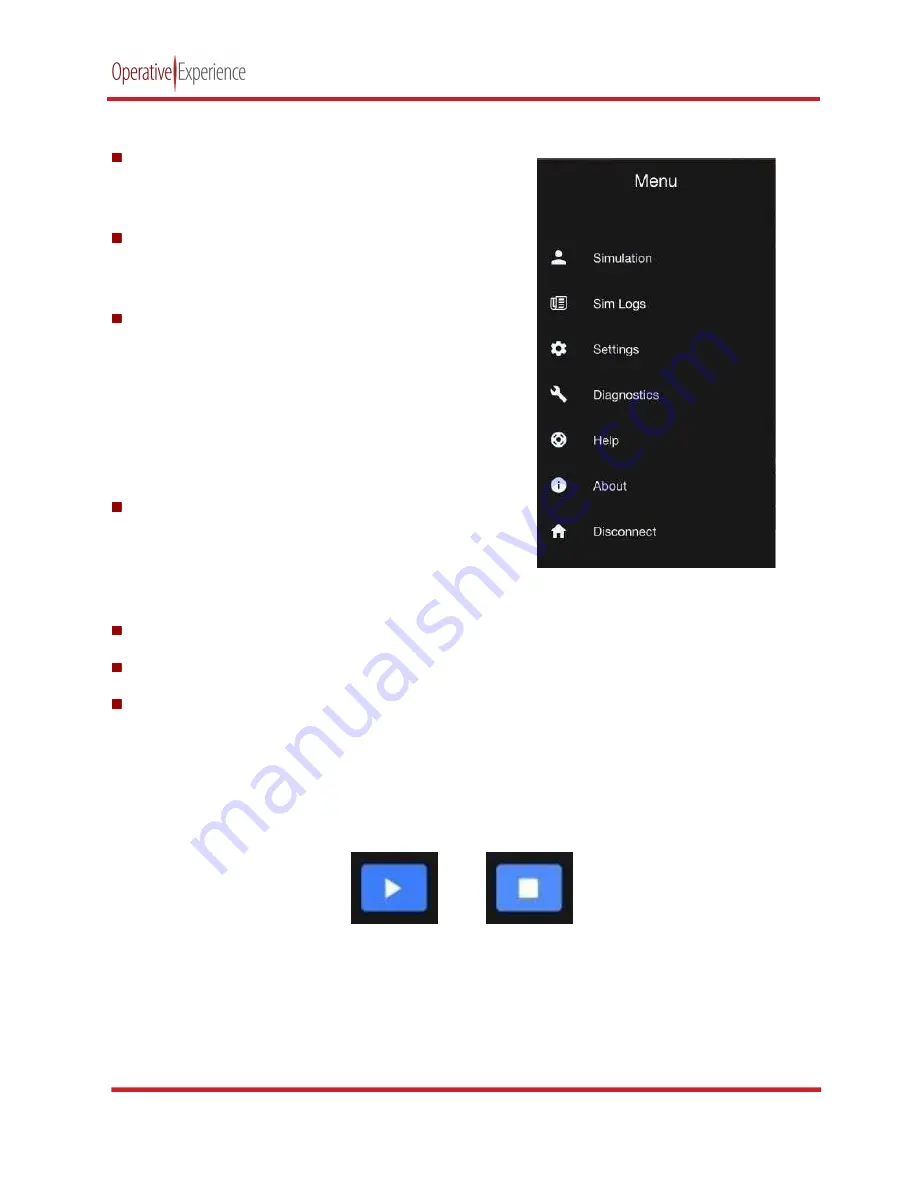
Selecting the 

Menu

 button opens the application menu with seven options related to system operation.  


The 

Simulation

 option is activated by default, giving 

the tablet operator control of the simulator and 
displaying the Main Screen. 


Selecting the 

Sim Logs

 option opens a page with a 

history of the simulation logs and the messages 
logged for each of these simulations. 


Choosing the

 Settings 

option displays a page with 

controls to set the 

App Color 

(Dark Mode or Non-

Dark), the Interface Type (Instructor of Medical 
Monitor), 

Bleeding


Location

, and the

 Language


(

English

 is selected by default). The 

Simulator 

Network Settings

 can be confured, and 

System 

Update 

files are also uploaded and installed from 

this page. 


Clicking the

 Diagnostics

 option opens a page with 

the basic 

Product Information

 as well as all 

System 

Diagnostics

. If necessary, the 

Shutdown Simulator


or 

Reboot Simulator

 functions can be initiated from 

this page. 


The 

Help

 option provides access to all the available user guides. 


The 

About

 option opens a page with the basic details of the system. 


The 

Disconnect 

option disconnects the application from control of the simulator. 

Navigation between these pages is available from the menu. For example, you can return to the Main 

Screen from the 

Settings

 page by selecting the 

Simulation

 option. 

To the right of the menu is the 

Play/Stop

 button. When you first activate the Tablet, the 

Play

 button is 

visible. Once you click 

Play

, the 

Stop

 button appears during the simulation. 


Figure 21: The Play and Stop Buttons


Clicking the 

Stop

 button stops the simulation. A warning box appears to verify that you wish the 

simulation to end. 


Figure 20: The Menu


Summary of Contents for TCCS Plus

Page 1: ...OEI Part Number 10001_B TCCS Plus Male and Female Trauma Simulators ...

Page 2: ...ut the written permission of the copyright owner Inquiries regarding permission for use of material contained in this documentation should be addressed to Operative Experience Inc 500 Principio Parkway West Suite 900 North East MD 21901 Phone 410 287 5748 E mail info operativeexperience com Disclaimer This documentation is provided as is without any express or implied warranty of any kind includin...

Page 3: ...shooting 3 Storage 3 Understanding Your Simulator 4 Common Features 4 Airways 4 Circulation 4 Hemorrhage Management 4 Breathing 4 Sounds 4 Medication and Vascular Access 4 Neurological 5 Appearance 5 Gender 5 Trauma Configurations 6 Connecting to the Simulator 7 Installing the OEI Sim Application 7 Connecting to the Simulator s WiFi Network 8 Opening the OEI Sim Application 8 Understanding the Wel...

Page 4: ... Logs 18 Modifying Settings 20 Examining Diagnostics 25 Viewing the About Page 28 Accessing Help 29 The Physiological Controls 30 Cardiovascular Parameters 31 Respiratory Parameters 35 Airway Parameters 38 The Eyes Panel 40 The Pulses Panel 40 The Bleeding Panel 41 The Temperature Control 42 Operating Your Simulator 43 Adding Blood to Your Simulator 43 Powering Your Simulator 44 Operating the Head...

Page 5: ...g Cleaning the Bleeding System 48 Replacing the Emergency Airway Neckband 48 Replacing the Sternal Insert 49 Replacing the Humeral Cap 49 Repairing the Skin 50 Charging Replacing the Battery Pack 52 Removing and Installing the Battery Pack 52 Charging the Battery Pack 52 Upgrading the Simulator s Firmware 53 Requirements 53 Procedure 53 Storing the Simulators 59 ...

Page 6: ...IONAL PANEL 15 FIGURE 20 THE MENU 16 FIGURE 21 THE PLAY AND STOP BUTTONS 16 FIGURE 22 CLOCK DISPLAYING TIME IN SIMULATION 17 FIGURE 23 BATTERY AND CHARGING STATUS ICONS AND PERCENTAGES 17 FIGURE 24 THE SIMULATION LOGS PAGE 18 FIGURE 25 SAMPLE SIMULATION LOG SHARED FILE 19 FIGURE 26 THE SETTINGS PAGE 20 FIGURE 27 DARK MODE UNCHECKED 21 FIGURE 28 A SAMPLE PAGE IN NON DARK MODE 21 FIGURE 29 THE CONTR...

Page 7: ...IGURE 63 MALE BLOOD PORT WITH PUMP 43 FIGURE 64 BLOOD INFUSION PORT FEMALE 43 FIGURE 65 THE HAND PUMP 43 FIGURE 66 POWER CORD 44 FIGURE 67 POWER CORD RECEPTACLE FEMALE 44 FIGURE 68 POWER CORD RECEPTABLE MALE 44 FIGURE 69 POWER CORD PLUG 44 FIGURE 70 THE HEADSET 45 FIGURE 71 THE SIMULATOR HARDWARE ERROR MESSAGE 46 FIGURE 72 THE SIMULATOR HIGH TEMPERATURE WARNING 46 FIGURE 73 THE EMERGENCY AIRWAY NE...

Page 8: ... 54 FIGURE 93 CLICK SETTINGS 54 FIGURE 94 CLICK THE CHOOSE FILES BUTTON 55 FIGURE 95 SEARCHING FOR A FILE MAC OS 55 FIGURE 96 SEARCHING FOR A FILE WINDOWS 55 FIGURE 97 CLICK APPLY UPDATE 56 FIGURE 98 CLICK OK ON THE CONNECTION ERROR MESSAGE 56 FIGURE 99 RECONNECTION SCREEN 56 FIGURE 100 OPEN THE MENU ON THE OEI SIM APP 57 FIGURE 101 SELECT ABOUT 57 FIGURE 102 VERIFY VERSIONS ON THE ABOUT PAGE 58 ...

Page 9: ...plus hours of battery life Product Components Each simulator comes with all the components needed to perform the associated trauma scenarios Case with Casters 1 Tablet 2 Tablet Case 2 Vent Plug Sets for washing 2 Li ion Polymer Battery Pack 18 5V 6400mAh 118Wh 2 Battery Charger 1 Concentrated Simulated Blood 1 Gallon 1 Hand Pump Canister 1 Neck Bands 3 White Tape for Crichotomy 1 Repair Kits 2 Ste...

Page 10: ... or legs The simulators are water resistant but not waterproof Use the vent plugs to protect the electronics when cleaning the simulators or when using them in the rain or in a wet area Because the ventilation openings are used to reduce the temperature on the electronics remove the plugs when working in a dry area Operating Conditions The simulator may not operate correctly in certain extreme con...

Page 11: ...ing or replacing the battery See Charging Replacing the Battery Pack below For minor tears in the skin see Repairing the Skin below Storage Simulators should be dry fluid free and without clothes during long term storage As stated above the storage temperature is from 14 to 140 25 to 60 and humidity needs to be less than 80 See Storing the Simulators below The blood flow system does not need to be...

Page 12: ...tibial and dorsalis pedis pulses Defibrillation cardioversion and pacing with iSimulate monitoring software Hemorrhage Management Remote controlled pulsative arterial hemorrhage Remote controlled venous bleeding Bleeding control via pressure elevation and pressure points Combat Application Tourniquets and junctional tourniquets Wound packing Multiple and independent bleeding sites Penetrating trau...

Page 13: ...s are designed for gender realism during physiologically based prolonged field care training Male Anatomically accurate male simulator is 76 inches high height 28 inches wide and 12 inches in diameter 192cm x 70cm x 30cm The male simulator weighs 185 pounds 82kg with a 5 variance Figure 2 The Female TCCS Plus Female Anatomically accurate female simulator is 65 inches high height 23 6 inches wide a...

Page 14: ...ide of the Back Axillary Wound Left Side Arterial Bleeding Amputation Bilateral Below the Knee Arterial Bleeding Wound Configuration 3 Gun Shot Wound GSW Right Side of the Chest Venous Bleeding Gun Shot Wound GSW Exit Left Side of the Back Inguinal Wound Right Side Arterial Bleeding Amputation Left Lower Arm Arterial Bleeding Amputation Left Below the Knee Arterial Bleeding Wound Configuration 4 2...

Page 15: ...re icon to go to the store s page You can also access the application by going directly to http appstore com oeisim ii Use the Search field i e the field with the magnifying glass and enter OEI Sim or Operative Experience as your search criteria iii Select the OEI APP and click Get iv Click Install b For most Android devices the Play Store is a default application on your screen i To download clic...

Page 16: ...ial number 3 Enter the password of oeiadmin Opening the OEI Sim Application After the wireless connection has been established open the OEI Sim application to access the Instructor Control Interface Click the shortcut icon for the simulator to open the OEI Sim application The software loads and the Welcome screen appears Understanding the Welcome Page The Welcome page displays all Available Simula...

Page 17: ... button in the Manual Simulator Connection panel and follow the directions provided above When running diagnostics or considering updates you ll want to identify the Tablet Version which is displayed in the panel on the left Establishing the Wireless Connection Manually If you need to configure the wireless connection or if the tablet s Wi Fi doesn t recognize the simulator network on the Welcome ...

Page 18: ...on 1 Disconnect the AC charger for remote operation by unscrewing and detaching the connector a Male i Unzip the flap on the inside of the left leg ii Remove the white cover revealing the connector iii Disconnect the AC charger b Female i Locate the power connector on the right shoulder ii Disconnect the AC charger 2 Power on the simulator a Male i Unzip the flap on the inside of the left leg ii R...

Page 19: ...5 Use the pump s handle to fill the blood reservoir on the simulator The simulator s reservoir holds the contents from one tank NOTE Be careful not to overfill and always remove the simulated blood before storing the simulator for its next use 6 Disconnect the pump 7 Connect to join the Simulator Network 8 Start the OEI App on the Instructor s Tablet 9 Once the simulator shows on the screen select...

Page 20: ...he simulator When practicing with the Emergency Airway use the insert with the open trachea rings and then place tape over them to simulate the cricothyroid membrane Additionally a replaceable multi use neck band enables the practice of performing surgical emergency airway procedures Each band should enable six to eight applications After each use rotate the band to move the incision site away fro...

Page 21: ...meral or sternal inserts become worn through several uses and the needle does not stick firmly due to multiple holes in close proximity the insert can be replaced See Replacing the Humeral Cap and Replacing the Sternal Insert below Hemorrhage Management The Bleeding control on the TCCS Plus can be used to simulate a variety of hemorrhage scenarios Remote controlled pulsative arterial hemorrhage Re...

Page 22: ...e is not a noticeable expulsion of air When the skin becomes dimpled from multiple punctures the skin can be repaired See Repairing the Skin below Sounds Multiple sounds on the TCCS Plus can be adjusted using the Sound controls and accurately auscultated Airway sounds No Sound Healthy Normal and Stridor Heart sounds Normal S3 S4 S3 S4 Early Systolic Murmur Mid Systolic Murmur Late Systolic Murmur ...

Page 23: ...w on the left and center allow you to set the various physiological features and the panel on the right displays an active log of the simulation The Operational Panel At the top of the main screen the uppermost panel displays the Menu button the Play Stop button a clock recording the time of the simulation as well as icons displaying the Audio status and the simulator s Battery and Charging status...

Page 24: ...stalled from this page Clicking the Diagnostics option opens a page with the basic Product Information as well as all System Diagnostics If necessary the Shutdown Simulator or Reboot Simulator functions can be initiated from this page The Help option provides access to all the available user guides The About option opens a page with the basic details of the system The Disconnect option disconnects...

Page 25: ...n the simulation ends by clicking the Stop button Figure 22 Clock Displaying Time in Simulation The simulator s available battery status and the charging status appear as percentages on the right hand side of the Operational Panel Both are indicated by the icon of a charging battery The simulator s battery status is to the left and charging status is on the right Figure 23 Battery and Charging Sta...

Page 26: ... intervention of Needle Decompression is recorded in the log as it is applied and registered by the sensors These logs are archived for future reference Selecting the Sim Logs option displays two columns with the archived logs appearing in the Simulation Sessions column Selecting a simulation session displays all the messages recorded for that session under Simulation Log Messages in the right col...

Page 27: ...Experience 10001_B 19 All rights reserved Clicking the Share icon to the right of the Simulation Log Messages header displays the messages in a format that can then be printed or saved as a PDF Figure 25 Sample Simulation Log Shared File ...

Page 28: ...r Bleeding View the configured Bleeding Locations on the list of Channels UI Locations These locations are available on the Bleeding panel for selection during the simulation Language Choose a Language Selection from the drop down menu English is selected by default Currently Spanish Chinese and Dutch are also available and more languages are to be added in future updates System Update locate and ...

Page 29: ...e screen appears with a black and dark grey background Unchecking this box changes the background to a non dark light colored and white background Correspondingly text for Dark Mode and Non Dark mode change to allow for contrast and readability Figure 27 Dark Mode Unchecked Figure 28 A Sample Page in Non Dark Mode Uncheck Dark Mode to have a light colored screen ...

Page 30: ...ect whether you wish to display the software on the Instructor tablet the default or on a Medical Monitor The Instructor interface is used to view and control the simulation When the Medical Monitor is selectedas the Interface Type only the patient s vital signs appear Figure 29 The Control Interface Type Options Figure 30 The Medical Monitor Display ...

Page 31: ...d for the selected simulator These locations are available on the Bleeding panel for selection during the simulation Selecting the Language In the Language panel use the drop down menu to select the language you want displayed on the screen by clicking the appropriate option button English is selected by default Figure 32 Selecting a Language Figure 31 Bleeding Locations ...

Page 32: ...Upgrading the Simulator s Firmware section Figure 33 Updating the System Managing the Wi Fi Network The Simulator Network Settings panel displays the Current Wi Fi Setting and provides a list of the available Wi Fi networks from which you can select an alternative network Figure 34 Simulator Network Settings To choose the different Wi Fi network use the Available Wi Fi List drop down menu to locat...

Page 33: ...s Product Information and shows your simulator s Product Type the firmware version used in running the system and the version of the software on the tablet Figure 36 The Diagnostics Page The lower panel displays the System Diagnostics In addition to displaying the Simulator Temperature additional systems are shown with their operational status in a scrollable window Properly functioning systems di...

Page 34: ...ht 2021 Operative Experience 10001_B 26 All rights reserved Figure 37 System Diagnostics When a system is not functioning properly a Failed status appears to its right Figure 38 System Diagnostics Showing System Failure ...

Page 35: ...e simulator or in some cases reboot the simulator to reset the systems Figure 39 Shutdown Simulator and Reboot Simulator Buttons Clicking the Shutdown Simulator or Reboot Simulator button opens a message box requesting your verification of the shutdown or reboot Figure 40 Reboot Simulator Verification Message Click the Reboot Simulator or Shutdown Simulator button on the message to complete the ac...

Page 36: ...e Menu to open the About page which is comprised of two panels In addition to the OEI Mission Statement this page identifies your product and provides you with basic information about the versions of the software and firmware you re running as well as contact information for Operative Experience Figure 41 The About Page ...

Page 37: ... Operative Experience 10001_B 29 All rights reserved Accessing Help The Help page provides you with additional access to the available user guides Selecting a user guide opens the guide in a PDF viewer Figure 42 The Help Page ...

Page 38: ...nd center that provide the Physiological Controls Figure 43 The Physiological Controls These controls interact with the simulator to provide learners with the experience you establish for them by setting parameters for the different physiological systems When changes are made to the parameters these appear in the Simulation Logs panel The Physiological Controls ...

Page 39: ...re 44 The Cardiovascular Parameters Heart Rate Clicking the HR setting displays a slider bar enabling the heart rate to be adjusted from 0 to 220 The slider bar or the plus and minus buttons can be used to set the heart rate The heart rate changes automatically as you adjust the setting Figure 45 Setting Heart Rate Once the HR Control is closed the heart rate is changed during the simulation on th...

Page 40: ...s that can be used to set the Systolic and Diastolic pressures in the simulation The Systolic can be adjusted from 0 to 220 and the Diastolic can be adjusted from 0 to 180 using the slider bars or the plus and minus buttons Click Apply to affirm the Blood Pressure settings Figure 46 Setting Blood Pressure Click BP to set the Blood Pressure ...

Page 41: ...ult Figure 47 Setting the ECG Rhythm Available ECG Rhythms Sinus Rhythm Sinus Bradycardia Sinus Tachycardia 1st Degree AV Block Junctional Rhythm Acclelerated Junctional Rhythm Idioventricular Rhythm Accelerated Idioventricular Rhythm Supraventricular Tachycardia Monomorphic Ventricular Tachycardia A check appears beside the chosen rhythm and the rhythm changes in the simulation automatically when...

Page 42: ...k on the desired sound A check appears beside the chosen sound The Healthy heart sound is selected by default Figure 48 Setting the Heart Sound Available Heart Sounds Normal S3 S4 S3 S4 Early Systolic Murmur Mid Systolic Murmur Late Systolic Murmur Pan Systolic Murmur Late Diastolic Murmur Once the Heart Sound Control is closed the Heart Sound is changed during the simulation on the fly Click the ...

Page 43: ...Respiratory Rate Clicking the RR setting displays a slider bar enabling the Respiratory Rate to be adjusted from 0 to 60 breaths per minute The slider bar or the plus and minus buttons can be used to set the rate The respiratory rate changes automatically as you adjust the setting and close the popup Figure 50 Setting Respiratory Rate Once the Respiratory Rate Control is closed the Respiratory Rat...

Page 44: ...g Figure 51 Setting SpO2 Once the SpO2 Control is closed SpO2 is changed during the simulation on the fly Tension Pneumothorax To set a Tension Pneumothorax click the lung or lungs you want to affect The selected lung s are displayed in Red on the control Figure 52 Setting a Tension Pneumothorax Once the Tension Pneumothorax Control is closed Tension Pneumothorax is changed during the simulation o...

Page 45: ...tly From the list click on the desired sound A check appears beside the chosen sound Both lungs are set to a Healthy sound by default Figure 53 Setting Respiratory Sounds Available Respiratory Sounds selected independently for each lung No Sound Healthy Normal Wheeze Rhonchi Pleural Rub Crackles Once the Respiratory Sounds Control is closed Respiratory Sounds are changed during the simulation on t...

Page 46: ...trolled using the Airway panel s settings Figure 54 The Airway Parameters Swollen Tongue A Swollen Tongue can be toggled off and on using the setting under Airway When toggled On the switch displays as green Figure 55 Swollen Tongue Toggled to On Once the Swollen Tongue is toggled on the tongue hardens to inhibit intubation during the simulation on the fly ...

Page 47: ...desired sound A check appears beside the chosen sound and the sound changes in the simulation automatically when you make your selection The Healthy or normal sound is chosen for the Airway by default Figure 56 Setting Airway Sounds Available Airway Sounds No Sound Healthy Normal Stridor Once the Airway Sound Control is closed the Airway Sound is changed during the simulation on the fly Click the ...

Page 48: ...or off using the location sites found in the Pulses panel By default the sites are set to off Clicking a site turns it on and off Pulses are activated and deactivated independently or all fourteen pulse sites can be activated or deacatived using the All On or All Off buttons There are seven pulses whose sites appear bilaterally Carotid Radial Brachial Femoral Popliteal Dosalis Pedis Tibialis Pedis...

Page 49: ...ability of a bleeding site depends on the simulator so not all simulators have all sites Bleeding Site Type of Bleeding Simulator s Wound Face Neck Venous TCCS1 TCCS3 Right Side GSW Face Neck Venous TCCS3 Right Side Shrapnel Chest Venous TCCS1 TCCS3 Right Side GSW Chest Venous TCCS2 Left Side GSW Chest Arterial TCCS5 Open Tibial Fibular Fracture Arm Axillary Arterial TCCS2 TCCS3 Lower Left Arm Amp...

Page 50: ...l displays a slider bar enabling the patient s Temperature to be adjusted from 35 6 to 41 1 Celsius The slider bar or the plus and minus buttons can be used to set the Temperature which changes automatically as you adjust the setting Figure 61 The Temperature Control The temperature can be changed during the simulation on the fly ...

Page 51: ...ir on the hand pump with simulated blood 2 If the simulator has been in use stop all blood flow prior to infusing or a pressure lock may occur and the blood hose coupling will not engage 3 Attach the blood fill hose by snapping onto the blood fill port on the simulator located on the left side of the chest for the Male or on the right shoulder for the Female Be sure the hose nozzle is free of debr...

Page 52: ... threaded cylinder to hold the power cord in place Note that the power connection on the Female simulator is located on the right shoulder and on the male simulator the connection is located beside the battery compartment in the right thigh The simulator must be powered by either a battery or the power cord to operate During a simulation if a battery is running low on power a second charged batter...

Page 53: ...he diagnostics used to prepare the simulator 2 Connect the hand held pump filled with blood to the port on the right side of the simulator and infuse the blood using the steps described in Adding Blood to Your Simulator above 3 Power on the tablet 4 Connect the tablet to the simulator s Wi Fi see Connecting to the Simulator above 5 Start the OEI App on the Instructor s Tablet 6 Press Play to begin...

Page 54: ...l Click Yes on the verification message to complete the process Figure 71 The Simulator Hardware Error Message You can also power off the simulator by holding the Simulator Power Button for four 4 seconds before turning the simulator back on If you receive a Simulator High Temperature Warning shut down the simulator immediately by clicking the Shutdown Simulator button or by holding the Simulator ...

Page 55: ...ong term storage 1 Turn the simulator on by holding down the power button for approximately two seconds or until the blue light comes on 2 Activate the tablet and connect to the simulator 3 Using the tablet turn all bleeding sites to On to activate the blood flow until the bleeding stops Flushing the System Should you wish to flush the system 1 In the hand pump mix one 1 capful of an antibacterial...

Page 56: ...replaceable multi use neck band enables practice in providing an emergency airway Each band should enable six to eight applications After each use rotate the band to move the incision site away from the trachea To replace the band 1 Stretch and pull the used band over the head This band can be discarded or repaired see Repairing the Skin below 2 Apply glycerin or lubricant to the trachea 3 Stretch...

Page 57: ...nsert and replace it with a new insert Pull the torso jacket back up and secure it using the zipper Replacing the Humeral Cap The humeral cap insert used for non infusing practice in humeral intraosseous is replaced at the user s discretion when the needle does not stick firmly due to multiple holes in close proximity Figure 77 Locating the Humeral Cap Insert Figure 78 Humeral Cap Insert with Tabs...

Page 58: ... Scrubbing is not necessary 91 Isopropyl Alcohol can be used if acetone is not available however acetone promotes better adhesion of silicone 3 Mix together a small amount of the silicone repair material a Remove the small plastic tip from the two part dispensing syringe b Add a small amount of both components in equal parts to your cup or cardboard and stir together well c Using the replacement p...

Page 59: ...ure Figure 86 Spread the Area Figure 87 Apply the Mixture Figure 88 Close the Area 5 Apply a small amount of acetone to a paper towel so that the towel is nearly dry and acetone is not dripping from the towel and very gently wipe down the repaired area to remove any excess material Pushing hard could force out the material that was just applied Figure 89 Wipe with a Small Amount of Acetone Figure ...

Page 60: ...ilable to provide the necessary power Charging the Battery Pack Batteries can be charged while connected in the battery compartment during operation if the power cord is also attached and operational During this process the power button blinks to indicate the average charge available from the battery or batteries one 1 blink indicates that the batteries hold an average charge of 25 two 2 blinks in...

Page 61: ...ter to the Internet 2 Open your browser and go to www operativeexperience com support to download the latest firmware software OEI file e g OEI_Update_3 0 1 oei for your simulator a Select the Software Downloads and Updates tab b Under the name of the update e g Simulator Firmware 3 0 1 click Download c Follow your computer s prompts to complete the download process Figure 91 Downloading the Updat...

Page 62: ...twork use your computer s network settings to select the Simulator Network Your computer is no longer connected to the Internet 5 In the browser s URL field type http 10 42 0 1 The main screen of the OEI Sim application appears Figure 92 Open the Menu on the OEI SIM APP 6 Open the Menu and select Settings Figure 93 Click Settings Click to open the Menu Click Settings ...

Page 63: ...ick the Choose Files Button 7 In the System Update panel click the Choose Files button beneath Select Update File to install The File Picker for Macs or File Explorer for PCs appears 8 Locate and select the downloaded file Figure 95 Searching for a File Mac OS Figure 96 Searching for a File Windows Click Choose Files ...

Page 64: ...n Error message appears Figure 98 Click OK on the Connection Error Message 10 Click OK When the update has completed the simulator restarts and a screen appears reminding you to reconnect to the simulator Figure 99 Reconnection Screen 11 In your computer s settings verify that you re still connected to the Simulator Network 12 Enter the Simulator IP 10 42 0 1 and click Go to reconnect to the simul...

Page 65: ...ht 2021 Operative Experience 10001_B 57 All rights reserved The OEI SIM APP appears Figure 100 Open the Menu on the OEI SIM APP 13 Open the Menu and click About Figure 101 Select About Click About Click to open the Menu ...

Page 66: ...ct type is correct by reviewing the following a App Version b Firmware Version c Product Type 15 Once you ve verified that you re running the updated version close the Internet Browser and disconnect the computer from the Simulator Network 16 Start your tablet for operation of the simulator 17 Join the Simulator Network and start the OEI Sim application 18 Using the About screen on your tablet s O...

Page 67: ...d in a variety of ways as long as as their environment falls within the following conditions Storage Temperature 14 to 140 F 25 to 60 C Ambient Pressure 10 to 15 Psi which is the equivalent of 10 Mts below sea level to 2000 Mts above sea level 25 C Humidity 0 to 80 Always completely remove all fluids and disconnect the batteries before storing the simulator ...

Reviews: