OpenEye OE-7163A User Manual Download Page 16

31186AE 

17 

8.


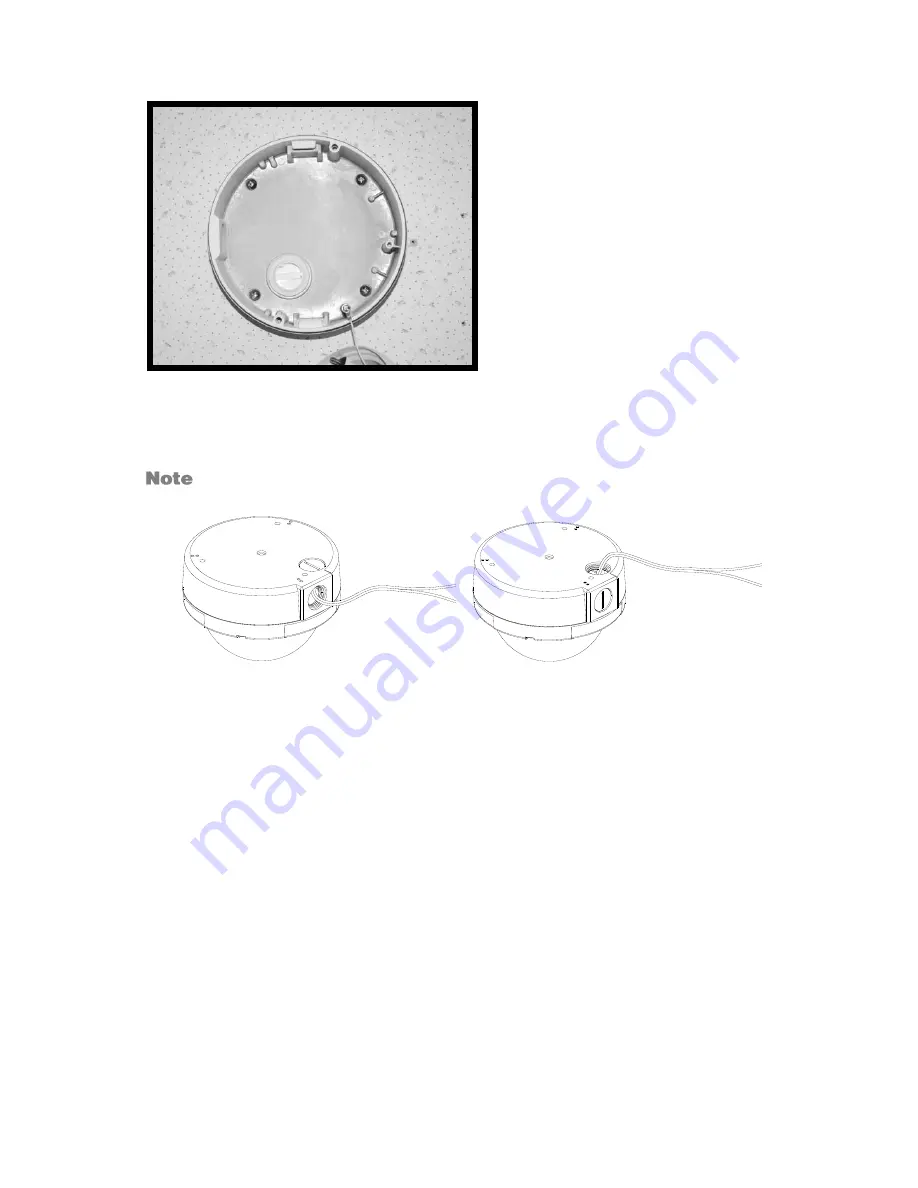
Fasten the camera housing to the ceiling with the supplies screws 


9.


Thread the power and Ethernet cables through the side conduit entry or the back 
conduit entry. 


The power cable is omitted if using PoE. 


10.


Connect the power and Ethernet connectors on the camera with their respective 
cables. 


Summary of Contents for OE-7163A

Page 1: ...Camera OE C7163 OE 7163A OE 7163R OE 7163AR www openeye net 3MP Outdoor HD IP Dome Camera User Manual Accessories CA 510G CA 510W CA 510C CA 510P25 CA 510P50 CA 510PML CA 510PMS CA 510PA25 CA 510PA50...

Page 2: ...emains with recipient In no event shall OPENEYE be liable for any direct consequential incidental special punitive or other damages whatsoever including without limitation damages for loss of business...

Page 3: ...Power source This product should be operated only from the type of power source indicated on the marking label Precautions Operating Before using make sure power supply and others are properly connect...

Page 4: ...ration is subject to the following two conditions 1 this device may not cause harmful interference and 2 this device must accept any interference received including interference that may cause undesir...

Page 5: ...T OPEN THE CABINET REFER SERVICING TO QUALIFIED PERSONNEL ONLY Caution CAUTION TO REDUCE THE RISK OF ELECTRIC SHOCK DO NOT REMOVE COVER OR BACK NO USER SERVICEABLE PARTS INSIDE REFER SERVICING TO QUAL...

Page 6: ...Installation 15 4S Electrical Box Installation 21 Network Camera manager Software 24 Installation 24 Starting Network Camera Manager 24 Camera Configuration 25 Device Addressing 25 Finding Network De...

Page 7: ...34 Picture Setup 35 Camera Tab 35 Exposure 35 White Balance 35 Picture Adjustment 36 Motion Detection 36 Add Detection Window 37 Delete Motion Detection Window 37 Motion Window 37 Streaming Settings...

Page 8: ...chedule 49 Recording 49 Schedule 50 Interval Recording 51 Maintenance 52 Configuration 52 Factory Default 52 Software 53 Picture Setting 53 Video Mask 53 Hot Spot 53 Text Overlay 53 Streaming Setting...

Page 9: ...ty cameras are not suited to survive the OE C7163 is equipped with a heater allowing operation in temperatures as low as 31 F 35 C The OE C7163 camera can be connected to both 24vAC and 12vDC power or...

Page 10: ...ontains the items listed here If any item is missing or has defects DO NOT install or operate the product and contact your dealer for assistance OE C7163 Camera Power Cable Self Tapping Screws Plastic...

Page 11: ...efore installing or connecting the dome camera please refer to this section and complete preparations for dome setup and all switch settings Dimensions Diameter 151 mm 5 9 inches Height 130 mm 5 12 in...

Page 12: ...eset Restore Factory Default Settings BNC Analog Video Output Alarm I O 1 Alarm Input 2 Alarm Input 3 Alarm Output 4 Alarm Output Audio I O 1 Output L 2 Output R 3 Ground 4 Input Power 12vDV 24vAC 1 P...

Page 13: ...ch will be suitable Please verify that all installations that require a heater use 24vAC power Make sure the camera s power cable is correctly and firmly connected If using Power over Ethernet PoE mak...

Page 14: ...iling The wall or ceiling must have enough strength to support the IP Dome Camera 1 Use the supplied Torx tool to unscrew the two Torx screws on the side of the dome cover and remove the dome cover 2...

Page 15: ...module as indicated in the figure and detach it from the Dome Camera s housing 5 Mark the positions of the four screw holes on the base of the Dome Camera at the chosen installation location 6 In the...

Page 16: ...ng with the supplies screws 9 Thread the power and Ethernet cables through the side conduit entry or the back conduit entry The power cable is omitted if using PoE 10 Connect the power and Ethernet co...

Page 17: ...camera module The terminal blocks should face the side conduit entry as shown in the figure 12 Use the OpenEye IP Finder software to locate the camera on the network and complete configuration of the...

Page 18: ...tment range is nearly 360 rotation angle range approaches to 270 Tilt is adjustable between 10 90 Pan Adjustment Tilt Adjustment Adjust the lens carefully within the limits mentioned above or the cabl...

Page 19: ...20 16 Replace the dome cover aligning the arrow mark on the dome cover with the one on the housing 17 Screw the two Torx screws on the side of the dome cover tightly to fasten the dome cover...

Page 20: ...Electrical Box unscrew and open the dome cover with the Security Torx 1 Run the wires Ethernet and power through the wall to the 4S box The Power Cable is omitted if using PoE 2 Press both sides of th...

Page 21: ...crew the Torx screw on the camera module as indicated in the figure with the supplied Torx tool 4 Press the sides of the snap on module as indicated in the figure and detach it from the Dome Camera s...

Page 22: ...ew the module screw tightly with the Security Torx to secure the camera module 8 Use the OpenEye IP Finder software to locate the camera on the network and complete configuration of the camera 9 After...

Page 23: ...tion You can install Network Camera Manager on any personal computer PC or laptop using the software CD included with your OpenEye IP camera or by downloading the program from openeye net Network Came...

Page 24: ...he Device Addressing tab allow you to find configure and view network cameras 1 Click Find Devices on the Device Addressing tab 2 To narrow your search by Camera Model Project or Camera Name select yo...

Page 25: ...ord 1234 4 The viewer software is now opened in Internet Explorer The viewer software will install automatically the first time you connect to the camera If your internet browser does not install the...

Page 26: ...is admin and the default Password is1234 The username and password are case sensitive If it is necessary to reset the camera to the factory default settings hold down the Reset button see Camera Over...

Page 27: ...where the traffic should be routed so no video appears at the recorder There are three solutions to this 1 Connect modems on both sides directly to the recorder and camera If there is no router no net...

Page 28: ...onnect to a camera the browser will ask for permission to install the ActiveX Control necessary to display the camera video Right click the information bar and click Install ActiveX Control to allow t...

Page 29: ...o the designated location on the local workstation The default location is C This location can be changed in File Location in the System menu If you are using Windows Vista or 7 you will need to chang...

Page 30: ...ge Time Zone Select your time zone Time Format Select your desired time format Sync With Computer Time Select to synchronize the camera date and time with the connected recorder Sync with NTP Server M...

Page 31: ...s bar of your Internet Explorer IP Address The IP Address is necessary for network identification Subnet mask Used to determine if the destination is in the same subnet The default value is 255 255 25...

Page 32: ...accounts 1 Type the new Username and Password 2 Select I O Access Camera Control Talk and or Listen as permissions for the User I O Access All functions in the Setup and Advanced menus are available t...

Page 33: ...erties are opened the access check boxes are automatically cleared Make sure you select any user access options each time you edit the user properties File Location This is the destination location th...

Page 34: ...um shutter speed that the camera will use This can drastically change the amount of light entering the camera Click Set to save your changes Use the white balance setting to change color representatio...

Page 35: ...on Turn the Digital Wide Dynamic Range Off or adjust between 1 and 3 Click Set after making changes to the Picture Adjustment settings to save the settings and update the Live screen Motion Detection...

Page 36: ...ction window as desired 4 Click Save 1 Click to select the desired motion detection window 2 Click Delete Motion Window The motion window displays a red line and a dynamic blue line The red line repre...

Page 37: ...eaming options and two sets of quad streaming options H 264 Only MJPEG Only H 264 H 264 H 264 MJPEG H 264 H 264 H 264 H 264 H 264 MJPEG H 264 H 264 H 264 H 264 H 264 H 264 H 264 MJPEG Once a codec opt...

Page 38: ...he I frames that occur within the stream of P frames 2 64 Increasing this number increases the number of P frames between each I frame decreasing the file size of the stream but increasing the risk of...

Page 39: ...djust the frame rate of each stream Each of the MJPEG and H 264 streams can have a separate frame rate setting from 1 to 30 frames per second Higher frame rate will increase video smoothness as well a...

Page 40: ...ession low bitrate low quality Middle compression default Low compression high bitrate high quality H 264 compression settings include 1024kbps highest compression lowest quality 2048kbps 4096kbps mid...

Page 41: ...ects traffic to your current IP address when using the hostname address Enable DDNS Select the check box to enable DDNS Provider Select a DDNS host from the Provider list Host name Type the registered...

Page 42: ...etwork administrator if you are not familiar with SNMP setup Enable UPnP When enabled the camera will appear in My Network Places on Windows computers running UPnP on the same network Enable UPnP Port...

Page 43: ...address You can Allow or Deny a specific IP address by adding it to the appropriate list IP addresses on the Allowed IP List will be able to access the IP camera IP addresses on the Deny IP List will...

Page 44: ...o a configured FTP and or e mail address when motion is detected When sending to email the alarm notification is text only When sending to FRP the alarm notification will upload a text file to the FRP...

Page 45: ...order for a Tampering Alarm to activate Triggered Action Designate the actions that will occur upon a Tampering Alarm activating Network Failure Detection Turn the Network Failure Detection On Off or...

Page 46: ...ecific information SD Card All OpenEye IP cameras include an integrated microSD card slot that can be used to record video or images The card slot is compatible with a microSD card up to 16GB Load Dev...

Page 47: ...le sharing between computers operating on Windows and computers operating on Unix This serves as an additional storage type Configuration requires the host IP address share name and credentials Once c...

Page 48: ...ation 2 Select Always as the type of Recording Schedule 3 Click Save To set up scheduled recording 1 Select type of Recording Storage 2 Select Only during time frame as the type of Recording Schedule...

Page 49: ...ows you to establish schedules to use in other section To create a schedule 1 Select a Schedule set 1 10 2 Check the desired week day check boxes 3 Select Day or Night 4 Designate a Start Time and Dur...

Page 50: ...pe a file name and then choose how the file name is multiplied for multiple files Add date time suffix add the date time to the end of the file name for each interval file saved Add sequence number su...

Page 51: ...d The default location for exported configurations is C Upload Import Configuration 1 Click Browse in the Configuration Import box 2 Select a bin file that you want to import 3 Click Import 4 Click Ye...

Page 52: ...click Remove to uninstall the previous software version 6 Open the internet browser again and log in to the camera The system will automatically download the new version of the Camera Viewer software...

Page 53: ...ync the audio and video Volume Sets the audio output volume level for listening to live audio Network Transfer Sets the camera to continue transmitting audio even if the video stops The Logout tab all...

Page 54: ...ck Yes BNC S N Ratio 50dB Focal Length 3 9 mm 3 9 mm autofocus lens 3 9 mm 3 9mm autofocus Iris Control F 1 2 fixed Synchronization Video Output 1 0 Vp p 75 BNC White Balance Manual AWB ATW Auto White...

Page 55: ...C7163 AR IR LEDs 24 IR LEDs 850nm IR Range Up to 50 ft 15 m Model OE C7163 OE C7163 A OE C7163 R OE C7163 AR Video Compression H 264 MJPEG Multi Streaming H 264 MJPEG H 264 H 264 Audio In 1 Audio Out...

Page 56: ...ctiveX controls and plug ins setting Setting Internet Security Level to Default 1 Open Internet Explorer 2 Click the Tools tab in the menu bar 3 Click Internet Options 4 In the Security tab select the...

Page 57: ...out prompt Allow Scriptlets Automatic prompting for ActiveX controls Binary and script behaviors Display video and animation on a web page that does not use external media player Download signed Activ...

Page 58: ...ssion from OpenEye The information in this publication is believed to be accurate in all respects However OpenEye cannot assume responsibility for any consequences resulting from the use thereof The i...

Reviews: