background image

OPEN824RLW/RL Router 

Configuring PPP And SIP 

step 3

 Click 

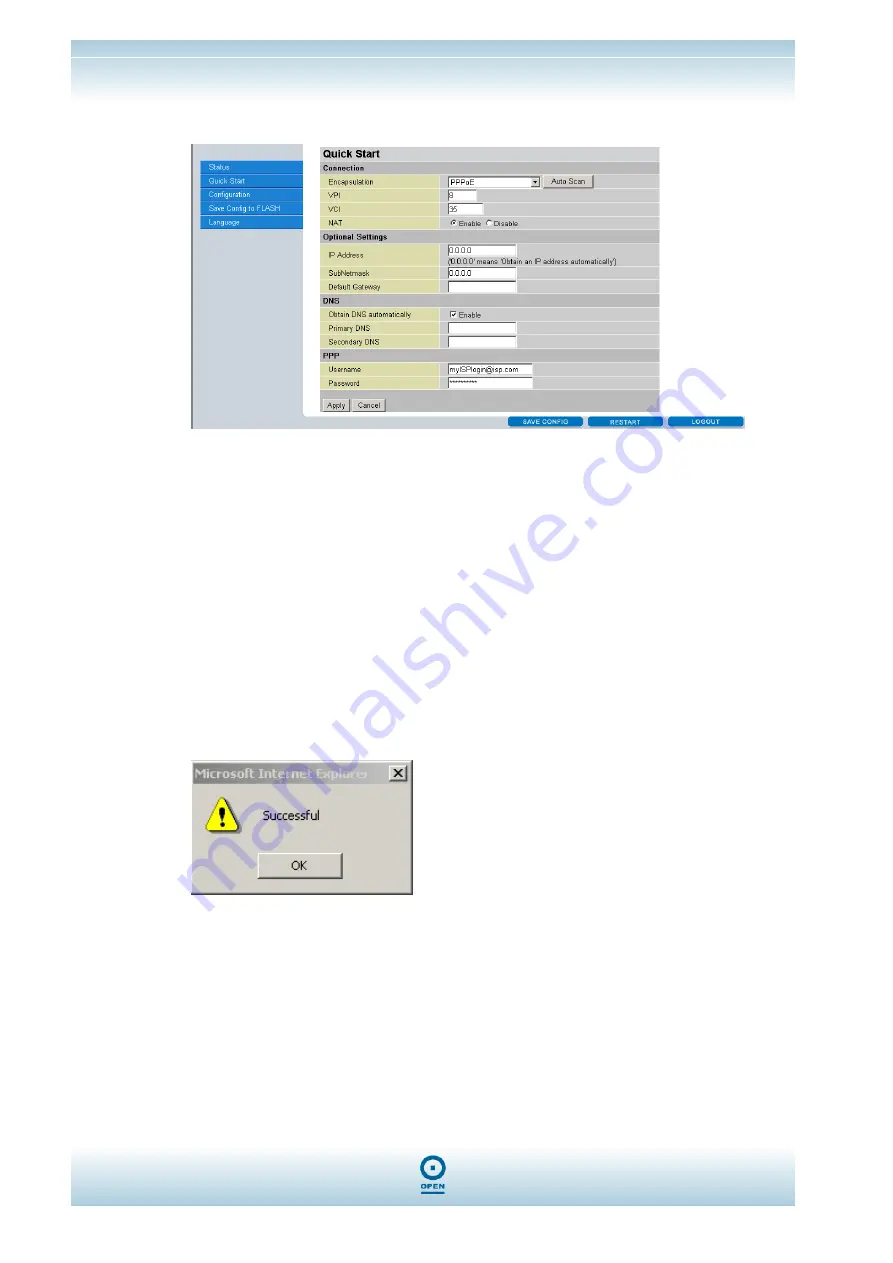
Quick Start from the menu list.  The following appears: 


In the Quick Start screen: 


In the Connection area of the screen, from the Encapsulation drop-down list, highlight 

PPPoE; 


Leave the VPI, VCI and NAT settings as the default; 


If using a static IP address complete the following Optional Settings area of the screen, 

enter a static IP, subnet and default gateway in the IP Address, SubNetmask and Default 
Gateway 
fields; 


In the DNS area of the screen, select Obtain DNS automatically.  If using a static IP 

address you may need to enter the primary and secondary DNS addresses in the 
Primary DNS and Secondary DNS fields; 


In the PPP area of the screen, enter your username and password as provided by your 

ISP in the Username and Password fields; 


Click Apply and OK to Successful dialog box. 


OPEN Networks Pty Ltd 
 

www.opennw.com


Commercial in Confidence

 Page 5


Summary of Contents for OPEN824RL

Page 1: ...OPEN Networks Pty Ltd No part of this manual may be translated transcribed reproduced in any form or by any means without prior written permission by OPEN Networks Pty Ltd D Di is sc cl la ai im me e...

Page 2: ...ty Ltd www opennw com Commercial in Confidence Page 1 Table of Contents Introduction 2 Purpose 2 Audience 2 Requirements 2 Hardware Set Up 3 Logging Into The OPEN824 And Setting Up PPP Connection 4 Se...

Page 3: ...ing VoIP Saving configuration Audience This Application Note is intended for a technical audience It is assumed that the reader is familiar with IP Networking and LAN WAN technologies Requirements You...

Page 4: ...thernet port of your computer using an Ethernet Cable or connect wirelessly Connect the analogue phone to Phone Port 1 on the OPEN824 Connect your ADSL telephone line to the OPEN824 ADSL port Ensure t...

Page 5: ...ping the following in the Address bar http 192 168 1 254 Note If you have changed the LAN IP address from the default you will need to connect to the new address step 2 At the Connect to screen in the...

Page 6: ...ea of the screen enter a static IP subnet and default gateway in the IP Address SubNetmask and Default Gateway fields In the DNS area of the screen select Obtain DNS automatically If using a static IP...

Page 7: ...ter Configuring PPP And SIP The following screen displays indicating the connection status Congratulations You are now ready to browse the Internet OPEN Networks Pty Ltd www opennw com Commercial in C...

Page 8: ...the screen enter the Registrar IP Address or hostname in the Registrar Address or Hostname field Leave the Registrar Port at the default unless instructed otherwise by your service provider NOTE If t...

Page 9: ...r your Phone Number In the Authentication Username field enter your Username if different to the Phone Number In the Authentication Password field enter your SIP password Click Apply the screen return...

Page 10: ...Router Configuring PPP And SIP step 6 To verify your VoIP service is ready click Phone Port from the VoIP menu Check the Phone port is registered OPEN Networks Pty Ltd www opennw com Commercial in Con...

Page 11: ...1 Click Save Config The following appears step 2 Click Apply to confirm and save the settings to Flash The following confirmation message appears step 3 Click OK Congratulations You can now make VoIP...

Reviews: