background image

33 


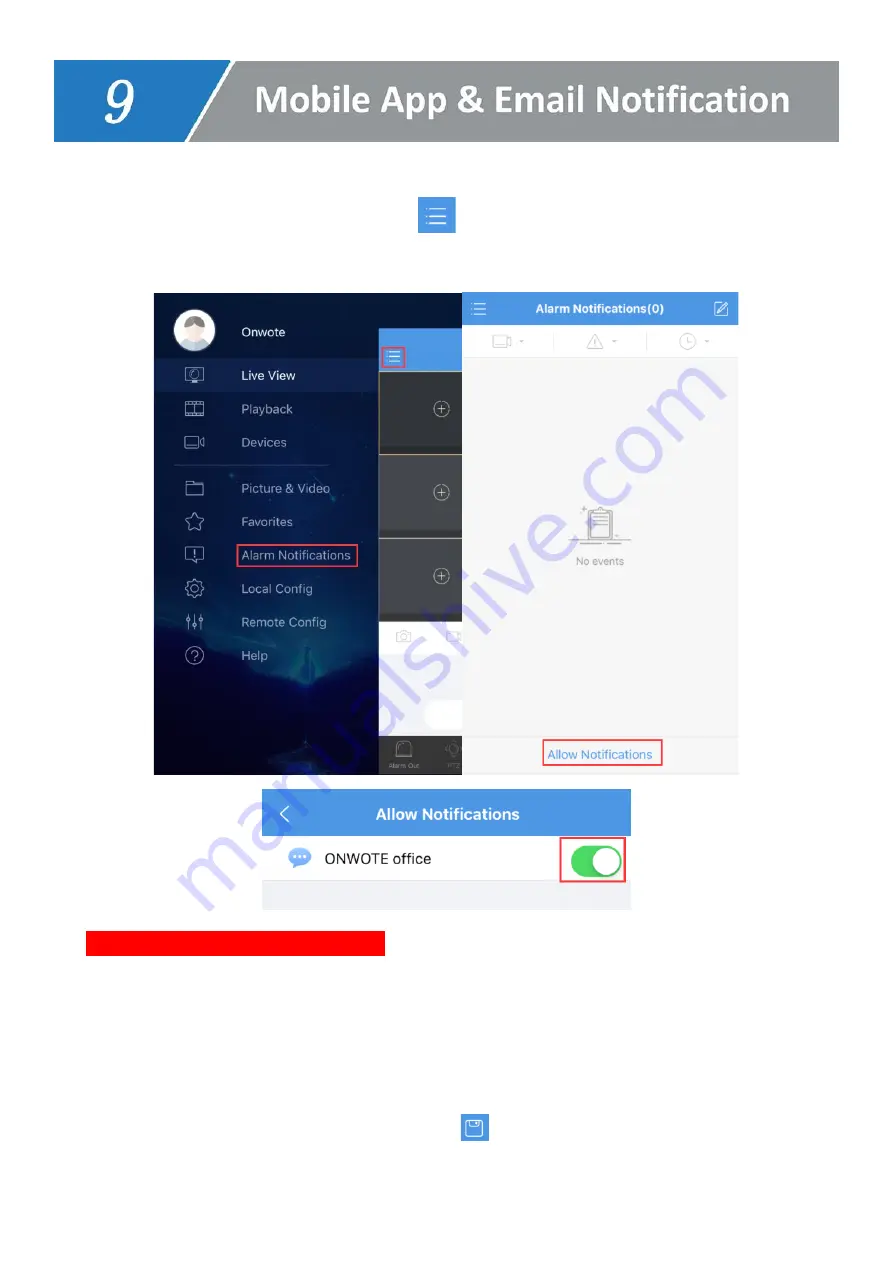
Mobile App alarm


1.


Open mobile App- Guard Viewer, click 

, choose 

Alarm Notifications

, turn on 

Allow 

Notification

.


2.


Set Alarm Schedule for App Alerts


(default is 24*7 for all the cameras, all type of alerts)


Click on 

Advanced


Settings--> Channel 

to select camera. 


Click 

Time 

to


set Start time & End time 

(click 

+Add

 to add more time period)

 and select 

day.


Click 

Type

 to select alarm type and click on 

  the top right corner to save the 

schedule.


Summary of Contents for Security NVR Kit

Page 1: ......

Page 2: ...Using Mobile Device 7 6 Access System Using PC Client Software 11 7 Access System Using Internet Explorer 20 8 Recording Setup 22 Set Motion Area 22 Normal Recording 23 Motion Recording 23 Scheduled R...

Page 3: ...shut down do not directly unplug the power A sudden power failure may cause device damage and data loss Do not install this device near any heat sources such as radiators heat registers stoves or othe...

Page 4: ...ook up a monitor to the NVR to setup the system For audio system the NVR comes with HDMI port to output audio hook a HD TV or HDMI monitor with speaker 8 Channel NVR Back Panel 16 Channel NVR Back Pan...

Page 5: ...tup 1 Select language 2 Login system with default account User name admin Password 123456 Tips To prevent your system from being hacked please set up a new password for system include letters numbers...

Page 6: ...5 3 Set a Pattern to unlock your system skip if you don t need 4 Click Next to setup time zone 5 TCP IP setup network configuration Please check in Enable DHCP...

Page 7: ...n only play one channel audio once Note 1 If your monitor does not come with a speaker or does not support audio input via HDMI it may fail to output audio 2 Some ONWOTE cameras do not support audio N...

Page 8: ...an also scan the QR code below to download the mobile app Guard Viewer For iPhone For Android 2 Go back to the NVR monitor Right click choose Menu Network Basic P2P 3 Check in Enable P2P and Add Witho...

Page 9: ...8 7 Set a password for your account and check in I have read and agree to Service Agreement Click Sign Up to register account 8 Click on the top left and choose Devices...

Page 10: ...Scan to scan the QR code on the NVR monitor Right click on NVR monitor and choose Menu Network Basic P2P to get the QR code 10 Type in a name for your device and click Start Live View on the bottom t...

Page 11: ...ck to enable audio 12 Select one channel and rotate the phone to horizontal orientation to view video in full screen Turn off the portrait orientation lock of your phone 13 Click Playback on the botto...

Page 12: ...id 48 For MAC http www onwote com download php id 47 Download the PC client software on Windows PC or MAC install Guard Station Tips If your MAC doesn t allow to install the software go to System Pre...

Page 13: ...name admin Password 123456 go to Control Panel Click Device Management to add device b Click Cloud Device and Register to register a cloud account If you ve already registered an account on your mobil...

Page 14: ...13 c Type in user name password email address and the verification code click Sign up to sign up an account d Click Add Device to add device...

Page 15: ...add device How to get Register Code Right click on NVR monitor choose Menu Network Basic P2P to get the register code f Go back to your PC client software Guard Station login with the account you reg...

Page 16: ...15 For audio cameras move mouse to the channel to show up menu click to play audio...

Page 17: ...lt account User name admin Password 123456 b Click Device Management to add device c Click Cloud Device and Register to register a cloud account If you ve already registered an account on your mobile...

Page 18: ...ification code click Sign up to sign up an account e Click Add Device to add device f Input the Register Code and set a name for your device Click Add How to get Register Code Right click on NVR monit...

Page 19: ...18 g Go back to your PC client software Guard Station login with the account you registered h Click Menu on the top left and choose Live View...

Page 20: ...19 i Double click device to view live video For audio cameras move mouse to the channel to show up menu click uncheck Silent to play audio...

Page 21: ...pe www star4live com in your IE browser bar 3 Login with the account you registered on mobile app Guard Viewer or PC client software Guard Station Tips If you haven t registered an account before clic...

Page 22: ...4 Download web plugin close your browser install the web plugin 5 Go back to www star4live com and login again Click Access to go to the live view page 6 Download another web plugin and refresh the pa...

Page 23: ...one to the windows on the right to view video Set Motion Area 1 Right click on NVR monitor choose Menu Alarm Motion 2 Select a camera and click Clear All press the left button of mouse drag on the ima...

Page 24: ...Recording 24 7 Full Time Recording Motion Recording The default record mode Record continuously but highlight the motion detection records in a different color b Motion Recording 1 Click Motion press...

Page 25: ...24 c Scheduled Recording 1 Click Edit on the right side 2 Select a day 3 Uncheck All Day 4 Manually set time period choose recording mode for each time period 5 Click OK to save changes...

Page 26: ...he to playback b Playback via IE Browser IE Internet Explorer Microsoft Edge doesn t work 1 Type www star4live com in IE browser bar 2 Login in with your account Tips If you haven t registered an acco...

Page 27: ...lient software Guard Station 1 Open PC client software go to Control Panel and click Playback 2 Select Recording Playback mode default is Normal Recording Playback 3 Check in device and select date cl...

Page 28: ...Attention Use VLC player to play backup files a Backup on NVR 1 Insert a USB disk into the NVR USB port Right click mouse on NVR monitor choose Menu Backup select camera date and time then click Sear...

Page 29: ...28 2 Then a window will pop up click Backup to continue 3 Choose USB disk select a folder click Backup to back up video...

Page 30: ...r IE browser bar 3 Login in with your account Tips If you haven t registered an account click Sign up follow the Step c to Step e on page 13 to register an account and add device 4 Click on Access and...

Page 31: ...30 c Backup via PC Software Guard Station 1 Open PC client software go to Control Panel and click Playback 2 Click on the lower left corner...

Page 32: ...31 3 Click on By File check in device select time and click on Search 4 Select files and click Download to back up video...

Page 33: ...32 5 Click on on the lower left corner to check the downloading process 6 Click on to open the folder and find the files you downloaded...

Page 34: ...et Alarm Schedule for App Alerts default is 24 7 for all the cameras all type of alerts Click on Advanced Settings Channel to select camera Click Time to set Start time End time click Add to add more...

Page 35: ...34 3 Turn on Allow Notifications in the settings of your mobile phone a iPhone Settings Notifications Allow Notifications...

Page 36: ...b Android phone Settings Notifications Allow Notifications E mail Notification 1 Right click on NVR monitor choose Menu Network Basic Email 2 Type in the sender and recipient information and click App...

Page 37: ...please check with your email supplier if you have troubles in email SMTP configuration 4 Set Alarm Schedule for Email Alert default is 24 7 full time Click behind Arming Schedule select day set time p...

Page 38: ...select camera and click behind Trigger Actions 6 Check in Send Email click Apply and OK Tips You just enabled Send Email for the selected camera please select other cameras and do the same steps to en...

Page 39: ...the NVR monitor choose Menu Alarm Human Body Detection Select a camera and check in Enable 2 Please select other cameras and do the same steps to enable Human Detection for them E mail Notification 1...

Page 40: ...lease check with your email supplier if you have troubles in email SMTP configuration 3 Set Alarm Schedule for Email Alert default is 24 7 full time 4 Click behind Arming Schedule select day set time...

Page 41: ...mail click Apply and OK Tips You just enabled Send Email for the selected camera please select other cameras and do the same steps to enable Send Email for them Enable Mobile App Alarm Set Alarm Sched...

Page 42: ...ection Select camera and click behind Trigger Actions 2 Click Recording select specific cameras to start recording when human body detected by the camera 3 Click Apply and OK to save the changes 4 Ple...

Page 43: ...42 1 Click Forget Password 2 Take a photo of the page and email it to support onwote com to get security code to reset your password...

Reviews: