

D.
Strip off 3 inches or so of the speaker cable jacket to expose the
positive and negative insulated wires. Strip 3/8 to 1/2 inch of
insulation off of these conductors.
E.
Hold the speaker with one hand, push in the speaker terminal
connectors and insert wires; remove speaker grill (for in-ceiling leave
the tweeter grill on). Be sure to have the positive wire in the RED
terminal and the negative in the BLACK.
NOTE: Wiring both speakers identically as the above instruction states will
yield speakers that are “in phase”. If one speaker is wired opposite of
the other, the speakers will be “out of phase” with one another.
When speakers are “out of phase” they loose most of their bass
response and have a “canned” type sound. Make sure every
installed pair of speakers are correctly phased.
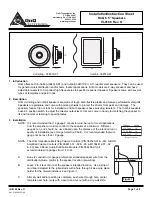
F.
Use one hand to push the speaker into the cut out and the other to
turn the screws that engage the installation tabs. Tighten the tabs in
a cross or X-pattern until “snug”. Be careful not to over tighten the
tabs or damage could result (
see Figure 2
).
NOTE: If using a cordless drill/screwdriver, it is suggested that the screws be turned
until almost tight, then finish tightening via a screwdriver.
G.
After the speaker has been installed, the tweeter can be positioned if desired
(
see Figure 3
).
H.
If installing the In-Wall speaker, the tweeter level can be adjusted by rotating
the three position selection switch (
see Figure 4
).
OnQ Technologies, Inc.
P.O. Box 60907
Harrisburg, PA 17106-0907
800-321-2343
www.onqtech.com
Installation/Instruction Sheet
OnQ 6.5” Speakers
IS-0166 Rev. O
IS-0166 Rev. O
Page 2 of 2
Ref. P/N 100225-66
12dB 9dB 6dB
1
2
3
Figure 2
Figure 3
Wattage
Freq. Response
Efficiency
Woofer Type
Tweeter Type
In-Ceiling
In-Wall
60Hz to 21 KHz
80 Watts RMS
6.5" Poly Mica
3/4" Neodymium
Impedance
8 Ohms
90 db
50Hz to 22 KHz
100 Watts RMS
6.5" Poly Mica
1" Titanium
8 Ohms
90 db
12dB 9dB 6dB
12dB 9dB 6dB
Figure 4
Specifications Table