background image

11

Front panel facilities
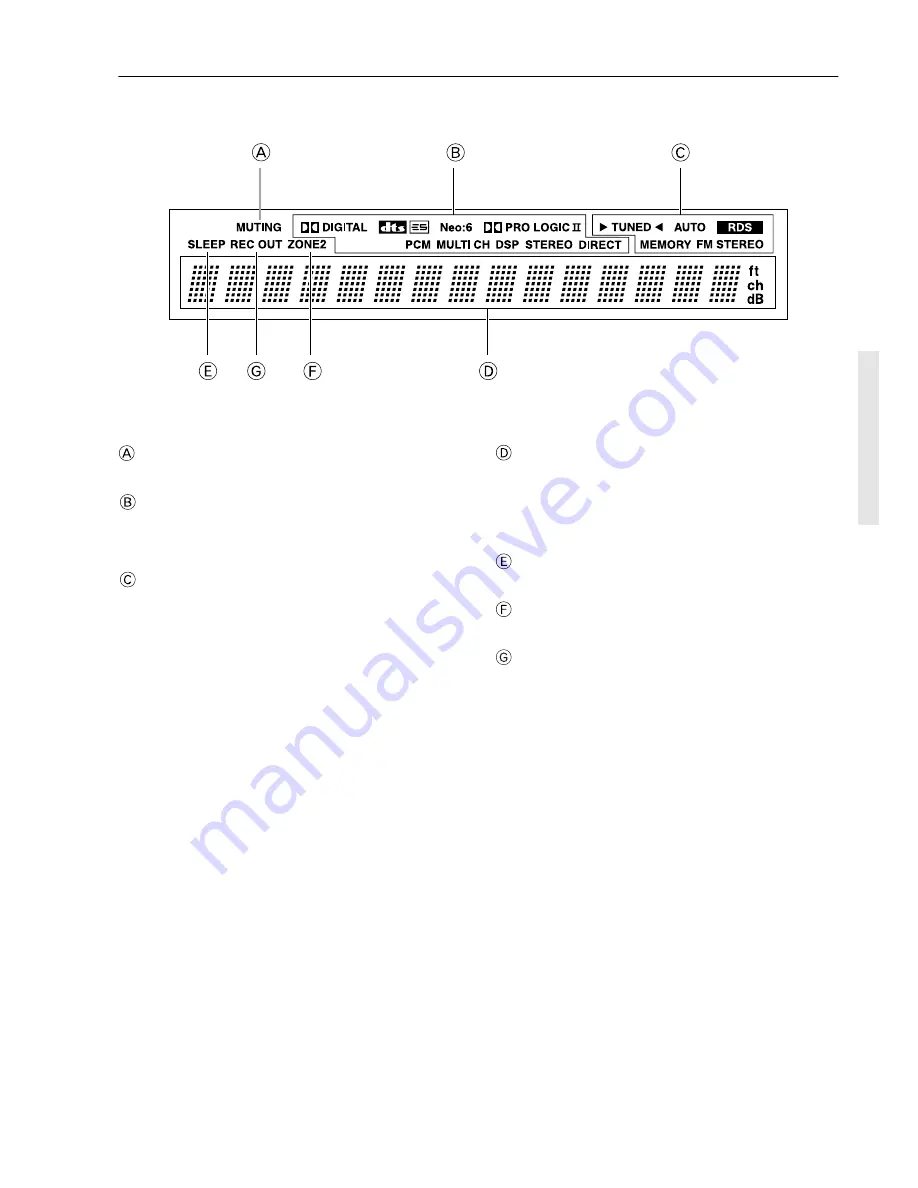
Front panel display

MUTING indicator

Flashes when the mute function is turned on.

Listening mode or digital input format indicators

One of these indicators lights to show the format of the current
input source. In addition, one of the listening mode indicators lights
to indicate the current listening mode.

Tuning indicators

TUNED indicator

Lights when a radio station is received.

AUTO indicator

Lights when receiving FM broadcasts in the stereo mode. Turns
off when placed into the monaural mode.

RDS indicator (European models only)

Lights when an RDS station is received.

MEMORY indicator

Lights when the MEMORY button is pressed to preset a radio
station.

FM STEREO indicator

Lights when an FM broadcast station is received in stereo.

Multi function display

During normal operation, shows the current input source and
volume. When the FM or AM input is selected, shows the frequency
and preset number. When the DISPLAY button is pressed, shows
the listening mode and input source format. However, does not
show the source format when the FM or AM source is selected.

SLEEP indicator

Lights when the sleep timer is turned on.

ZONE 2 indicator

Lights when using the remote zone (Zone 2).

REC OUT indicator

Lights when recording the input source from one component to
another (Rec Out)

Summary of Contents for TX-SR701E

Page 1: ... before making connections and plugging in the unit Following the instructions in this manual will enable you to obtain optimum performance and listening enjoyment from your new AV Receiver Please retain this manual for future reference Contents Before using 2 Facilities and connections 8 Setup and operation 31 Remote controller 63 Appendix 75 ...

Page 2: ...dult and serious damage to the appliance Use only with a cart stand tripod bracket or table recommended by the manufacturer or sold with the appliance Any mounting of the appliance should follow the manufacturer s instructions and should use a mounting accessory recommended by the manufacturer 12 An appliance and cart combination should be moved with care to avoid injury from tip over Quick stops ...

Page 3: ...ED PLUG IS UNSUITABLE FOR THE SOCKET OUTLET IN YOUR HOME THEN THE FUSE SHOULD BE REMOVED AND THE PLUG CUT OFF AND DISPOSED OF SAFELY THERE IS A DANGER OF SEVERE ELECTRICAL SHOCK IF THE CUT OFF PLUG IS INSERTED INTO ANY 13 AMPERE SOCKET If in any doubt consult a qualified electrician For U S models Note to CATV system installer This reminder is provided to call the CATV system installer s attention...

Page 4: ...sembling the AM loop antenna 29 Connecting the AM antenna cable 29 Connecting the included antennas 29 Connecting an FM outdoor antenna 30 Connecting an AM outdoor antenna 30 Directional linkage 30 Connecting the antenna cable to the 75 300 Ω antenna adapter For all models other than USA Canadian models and European models 30 Configuring the speakers 31 Displaying the Main Menu 31 Speaker Configur...

Page 5: ...controllers for other devices into the remote controller 71 Programming procedure 71 Erasing the programmed command from one button 72 Erasing all the commands programmed under a MODE button 72 Using the macro function 73 What is the macro function 73 Programming the macro 73 Executing the macro 73 Erasing a macro from the MACRO 1 or 2 button 74 Erasing all commands and macros that have been progr...

Page 6: ...0W 2 Surround 150 W SurroundBack at6ohms 1 kHz JEITA Wide Range Amplifier Technology WRAT Powered Zone 2 Capability State of the art linear PCM 192 kHz 24 bit DACs for All channels Optimum gain volume circuitry VLSC Vector Linear Shaping Circuitry except for USA Canadian models Australian models Audio Video Features Dolby Digital Dolby Digital EX Dolby Pro Logic II DTS DTS 96 24 DTS ES Extended Su...

Page 7: ...100W MAX 120V VOLTAGE SELECTOR 220 230V 3 2 1 Notes Do not mix new batteries with old batteries or different kinds of batteries To avoid corrosion remove the batteries if the remote controller will not be used for a long time Remove dead batteries immediately to avoid damage from corrosion If the remote controller does not operate smoothly remove the old batteries and replace them both with two ne...

Page 8: ... RETURN ENTER AUDIO ADJUST SETUP RT PTY TP VCR 2 VCR 1 S VIDEO VIDEO AUDIO L R OFF ON POWER TUNER CD PHONO DIRECT PURE AUDIO PURE AUDIO REC OUT ZONE 2 OFF LEVEL MEMORY CLEAR FM MODE PRESET TUNING STANDBY ON PHONES REC OUT ZONE 2 OFF VIDEO 4 INPUT DIGITAL VIDEO 3 TAPE TUNER VIDEO 4 SURROUND DSP STEREO DISPLAY MEMORY DIRECT VIDEO 2 DVD VIDEO 1 AUDIO SELECTOR CLEAR FM MODE LISTENING MODE TUNING PRESE...

Page 9: ...buttons to select a listening mode directly Press the DSP button to select any of the possible listening modes for the input source currently selected Note During playback of a multichannel source press the DIRECT button to turn off the tone control and the SURROUND button to turn on the tone control 45 Front display 11 MEMORY button 38 Press to assign the radio station that you are currently tune...

Page 10: ...y 46 48 PHONES jack 44 This is a standard stereo jack for connecting stereo headphones REC OUT ZONE 2 OFF LEVEL buttons and ZONE 2 indicator 60 61 The REC OUT and ZONE 2 buttons allow you to use the TX SR701 701E 601 601E to output to a remote zone Zone 2 or to another component for recording Rec Out To turn off the output press the OFF button The ZONE 2 indicator lights when a signal is output to...

Page 11: ...odels only Lights when an RDS station is received MEMORY indicator Lights when the MEMORY button is pressed to preset a radio station FM STEREO indicator Lights when an FM broadcast station is received in stereo Multi function display During normal operation shows the current input source and volume When the FM or AM input is selected shows the frequency and preset number When the DISPLAY button i...

Page 12: ...on button is pressed RETURN button 32 Press to enter the selected setting and return to the previous menu CH DISC button Press to select a preset channel for the tuner CH 38 When the CD mode is selected also press to select a disc when operating components with disc changers DISC 65 CH SEL TOP MENU button Press to select a speaker channel when adjusting the speaker level CH SEL 43 When the DVD mod...

Page 13: ...u can turn the Re EQ function on or off 49 DISPLAY For changing the display in the front display 45 DIMMER Adjusts the display brightness There are three settings available normal dark and very dark LIGHT button RC 533M only Press to turn on and off the lights in the buttons of the remote controller SETUP button 31 Press to display the Setup Menu on the TV screen and in the display Press again to ...

Page 14: ...or video connection Insert all plugs and connectors securely Improper connections can result in noise poor performance or damage to the equipment Do not bind audio video connection cables with power cords and speaker cables Doing so may adversely affect the picture and sound quality Cables are depicted in the connection diagrams as shown below Improper connection Inserted completely PR PB Y PR PB ...

Page 15: ...23 PRE OUT 21 When using the ZONE 2 SPEAKERS terminals 23 IR IN 22 Connecting your audio components 16 Connecting your video components 17 COMPONENT VIDEO INPUT OUTPUT 18 20 INPUT 1 INPUT 2 OUTPUT COMPONENT VIDEO PR PB Y COAXIAL OPTICAL 1 2 IN IN IN IN FRONT SURR CENTER SUB WOOFER VIDEO 2 VIDEO 1 VIDEO 2 DVD DVD TAPE CD TAPE CD L R L R VIDEO 3 VIDEO 1 V 12V TRIGGER OUT ZONE 2 VIDEO 3 OPTICAL IN IN...

Page 16: ...he TX SR701 701E 601 601E Make sure that you properly connect the left channel to the L jack and the right channel to the R jack If the compact disc player has a digital output connect it to either the DIGITAL INPUT COAXIAL jack or the DIGITAL INPUT OPTICAL jack of the TX SR701 701E 601 601E depending on the type of connector on the compact disc player With the initial settings of the TX SR701 701...

Page 17: ... the signal forgoes the extra processing that normally would degrade the image The result is vastly increased image quality with incredibly lifelike colors and crisp detail The signal that comes in from COMPONENT VIDEO INPUT is only sent to COMPONENT VIDEO OUTPUT When connecting a video player to the COMPONENT VIDEO INPUT jacks be sure to connect your television to the COMPONENT VIDEO OUTPUT jacks...

Page 18: ...utput jacks of the DVD player Make sure that you properly connect the left channels to the L jacks and the right channels to the R jacks If the device has a digital output connect it to either the DIGITAL IN COAXIAL jack or the DIGITAL IN OPTICAL jack of the TX SR701 701E 601 601E depending on the type of connector on the DVD player With the initial settings of the TX SR701 701E 601 601E the DVD i...

Page 19: ...01 701E 601 601E and connect the audio input jacks of the video cassette recorder to the VIDEO 1 OUT audio jacks of the TX SR701 701E 601 601E Make sure that you properly connect the left channels to the L jacks and the right channels to the R jacks If you are connecting a digital output device to the VIDEO 1 jack instead of a VCR connect it to either the DIGITAL IN COAX jack or DIGITAL IN OPT jac...

Page 20: ...01E and connect the audio input jacks of the device to the VIDEO 2 OUT audio jacks of the TX SR701 701E 601 601E Make sure that you properly connect the left channels to the L jacks and the right channels to the R jacks If the device has a digital output connect it to either the DIGITAL IN COAXIAL jack or the DIGITAL IN OPTICAL jack of the TX SR701 701E 601 601E depending on the type of connector ...

Page 21: ...puts at 12 V 100 mA 12V TRIGGER ZONE 2 terminal S Video output Digital output optical 9 Video camera Video game VIDEO 4 INPUT Video output Analog output R red L white These jacks are for connecting an auxiliary power amplifier You can use an auxiliary power amplifiers to listen at louder volumes than you can with the TX SR701 701E alone When using a power amplifier connect each speaker to the powe...

Page 22: ...n select Main at Hardware Config IR IN Position see page 55 The IR IN input allows you to control the TX SR701 701E 601 601E from the remote zone Zone 2 with the remote controller even though the remote zone may be on the other side of the building from the main zone The diagram below shows how to make the proper connections for the remote zone With this connection select Zone 2 at Hardware Config...

Page 23: ...lifier CD tape etc Adjust the volume with the amplifier connected to the ZONE 2 LINE OUT terminal In this connection whatever the Hardware Config setting is set to 6 1 channel playback is always available for main room 1 Connect the TX SR701 701E 601 601E to the amplifier for the remote zone 2 Connect the remote zone speaker cables to the speaker terminals on the amplifier When using the ZONE 2 SP...

Page 24: ...nges to that component Power off function When the TX SR701 701E 601 601E is placed in the standby state all connected components are also automatically put into the standby state Also if you press the ON button on the TX SR701 701E 601 601E remote controller while the TX SR701 701E 601 601E is turned on all connected components DVD players CD players MD recorders tuners etc are also turned on AC ...

Page 25: ... and right speakers at the same distance from the listening position Surround left and right speakers Place these speakers so that their height is 3 feet 1 meter higher than that of the listener s ears Surround back speakers Place these speakers so that their height is 3 feet 1 meter higher than that of the listener s ears TX SR701 701E only When using surround back left and right speakers place t...

Page 26: ...r terminals on the TX SR701 701E Using the surround back terminals on both the TX SR701 701E and power amplifier will not produce correct surround sound effect see page 55 Use the SUBWOOFER PRE OUT jack to connect a subwoofer with a built in power amplifier If your subwoofer does not have a built in amplifier connect an amplifier to the SUBWOOFER PRE OUT jack and the subwoofer to the amplifier If ...

Page 27: ...sary to connect the speakers correctly to your TX SR701 701E 601 601E Caution Be sure to connect the positive and negative cables for the speakers properly If they are mixed up the left and right signals will be reversed and the audio will sound unnatural Do not connect more than one speaker cable to one speaker terminal Doing so may damage the TX SR701 701E 601 601E Connect only speakers with an ...

Page 28: ...tton to turn on the TX SR701 701E 601 601E The display will light up and the STANDBY indicator will turn off If you press the STANDBY ON button again the receiver returns to standby state Turning on the power ON Turn off Before you can use the remote controller you must perform step 1 above and place the TX SR701 701E 601 601E in the standby state 1 Press the RCVR MODE button The RCVR MODE button ...

Page 29: ...ring use extend the antenna and adjust its orientation until the clearest signal is received Fix it with push pins or similar items in the position that will cause the least amount of distortion If the reception is not very clear with the attached FM indoor antenna the use of an outdoor antenna is recommended Connecting the AM loop antenna The AM loop antenna is for indoor use only Set it in the d...

Page 30: ...or antenna Indoor AM loop antenna Do not use the same antenna for both FM and TV or VCR reception since the FM and TV or VCR signals can interfere with each other If you must use a common FM TV or VCR antenna use a directional linkage type splitter Connecting the 300 Ω ribbon wire Loosen the screws on the adapter and wrap the wires of the ribbon wire around these screws Then tighten the screws dow...

Page 31: ...r on the remote controller to display the main menu Menu on the monitor and front display Displaying the Main Menu Menu 1 Hardware Config 2 Speaker Config 3 Speaker Distance 4 Level Calibration 5 Input Setup 6 Preference ENTER Quit SETUP TX SR701 701E 601 601E Remote controller For your reference to speaker size settings if the diameter of your speaker unit is larger than 6 1 2 16 cm use the Large...

Page 32: ...de setting Adjustable Crossover for Bass Management TX SR701 701E f Crossover This setting allows you to set the crossover frequency for your speaker system The crossover frequency is the minimum frequency delivered to a speaker and can be set to 40 Hz 60 Hz 80 Hz THX 100 Hz 120 Hz or 150Hz Select 80Hz THX if you are using a THX certified speaker system This setting is valid when Subwoofer is set ...

Page 33: ...ng position Menu 1 Hardware Config 2 Speaker Config 3 Speaker Distance 4 Level Calibration 5 Input Setup 6 Preference ENTER Quit SETUP Menu 1 Speaker Config 2 Speaker Distance 3 Level Calibration 4 Input Setup 5 OSD Setup 6 Preference 3 Speaker Distance a Unit feet b Left 12ft c Center 12ft d Right 12ft e Surr Right 7ft f Surround Back 7ft g Surr Left 7ft h Subwoofer 7ft Quit SETUP 4 Use the and c...

Page 34: ...OSD Setup 6 Preference 3 Speaker Distance a Unit feet b Front L R 12ft c Center 12ft d Surr Right 7ft e Surround Back 7ft f Surr Left 7ft g Subwoofer 7ft Quit SETUP 8 Use the and cursor buttons to select Subwoofer and then use the and cursor buttons to set the distance from the subwoofer speaker to your normal listening position Note The speaker distance value for subwoofer speaker cannot be 5 fee...

Page 35: ...e from the front right speaker so that it is the same level as that was emitted from the center speaker 4 Use the CH SEL button to select other speakers and adjust the volumes until all speakers are adjusted to the same level The pink noise level can be adjusted to anywhere between 12 and 12 decibels for all speakers in 1 decibel increments For subwoofer values between 15 and 12 dB can be set 2 Pr...

Page 36: ... button to select other speakers and adjust the volumes until all speakers are adjusted to the same level The pink noise level can be adjusted to anywhere between 12 and 12 decibels for all speakers in 1 decibel increments For subwoofer values between 15 and 12 dB can be set 2 Press the TEST button to complete the procedure You can change settings in the Setup Menu using the buttons on the front p...

Page 37: ...nel tune into the station you desire The tuner frequency changes in 100 kHz or 50 kHz increments for FM and 10 kHz or 9 kHz increments for AM You can press the TUNING or button continuously for more than 0 5 seconds to scan for an FM station in the direction of the button you pressed FM auto tuning mode After you release the button and a station is received in stereo the scanning stops The Europea...

Page 38: ...dicator turns off and the assigned number lights This programs the radio station as a preset radio station Up to 40 stations can be stored in memory as preset radio stations Presetting a radio station MEMORY Lights red Flashes PRESET TUNING Lights 1 Press the TUNER input source button 2 Press the PRESET buttons and select the number of the desired preset station When using the remote controller 1 ...

Page 39: ...ay appear on the display if the TX SR701E 601E receives characters that cannot be displayed correctly This is not a malfunction When an RDS station broadcasting PS information is selected the name of the station is displayed instead of the frequency Listening to RDS broadcasts The text given below in parenthesis is what is actually displayed on the TX SR701E 601E None NONE No program type News rep...

Page 40: ...the TUNER input source button and select the FM input source 2 Press the RT PTY TP button twice The current program type appears on the display 3 Using the buttons select the PTY program type you desire Displaying Radio Text RT Performing a PTY scan TUNER PRESET TUNING 4 Press the ENTER button The TX SR701E 601E will scan until it reaches a station of the program type you selected It will then sto...

Page 41: ...erating instructions for the source device 3 Adjust the volume to an appropriate level Adjusting the main volume adjusts the volume level of all the speakers connected to the TX SR701 701E 601 601E together If headphones are connected this also adjusts the volume heard from the headphone speakers To adjust the volume either press the VOL buttons on the remote controller or turn the MASTER VOLUME d...

Page 42: ...1E 601 601E will not automatically switch to analog output even though Auto is selected with the AUDIO SELECTOR button Selecting the type of audio input signal AUDIO SELECTOR TX SR701 701E 601 601E Remote controller Notes on DTS If you play a DTS formatted CD or LD when the PCM setting is selected on the TX SR701 701E 601 601E the DTS encoded signal will not be decoded and noise will be output Thi...

Page 43: ...r the maximum level indicated on the display will change if you raise the volume level When you press the TEST button after you set the level the current level will be used as the value set via the test tone If you connected an MD recorder to the TAPE jacks of the TX SR701 701E 601 601E you can have MD appear when the TAPE source button is pressed By changing the display when an Onkyo MD recorder ...

Page 44: ...ne 2 only set the sleep function with the main zone turned on and then put the main zone into the standby state To listen with headphones plug a pair of headphones with a standard stereo plug into the PHONES jack on the TX SR701 701E 601 601E front panel When you connect the headphones the TX SR701 701E 601 601E will enter the STEREO mode automatically and no sound will be heard from the speakers ...

Page 45: ...the TX SR701 701E 601 601E or the remote controller You can set separate video displays for when the input source is set to AM or FM broadcasts and for when it is set to anything else When an input source other than FM or AM is selected When the input signal is digital audio The program format is displayed For example the display Dolby D 3 2 1 shows that the format is Dolby Digital with 5 1 discre...

Page 46: ... stereo output This mode can be used with VHS and DVD videos with the mark and certain television programs The Music mode can be used with music compact discs and other stereo sources Dolby D Dolby Digital This mode is used for playing Dolby Digital sources Dolby Digital is compressed digital data with a maximum of 5 1 channel surround sound This source signal comes from DVDs and LDs that have the...

Page 47: ...nels depends on the source and may not fit your tastes Mono Movie This mode is suitable for playing back monaural recording such as old movie soundtracks The center channel delivers the unprocessed original sound whereas the other channels deliver the center channel sound processed with the appropriate reverberation This allows you to enjoy monaural sound with the atmosphere of a movie theater Enh...

Page 48: ...l type that is currently being input from the selected input source to the surround mode that matches the signal type e g Dolby Pro Logic II Dolby Digital DTS or DTS Neo 6 If pressed the corresponding settings in the Input Setup menu for the selected input source is also changed see page 54 If the SURROUND button is pressed While playing back DTS sources Each time you press the button the DTS ES s...

Page 49: ... in the Input Setup menu for the selected input source is also changed see page 54 DSP Changes the listening mode for the signal type that is currently being input from the selected input source as shown below Orchestra Unplugged Studio Mix TV Logic All Ch Stereo Mono T D Mono Movie Enhance Orchestra If pressed the corresponding settings in the Input Setup menu for the selected input source is als...

Page 50: ...h time you press the button the DTS ES setting switches from Auto On Off Auto When a DTS source with a DTS ES flag ID signal for DTS ES is input the listening mode changes automatically to DTS ES Discrete 6 1 or DTS ES Matrix 6 1 If the DTS source has no DTS ES flag the source is played in DTS mode On When a DTS source with a DTS ES flag is input the listening mode changes automatically to DTS ES ...

Page 51: ...icture soundtracks Select this function if the sound from the front speakers is too bright This function only works in the Dolby Digital Dolby Digital EX Dolby Pro Logic II Movie DTS DTS ES Discrete 6 1 DTS ES Matrix 6 1 DTS Neo 6 Cinema All Ch Stereo Mono listening modes Press the CINE FLTR button on the remote controller The current setting is displayed Press the button again to change the setti...

Page 52: ...tal Input OPT1 b Component Video Input1 c IntelliVolume 0dB Quit SETUP Menu 1 Speaker Config 2 Speaker Distance 3 Level Calibration 4 Input Setup 5 OSD Setup 6 Preference 5 Input Setup Input DVD d Analog PCM D F 2ch Last Valid e PCM fs 96k Last Valid f D F Last Valid g D F Mono Last Valid Quit SETUP 4 Use the and cursor buttons to select an item and then use the and cursor buttons to set the desir...

Page 53: ...n your various input source components When switching input sources you may find that the output level for different components or input sources connected to the TX SR701 701E 601 601E is different even though the main volume setting is the same Under normal circumstances you would then have to change the volume setting each time you change the input source This Intelli Volume setting allows you t...

Page 54: ...mono is monaural digital source such as DVD or LD which is recorded in Dolby Digital mono format Relationship between input source and listening mode 1 TX SR701 701E only 2 Not Available when the input source is the D F 2ch source 3 Available when the Dolby Digital EX setting is set to Auto with the software having an EX flag or set to On see pages 48 50 4 Available when the DTS ES setting is set ...

Page 55: ...ition TX SR601 601E Use this setting when you have a remote control sensor connected to the IR IN terminal The setting in this menu tells the TX SR701 701E 601 601E whether the remote control sensor is being used for operation of the TX SR701 701E 601 601E in the main zone or the remote zone Zone 2 Main Select when you are using the remote control sensor for operation with the remote controller in...

Page 56: ...aspect ratio Hint If this is set to Off the background color will not be displayed even when there is no video signal input d Volume Display You can choose from two ways of displaying the volume setting on screen Absolute This displays the volume with a minimum of 0 for no sound and a maximum of 100 As a reference the volume setting of Ref 82 is equivalent to 0 decibels for the relative display me...

Page 57: ...y or THX TX SR701 701E only is selected as the listening mode these settings cannot be made To make these settings first select another listening mode Double Bass The Double Bass function boosts the bass sound by letting the bass sound of Front L R speakers output also from the subwoofer To enable this function in the Speaker Config menu set the Subwoofer to Yes and FrontL R to Large The Double Ba...

Page 58: ...center and main speakers and effect the width of the center sound image or weight of the sound Many sound recordings processed for stereo playback will be reproduced better by proper control of this setting The recommended setting for Pro Logic II Music mode is 3 This allows you to easily distinguish the Pro Logic II Music mode from the Pro Logic II Movie mode whose setting is automatically set to...

Page 59: ...l ranges of the center channel signal Off Select to output the center channel signal at the regular level and frequency characteristics Front Effect Orchestra Unplugged Studio Mix TV Logic Enhance Mono Movie Some live recordings contain acoustic reverberation When you play these sources more reverberation will be applied by the DSP creating too much reverb effects and the sound loses frame or pres...

Page 60: ...is using the system in the remote zone the Zone 2 function will be deactivated and the source will turn off in the remote zone If you select FM or AM with the TUNER input source button when the source for the remote zone Zone 2 is set to AM or FM the output for the remote zone also changes to FM or AM When you are using the remote zone Zone 2 system operation will not work In the remote zone you c...

Page 61: ...ont display 3 Start recording at the recording device connected to the TAPE OUT jacks Recording the input source REC OUT selector VIDEO 3 TAPE VIDEO 4 VIDEO 2 DVD VIDEO 1 VCR 2 VCR 1 TUNER CD PHONO Note Be aware that if you change the input source that you are watching or listening to the selected source will be recorded Recording a source different from that you are listening to The TX SR701 701E...

Page 62: ...rce that you are watching or listening to the selected source will be recorded Hint You can also record the video from one source and the audio from another source together to make your own home movies and the like For example if you want to record the video from a video camera connected to VIDEO 4 and the audio from a CD player connected to CD IN at step 1 above press the VIDEO 4 source button an...

Page 63: ...desired operation button Operation buttons CH Selects the desired preset station number You may also use the following buttons VOL Adjusts volume at TX SR701 701E 601 601E MUTING Activates muting function at TX SR701 701E 601 601E The connector of the Onkyo cassette tape deck must be connected to the TX SR701 701E 601 601E see page 24 1 Press the RCVR MODE button The RCVR MODE button lights 2 Pres...

Page 64: ...enu of the DVD player ENTER Enter button for the OSD Menu of the DVD player RETURN Return button for the OSD Menu of the DVD player TOP MENU or MENU Displays menu screens recorded on DVD media DISC Selects disc in DVD changer AUDIO SEL Selects audio or language track if recorded on the DVD ANGLE Selects a camera angle if recorded on the DVD SUBTITLE Selects subtitle language if recorded on the DVD...

Page 65: ...re the operation buttons that can be used to control an Onkyo compact disc player Operation buttons ON Turns on and off the compact disc player same as STANDBY button on the remote controller DISC Selects a disc in the CD changer Track down Track up Play Stop Skip backward Skip forward Pause Opens closes the disc tray 0 1 to 9 10 Numeric keys RANDOM Random playback You may also use the following b...

Page 66: ...Track up Play Stop Skip backward Skip forward REC Record Pause Eject 1 to 9 0 Numeric keys ENTER Enters the settings You may also use the following buttons VOL Adjusts volume at TX SR701 701E 601 601E MUTING Activates muting function at TX SR701 701E 601 601E Note The SAT MD button is used for operating satellite tuners and Onkyo MD recorders Be aware that if you enter the preset code for a satell...

Page 67: ...sed and turns off when the DISPLAY button is pressed When the indicator turns off release both buttons The SEND LEARN indicator lights again 4 Within 30 seconds enter the 3 digit code number The SEND LEARN indicator slowly flashes twice If the SEND LEARN indicator quickly flashes three times then either a mistaken 3 digit code was entered or an incorrect operation was performed If this occurs retu...

Page 68: ...6 357 358 359 360 361 362 363 364 NEC 365 366 367 NOKIA 313 NORDMENDE 368 369 370 OKANO 371 372 ORION 319 373 PANASONIC 374 375 376 377 378 PHILIPS 353 379 380 PHONOLA 311 PIONEER 381 RCA 382 SABA 383 SAMSUNG 384 385 386 387 388 389 390 SANYO 391 392 393 SCOTT 394 SELECO 395 SHARP 396 397 398 399 SHINTOM 400 SIEMENS 401 SONY 402 403 404 405 406 407 408 409 410 411 412 413 SYMPHONIC 414 TEKNIKA 414...

Page 69: ...eset channel Moves cursor ENTER Confirms selection MENU Displays menu 0 1 to 9 Numeric keys ENTER Confirm You may also use the following buttons VOL Adjusts the volume at the TX SR701 701E 601 601E MUTING Activates the muting function at the TX SR701 701E 601 601E 1 Press the CABLE MODE button The CABLE MODE button lights 2 Press the desired operation button The buttons shaded in the figure to the...

Page 70: ... forward Pause 0 1 to 9 10 Numeric keys You may also use the following buttons VOL Adjusts the volume at the TX SR701 701E 601 601E MUTING Activates the muting function at the TX SR701 701E 601 601E 1 Press the TV MODE button The TV MODE button lights 2 Press the desired operation button The buttons shaded in the figure to the left are the operation buttons that can be used to control your televis...

Page 71: ... 515M remote controller Any button is programmable for this step except for the eight MODE buttons RCVR CD DVD SAT MD TV VCR and CABLE the two MACRO buttons 1 and 2 and the LIGHT button RC 533M only Even after the commands have been memorized keep your old remote controller in a safe place If for some reason the commands are lost e g when the batteries run down it will be necessary to memorize the...

Page 72: ...ble to be programmed Some remote controllers have a single button that performs multiple functions for example the function may change each time the button is pressed If this is the case each function must be programmed to a separate button on the remote controller Once you have transferred the commands from the other remote controller refer to the instruction manual that came with that product fo...

Page 73: ...ro described above on this page for the MACRO button perform the steps given below 1 Press and hold down any one of the seven MODE buttons press the MACRO 1 or 2 button and then release both buttons When you press the MODE button it lights and the SEND LEARN indicator lights When you press the MACRO 1 or 2 button the indicator turns off When you release the buttons the indicator flashes briefly an...

Page 74: ... in Step 2 then you will in effect be overwriting the previous macro with a new macro This procedure will erase all the commands and macros that you have programmed into the remote controller and return it to its default settings This operation will not affect the preset settings of the remote controller 1 Open the battery cover and remove the batteries from the remote controller 2 While pressing ...

Page 75: ... to Large or Small at Speaker Config see page 31 No sound or very low volume from subwoofer Subwoofer setting is set to No Set the Subwoofer setting to Yes at Speaker Config see page 32 Subwoofer volume is set to minimum Set the subwoofer level to the appropriate volume see page 34 POWER SPEAKERS Low frequency humming is heard Turntable motor is not properly grounded TX SR701 701E only Check for p...

Page 76: ...d to COMPONENT VIDEO OUT connectors see page 20 VIDEO and AUDIO Front panel controls function but remote controller controls do not No batteries in remote controller Insert batteries see page 7 Batteries have worn out Replace batteries see page 7 Remote controller is not pointed at the remote sensor of the TX SR701 701E 601 601E Point the remote controller at the remote sensor of the TX SR701 701E...

Page 77: ...he muting is activated Zone 2 is not On Will not work because the Zone 2 has not been turned on Also refer to the respective instruction manuals of the CD player DVD player video cassette recorder TV monitor etc that compose your entertainment system The TX SR701 701E 601 601E contains an internal microcomputer that performs high level operations However on extremely rare occasions noise or interf...

Page 78: ...6 dB IHFA 0 5V input Direct mode Muting 50 dB TUNER SECTION FM Tuning range USA Canadian models 87 50 108 00 MHz 100 kHz steps Other area models 87 50 108 00 MHz 50 kHz steps Usable sensitivity Mono 11 2 dBf 1 0 µV 75 Ω IHF 0 9 µV 75 Ω DIN Stereo 17 2 dBf 2 0 µV 75 Ω IHF 23 µV 75 Ω DIN 50 dB quieting sensitivity Mono 17 2 dBf 2 0 µV 75 Ω Stereo 37 2 dBf 20 µV 75 Ω Capture ratio 2 0 dB Image reject...

Page 79: ...USA Canadian models 87 50 108 00 MHz 100 kHz steps Other area models 87 50 108 00 MHz 50 kHz steps Usable sensitivity Mono 11 2 dBf 1 0 µV 75 Ω IHF 0 9 µV 75 Ω DIN Stereo 17 2 dBf 2 0 µV 75 Ω IHF 23 µV 75 Ω DIN 50 dB quieting sensitivity Mono 17 2 dBf 2 0 µV 75 Ω Stereo 37 2 dBf 20 µV 75 Ω Capture ratio 2 0 dB Image rejection ratio USA Canadian models 40 dB Other area models 85 dB IF rejection rat...

Page 80: ...RATION 18 Park Way Upper Saddle River N J 07458 U S A Tel 201 785 2600 Fax 201 785 2650 http www onkyousa com ONKYO EUROPE ELECTRONICS GmbH Liegnitzerstrasse 6 82194 Groebenzell GERMANY Tel 49 8142 4401 0 Fax 49 8142 4401 555 http www onkyo net ONKYO CHINA LIMITED Units 2102 2107 Metroplaza Tower I 223 Hing Fong Road Kwai Chung N T HONG KONG Tel 852 2429 3118 Fax 852 2428 9039 ...

Page 81: ......

Page 82: ......

Page 83: ......

Page 84: ......

Page 85: ......

Page 86: ......

Page 87: ......

Page 88: ......

Reviews: