

DVD player
TV
HDMI
IN
TV
VIDEO 1
IN
HDMI
OUT
Antenna input
(e.g., RF IN)
Cable/
satellite
Cable/satellite
VIDEO
OUT
AUDIO
OUT
L
R
DIGITAL
OUT
COAXIAL
Antenna input
(e.g..RF IN)
DVD player
VIDEO
OUT
AUDIO
OUT
DIGITAL
OUT
COAXIAL
L
R
HDMI
OUT
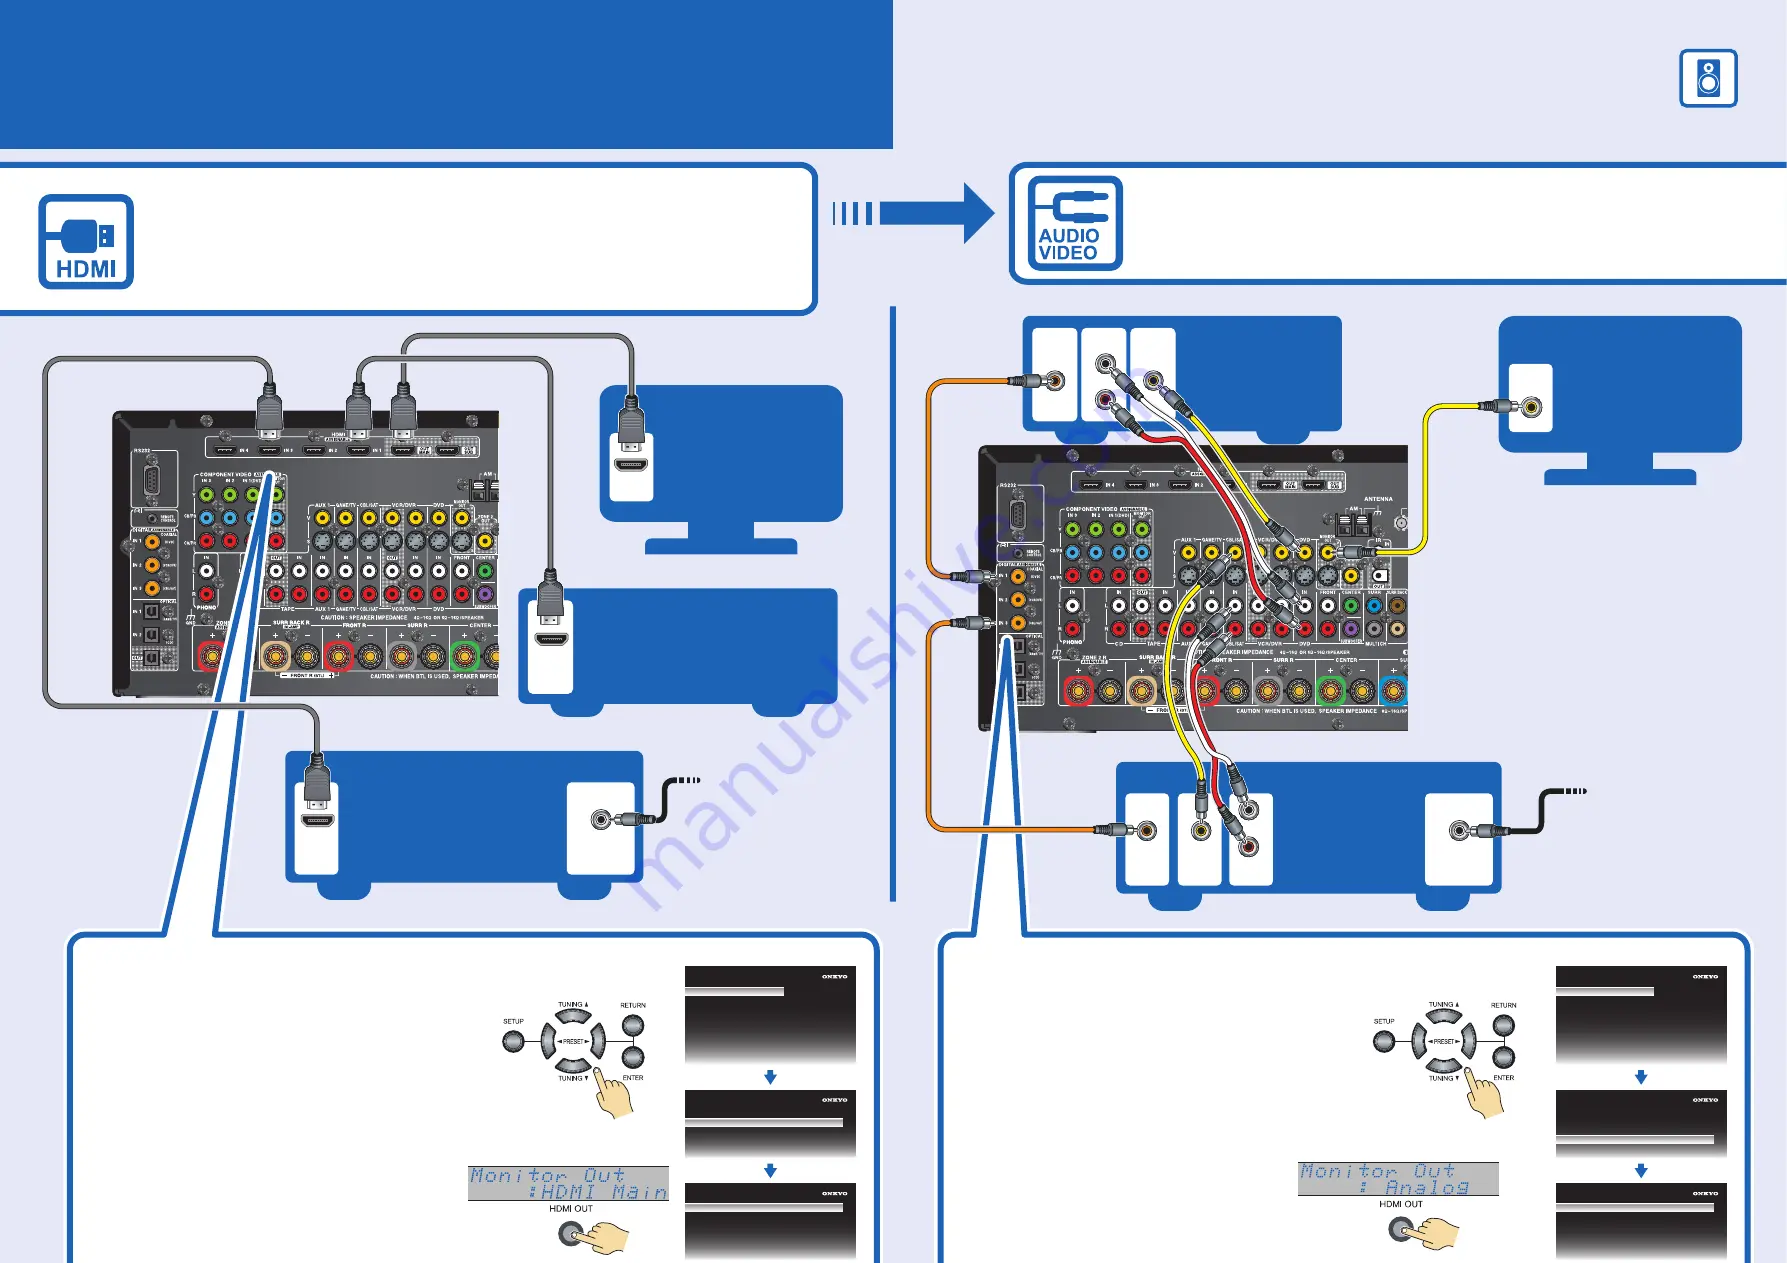
AV Component Hookup
IF NO HDMI
See the other side of this sheet for the Speaker hookup.
With an HDMI cable you can send both audio and video with a single cable,
making connecting simple and keeping wires neat.
If you have an HDMI-compatible TV and players, you can connect them
to the AV receiver with HDMI cables. Digital audio signals received
at HDMI IN input are output by the speakers and headphones connected
to the AV receiver.
If your TV or player doesn
’
t support HDMI, use the analog or digital
connections shown below.
Please ensure the monitor input
(VIDEO 1, VIDEO 2, VIDEO 3, etc.)
selected corresponds to actual
connection used.
Coaxial feed from
TV antenna
If you are not using
Cable/satellite box,
please refer to the
instruction manual.
Coaxial feed from
TV antenna
If you are not using
Cable/satellite box,
please refer to the
instruction manual.
Using the Digital Inputs
If there’s no sound, you’ll need to assign the
digital inputs as necessary using the onscreen
setup menus.
If you connect your DVD player to the AV
receiver’s DIGITAL COAXIAL IN 1, and your
cable/satellite receiver to the DIGITAL COAXIAL IN 3,
as shown, it’s not necessary to assign the digital input.
On the front panel
On the front panel
In addition, you must set the “Monitor
Out” setting to “Analog” by pressing
the [HDMI OUT] button first.
MENU
1. Input/Output Assign
2. Speaker Setup
3. Audio Adjust
4. Source Setup
5. Listening Mode Preset
6. Miscellaneous
7. Hardware Setup
8. Lock Setup
1. Monitor Out
2. HDMI Input
3. Component Video Input
4. Digital Audio Input
5. Analog Audio Input
1. Input/Output
Assign
DVD
VCR/DVR
CBL/SAT
GAME/TV
AUX1
AUX2
1–2. HDMI
Input
HDMI1
HDMI2
HDMI3
HDMI4
- - - - -
- - - - -
MENU
1. Input/Output Assign
2. Speaker Setup
3. Audio Adjust
4. Source Setup
5. Listening Mode Preset
6. Miscellaneous
7. Hardware Setup
8. Lock Setup
1. Monitor Out
2. HDMI Input
3. Component Video Input
4. Digital Audio Input
5. Analog Audio Input
1. Input/Output
Assign
DVD
VCR/DVR
CBL/SAT
GAME/TV
AUX1
AUX2
1–4. Digital Audio Input
COAX1
COAX2
COAX3
OPT1
- - - - -
FRONT
Using the HDMI Inputs
If there’s no picture on your TV, you’ll need to
assign the HDMI inputs as necessary using the
onscreen setup menus.
If you connect your DVD player to the AV receiver’s
HDMI IN 1, and connect your cable or satellite
receiver to HDMI IN 3, as shown above, it’s not
necessary to change the default assignments.
In addition, you must set the “Monitor Out”
setting to “HDMI Main” by pressing the
[HDMI OUT] button.
(If your TV is not connected to the HDMI OUT,
set the “Monitor Out” setting to “Analog”.)


