background image

En-

21

Enjoying Audio Sources

—Continued

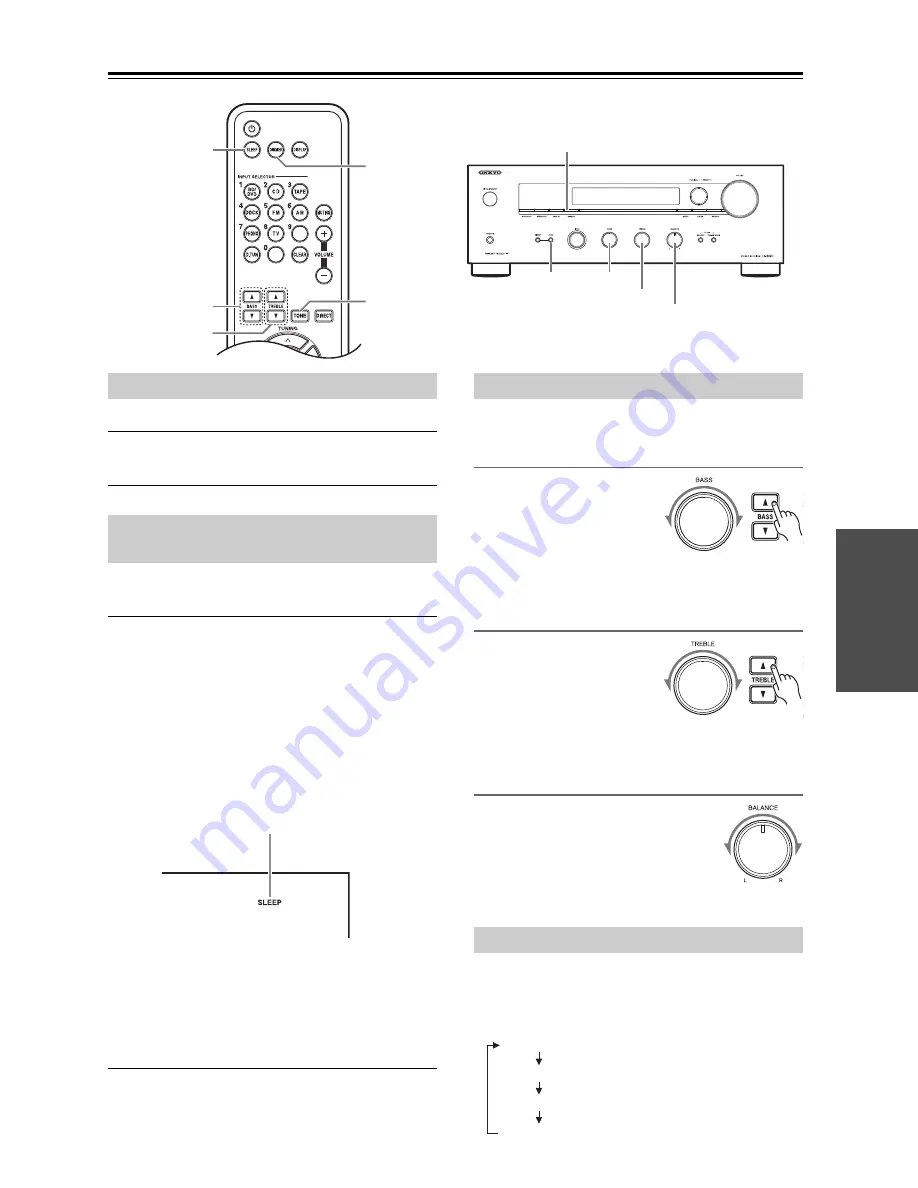
You can adjust the brightness of the display.

Press the [DIMMER] button repeatedly to select: 
dim, dimmer, or normal brightness.

With the sleep timer, you can set the receiver so that it 
turns off automatically after a specified period.

Press the remote controller’s [SLEEP] button 
repeatedly to select the required sleep time.

You can set the sleep time from 90 to 10 minutes in 10 
minute steps. At this time, by using the remote 
controller’s [

]/[

] buttons, you can set the time in 

1 minute steps.

The SLEEP indicator appears on the display when the 
sleep timer has been set, as shown. The specified sleep 
time appears on the display for about 5 seconds; then the 
previous display reappears.

To cancel the sleep timer,

 press the [SLEEP] button 

repeatedly until the SLEEP indicator disappears.

To check the remaining sleep time,

 press the [SLEEP] 

button. Note that if you press the [SLEEP] button while 
the sleep time is being displayed, you’ll shorten the sleep 
time by 10 minutes.

This section explains the following functions that can be 
used with any input source.

Adjusting the Bass

You can adjust the Bass sounds 
by rotating the [BASS] control 
on the receiver or pressing the 
remote controller’s BASS [

]/

[

] buttons. You can set the 

level from –6 to +6. Set it higher to make them louder. 
Set it lower to make them quieter.

Adjusting the Treble

You can adjust the Treble 
sounds by rotating the 
[TREBLE] control on the 
receiver or pressing the remote 
controller’s TREBLE [

]/[

buttons. You can set the level from –6 to +6. Set it higher 
to make them louder. Set it lower to make them quieter.

Adjusting the Balance

The [BALANCE] control is used to 
control the relative volume level of the 
left and right speaker systems.

Note:

If headphones are connected, the 
BALANCE control has no effect.

You can check the tone level by pressing the [TONE] 
button repeatedly.

The display will change as follows each time you press 
the [TONE] button.

SLEEP

BASS [

F

]/[

H

]

TREBLE [

F

]/[

H

]

DIMMER

TONE

BASS

TONE

DIMMER

TREBLE

BALANCE

Setting the Display Brightness

Using the Sleep Timer 
(remote controller only)

SLEEP Indicator

Using the Tone and Balance Controls

Displaying the Tone Level

Current input source

“TONE MODE” display

Bass tone level

Treble tone level

Summary of Contents for TX-8020

Page 1: ...in the unit Following the instructions in this manual will enable you to obtain optimum performance and listening enjoyment from your new Stereo Receiver Please retain this manual for future reference...

Page 2: ...paratus does not operate normally by following the operating instructions Adjust only those controls that are covered by the operating instructions as an improper adjustment of other controls may resu...

Page 3: ...not be exposed to excessive heat as sunshine fire or the like 7 Never Touch this Unit with Wet Hands Never handle this unit or its power cord while your hands are wet or damp If water or any other li...

Page 4: ...atus may not correspond with the coloured mark ings identifying the terminals in your plug proceed as follows The wire which is coloured blue must be connected to the terminal which is marked with the...

Page 5: ...ng On the Receiver 19 Turning On and Standby 19 Auto Standby 19 Enjoying Audio Sources 20 Selecting the Speaker Set 20 Muting the Receiver remote controller only 20 Using Headphones 20 Setting the Dis...

Page 6: ...y Free Memory Back up Full Sized Full Function RI Remote Control Supplied Accessories Make sure you have the following accessories Remote controller and two batteries AAA R03 Indoor FM antenna AM loop...

Page 7: ...MMER button 21 e SETUP button 13 19 22 24 27 f TUNING PRESET buttons 25 26 29 g ENTER button 29 h RETURN button 13 19 22 24 27 i VOLUME control 20 j PHONES jack 20 k DIRECT TONE buttons 21 22 l INPUT...

Page 8: ...OUT jack 12 d SPEAKERS A and B terminals 11 e PHONO IN MM jacks and GND terminal 16 f CD IN jacks 16 g BD DVD IN jacks 16 h DOCK IN jacks 16 i TAPE IN OUT jacks 16 18 j TV IN jacks 16 k DIGITAL IN OPT...

Page 9: ...b Headphone indicator c Message area d Tuning indicators RDS indicator European model 28 AUTO indicator 25 TUNED indicator 25 FM STEREO indicator 25 32 e MUTING indicator 32 f SLEEP indicator 21 g ASb...

Page 10: ...25 26 e CLEAR button 27 f BASS buttons 21 g TREBLE buttons 21 h Arrow and ENTER buttons 13 19 22 24 26 27 31 i SETUP button 13 19 22 24 27 j DIMMER button 21 k DISPLAY button 27 28 29 l SLEEP button...

Page 11: ...Pay close attention to speaker wiring polarity In other words connect positive terminals only to positive terminals and negative terminals only to negative terminals If you get them the wrong way aro...

Page 12: ...powered subwoofer If your subwoofer is unpowered and you re using an external amplifier connect the SUBWOOFER PRE OUT to the amp s input Note SUBWOOFER PRE OUT is linked to SPEAKER A s On Off When SP...

Page 13: ...ou want to change the impedance setting back to the factory default setting of 6 follow the same procedure described above 6 Press the SETUP button on the remote controller to complete the setting Not...

Page 14: ...eceiver TV speaker cables and power cords Refer to Radio Frequency Setup on page 24 for more information on switching the frequency setup Tips If you cannot achieve good reception with the supplied in...

Page 15: ...k component The receiver s optical digital jacks have shutter type covers that open when an optical plug is inserted and close when it s removed Push plugs in all the way Caution To prevent shutter da...

Page 16: ...HONO IN See your turntable s manual for details If your turntable has a ground wire connect it to the GND screw With some turntables connecting the ground wire may produce an audible hum If this happe...

Page 17: ...t component as the input source Remote Control You can use the receiver s remote controller to control your other Dock pointing the remote controller at the receiver s remote control sensor instead of...

Page 18: ...ll be recorded as noise so don t attempt analog recording of DTS CDs or LDs Connect the receiver s power cord to a suitable wall outlet Notes Before connecting the power cord connect all of your speak...

Page 19: ...an model Notes If you re listening at a low volume the Auto Standby function may detect this as silence With some sources the Auto Standby function may activate itself during playback 1 Press the butt...

Page 20: ...down the volume You can temporarily mute the output of the receiver Press the remote controller s MUTING button The receiver is muted To unmute the receiver press the MUTING button again Note The Mut...

Page 21: ...xplains the following functions that can be used with any input source Adjusting the Bass You can adjust the Bass sounds by rotating the BASS control on the receiver or pressing the remote controller...

Page 22: ...nput Note The maximum sampling rate for PCM signals from a digital input optical and coaxial is 96 kHz 24 bit 1 Press the button to turn on the power 2 Press the SETUP button on the remote controller...

Page 23: ...recorder Set the recorder so that it s ready for recording If necessary adjust the recording level on the recorder See the recorder s manual for more information 2 Use the receiver s INPUT selector o...

Page 24: ...se the arrow buttons to select AM FM FreqStep North American model or AM Freq Step European model and then press ENTER 4 Use the arrow buttons to specify the frequency 5 Press the ENTER button to conf...

Page 25: ...a station is found Manual Tuning The frequency stops changing when you release the button Press the buttons repeatedly to change the frequency one step at a time The frequency changes in 0 05 MHz ste...

Page 26: ...procedure for all of your favorite AM FM radio stations Selecting Presets To select a preset use the remote controller s arrow buttons or the receiver s PRESET buttons Selecting Preset by entering Pr...

Page 27: ...ENTER button If the displayed character string pattern does not contain the character you want to input use the buttons to display the Shift BS OK character string use the buttons to select Shift and...

Page 28: ...racters may be displayed when unsupported characters are received This is not a malfunction If the signal from an RDS station is weak RDS data may be displayed intermittently or not at all Switching t...

Page 29: ...by type 1 Use the DISPLAY button to display PTY The current program type appears on the display Note If you tuned to another station than RDS Not RDS will appear 2 Use the PRESET buttons to select the...

Page 30: ...The available functionality depends on the receiver iPod iPhone Alarm If you use the Alarm function on your iPod iPhone to start playback the receiver will turn on at the specified time and select you...

Page 31: ...the input source Notes With some iPod iPhone models or generations or some RI Docks certain buttons may not work as expected For details on operating your iPod iPhone please refer to the instruction m...

Page 32: ...Press the TONE button to turn the function off Reception is noisy stereo FM reception suffers from hiss or the FM STEREO indicator doesn t appear Relocate your antenna Move the receiver away from your...

Page 33: ...receiver contains a microcomputer for signal processing and control functions In very rare situations severe interference noise from an external source or static electricity may cause it to lockup In...

Page 34: ...verload 70 mV MM 1 kHz 0 5 Frequency Response 10 Hz 100 kHz 1 dB 3 dB CD Tone Control Characteristics 11 dB 100 Hz BASS 11 dB 10 kHz TREBLE Signal to Noise Ratio 100 dB CD IHF A 80 dB PHONO MM IHF A S...

Page 35: ...Memo...

Page 36: ...en House Ground floor 69 71 Clarendon Road Watford Hertfordshire WD17 1DS United Kingdom Tel 44 0 8712 00 19 96 Fax 44 0 8712 00 19 95 Unit 1033 10 F Star House No 3 Salisbury Road Tsim Sha Tsui Kowlo...

Reviews: