background image

5

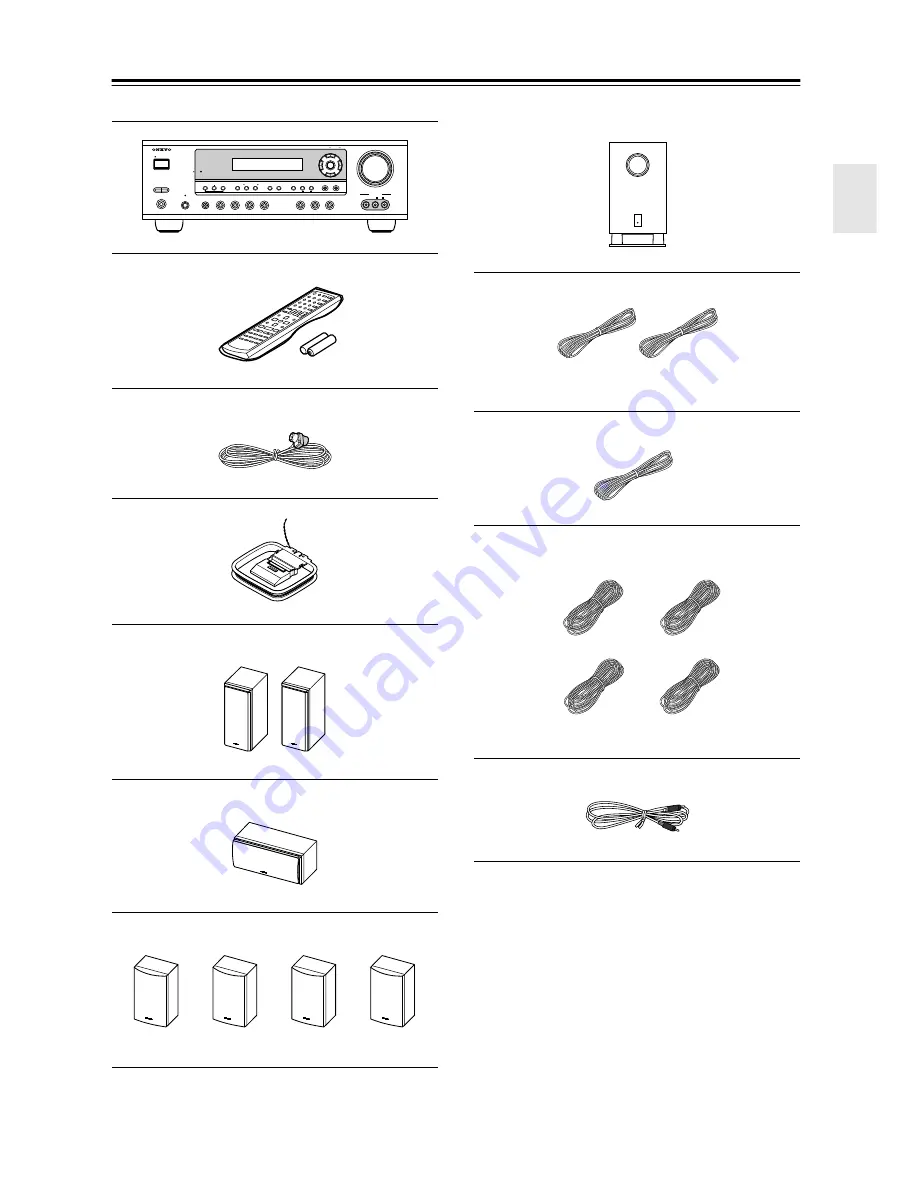
Supplied Accessories

Make sure you have the following accessories:

  * In catalogs and on packaging, the letter at the end of the 

product name indicates the color. Specifications and oper-
ation are the same regardless of color.

AV receiver  (HT-R530)

Remote controller & two batteries (AA/R6)

Indoor FM antenna

AM loop antenna

Front speakers (SKF-530F)

Center speaker (SKC-530C)

Surround and Surround back speakers 
(SKM-530S/SKB-530)

TONE

+

STEREO

LISTENING MODE

DISPLAY DIGITAL INPUT

RT/PTY/TP MEMORY TUNING MODE

RETURN

TUNING / PRESET

ENTER

SETUP

STANDBY

STANDBY/ON

CLEAR

PURE AUDIO

PHONES

MULTl CH

DVD

VIDEO 1

VIDEO 2

VCR

VIDEO 3

TAPE

TUNER

CD

VIDEO

VIDEO 3 INPUT

AUDIO

L

R

MASTER VOLUME

A   SPEAKERS   B

Subwoofer (SKW-530)

Speaker cable for front speakers 15 ft. (4.5 m)

Speaker cable for center speaker 10 ft. (3 m)

Speaker cables for surround speakers 30 ft. (9 m)

RCA cable for subwoofer connection 10 ft. (3 m)

(Red)

(White)

(Green)

(Blue)

(Gray)

(Brown)

(Tan)

Summary of Contents for SKB-530

Page 1: ...is manual thoroughly before making connections and plugging in the unit Following the instructions in this manual will enable you to obtain optimum performance and listening enjoyment from your new 7...

Page 2: ...aratus does not operate normally by following the operating instructions Adjust only those controls that are covered by the operating instructions as an improper adjustment of other controls may resul...

Page 3: ...the case This unit s top and rear panels may get warm after prolonged use This is normal If you do not use this unit for a long time it may not work properly the next time you turn it on so be sure to...

Page 4: ...e unit away from the turntable or CD player otherwise lower the unit s output level Using Close to a TV or Computer TVs and computer monitors are magnetically sensitive devices and as such are likely...

Page 5: ...30C Surround and Surround back speakers SKM 530S SKB 530 TONE STEREO LISTENING MODE DISPLAY DIGITAL INPUT RT PTY TP MEMORY TUNING MODE RETURN TUNING PRESET ENTER SETUP STANDBY STANDBY ON CLEAR PURE AU...

Page 6: ...ts 1 output 3 S Video inputs 2 outputs 4 assignable digital inputs 3 optical 1 coaxial Subwoofer pre out Color coded multichannel input for use with Super Audio CD and DVD Audio A B speaker drive Colo...

Page 7: ...Turning On First Time Setup Turning On 32 Turning On the AV Receiver 32 First Time Setup 33 Assigning Digital Inputs to Input Sources 33 Changing the TAPE MD CDR Display 33 Basic Operation Playing Yo...

Page 8: ...ed input source H DIGITAL INPUT button 33 This button is used to assign the digital inputs and to specify the format of digital input signals I DIMMER button 38 This button is used to adjust the displ...

Page 9: ...on This button is used to access various settings T VIDEO 3 INPUT 27 51 This input can be used to connect a camcorder games console and so on There are jacks for com posite video and analog audio U PU...

Page 10: ...connect a CD player with analog outputs I TAPE IN OUT These analog inputs and outputs can be used to con nect a cassette recorder MiniDisc recorder or other recorder with analog inputs and outputs J...

Page 11: ...o turn off the power Note TheAuto Standby function turns the subwoofer on when the input signal exceeds a certain level If the Auto Standby function does not work reliably try slightly increasing or d...

Page 12: ...operations described in this manual may not work as expected with other com ponents RECEIVER mode is used to control the AV receiver To set the remote controller to RECEIVER mode press the RECEIVER RE...

Page 13: ...ns can be used to select any of the avail able listening modes K TEST TONE CH SEL LEVEL LEVEL buttons 32 These buttons are used to adjust the level of each speaker L DISPLAY button 35 52 This button i...

Page 14: ...including the elapsed time remain ing time total time and so on L CLR button This button is used to cancel functions and to clear entered numbers M MENU button This button is used to display a DVD s m...

Page 15: ...e and so on G CLR button This button is used to cancel functions and to clear entered numbers H RANDOM button This button is used with the random playback func tion I REPEAT button This button is used...

Page 16: ...V see page 52 A TV This sets the TV to On or Standby B TV INPUT This selects inputs on the TV C TV VOL This adjusts the TV s volume TAPE Mode Before selecting TAPE mode and starting play back you shou...

Page 17: ...mind when installing If another remote controller of the same type is used in the same room or the AV receiver is installed close to equipment that uses infrared rays the remote control ler may not wo...

Page 18: ...and equi distant from the TV Angle them inward so as to create a triangle with the listener at the apex Center speaker SKC 530C This speaker enhances the front left and right speakers making sound mo...

Page 19: ...i cation The negative speaker terminals are all black Match the color of each cable to the corre sponding speaker terminal Note When speaker set B is turned on speaker setA is reduced to 5 1 channel p...

Page 20: ...une into an FM radio station and adjust the position of the FM antenna to achieve the best possible reception 2 Use thumbtacks or something similar to x the FM antenna into position Caution Be careful...

Page 21: ...h local regulations to prevent electrical shock haz ards Using a TV FM Antenna Splitter It s best not to use the same antenna for both FM and TV reception as this can cause interference problems If ci...

Page 22: ...video Left white Right red Yellow Right Wrong Video Cable Jack Description Component video cable Component video separates the luminance Y and color difference signals PR PB providing the best picture...

Page 23: ...EO DVD IN a video signal will be output by the S VIDEO MONITOR OUT for your TV and the S VIDEO VIDEO 1 OUT for your VCR but not by any composite video or component video outputs Video Input Output Dia...

Page 24: ...OUT V Composite video input Standard Connection HT R530 Signal ow TV VIDEO 2 IN L R Analog audio L R output DIGITAL IN COAXIAL Digital coaxial output DIGITAL IN OPTICAL 2 Digital optical output Y PB P...

Page 25: ...ard Y PB PR Y PB PR COMPONENT VIDEO DVD IN COMPONENT VIDEO S VIDEO OUT OUT IN DVD VIDEO OUT IN V S DVD Step 1 Video Connection Choose a connection type or that matches the DVD player and then make the...

Page 26: ...Video output Better VIDEO 1 IN V Composite video output Standard Connection HT R530 Signal ow VCR DVD recorder VIDEO 1 IN L R Analog audio L R output DIGITAL IN COAXIAL Digital coaxial output DIGITAL...

Page 27: ...R output L R L R VIDEO 1 AUDIO IN S VIDEO IN VIDEO IN VIDEO 1 V S VIDEO 1 Step 1 Choose a video connection type or that matches the VCR DVD recorder and make the connection The video source that you w...

Page 28: ...T VIDEO OUT S VIDEO OUT VIDEO OUT VIDEO 2 IN IN V S VIDEO 2 Step 1 Video Connection Choose a connection type or that matches the video source and then make the connection A B C A B C Satellite cable s...

Page 29: ...Connecting a CD Player or Turntable Connection HT R530 Signal ow CD or turntable CD IN L R Analog audio L R output DIGITAL IN COAXIAL Digital coaxial output DIGITAL IN OPTICAL 1 Digital optical output...

Page 30: ...W Notes Onkyo components with jacks should be con nected directly to wall outlets not the AV receiver s AC OUTLET The socket type and capacity will depend on the country in which you purchased the AV...

Page 31: ...the AV receiver s remote control sensor You must enter the appropriate remote control code rst page 53 Notes Use only cables for connections cables are supplied with Onkyo players DVD CD etc Some comp...

Page 32: ...r always turn down the volume before turning it off To turn on the subwoofer press its POWER switch to the ON position not North American models STANDBY ON Remote controller AV receiver or Smooth Oper...

Page 33: ...ign Digital inputs cannot be assigned to the TUNER input source 2 Press the DIGITAL INPUT button The current assignment appears 3 Press the DIGITAL INPUT but ton repeatedly to select COAX OPT1 OPT2 OP...

Page 34: ...at you want to use Pressing the remote controller s SPA B button cycles through the following settings Speaker Set A Speaker Set A B Speaker Set B Off The A and B speaker indicators show whether each...

Page 35: ...tion reappears Interpreting Surround Channel Information A The number of front channels front left front right and center B The number of surround channels surround left and surround right If there s...

Page 36: ...o select either AM or FM In this example FM has been selected Actual display depends on country 1 Press the SETUP button and use the Up and Down buttons to select 0 Hardware Setup and then press ENTER...

Page 37: ...RY TUNING PRESET ENTER MEMORY TONE STEREO LISTENING MODE DISPLAY DIGITAL INPUT RT PTY TP MEMORY TUNING MODE RETURN TUNING PRESET ENTER SETUP STANDBY STANDBY ON CLEAR PURE AUDIO PHONES MULTl CH DVD VID...

Page 38: ...dly to select dim dim mer or normal brightness MUTING PREVIOUS MENU GUIDE TOP MENU SP A B SETUP RETURN RANDOM SUBTITLE PLAY MODE AUDIO REPEAT RC 608M TAPE AMP MD CDR CABLE ON STANDBY DIMMER SLEEP 10 1...

Page 39: ...ker set B is on you can also adjust the levels of the left and right speakers in speaker set B from 12 dB to 12 dB These settings are stored when the AV receiver is set to Standby While speaker set B...

Page 40: ...ning modes that can be used with the cur rent input source Selecting Listening Modes The Dolby Digital and DTS listening modes can only be selected if your DVD player is connected to the AV receiver w...

Page 41: ...rocessed as DTS 96 24 Everything else is pro cessed as DTS Multich 2 2 0 Stereo 1 0 1 1 Other 3 2 1 2 0 Stereo DTS ES Discrete Matrix Source Listening mode CD TV VHS MD turntable radio cassette DTV et...

Page 42: ...sound enhance the listening experience with CDs movies and games Dolby Pro Logic IIx has three modes of operation Movie mode for movies Music mode for listening to music and Game mode for use with gam...

Page 43: ...usic CDs Onkyo Original DSP Modes Mono Movie This mode is suitable for use with old movies and other mono sound sources The center speaker outputs the sound as it is while reverb is applied to the sou...

Page 44: ...h speaker set A Audio Adjust provides various functions for adjusting the sound Using the Late Night Function Dolby Digital only 1 Press the RECEIVER button and then press the L NIGHT but ton repeated...

Page 45: ...or Pro Logic IIx Music listening mode Normally if you re using a center speaker the center channel sound is output by only the center speaker If you re not using a center speaker the center channel s...

Page 46: ...gs cannot be changed while headphones are connected Speaker set B is on or the multichannel input is being used MUTING PREVIOUS MENU GUIDE TOP MENU SP A B SETUP RETURN RANDOM SUBTITLE PLAY MODE AUDIO...

Page 47: ...tton on the remote controller 2 Use the Up and Down buttons to select 3 Level Cal and then press the ENTER but ton A pink noise test tone is output by the front left speaker 3 Turn up the volume so th...

Page 48: ...to select Front and then use the Left and Right buttons to select Small or Large Small Select if the front speakers are small Large Select if the front speakers are large Note If the Subwoofer setting...

Page 49: ...set to Small the Large option cannot be selected 8 Use the Down button to select Surr Back Ch and use the Left and Right but tons to select 2ch or 1ch 2ch Select if two left and right surround back sp...

Page 50: ...M 1 Press and hold the AV receiver s DIGITAL INPUT button for about 3 seconds 2 While Auto is displayed about 3 sec onds press the DIGITAL INPUT button again to select PCM DTS or Auto DTS or PCM The D...

Page 51: ...e VIDEO 3 input source followed by the CD input source you can watch the video from theVIDEO 3 input and listen to the audio from the CD input In the following example audio from the CD player con nec...

Page 52: ...code for the component in the appro priate category See the separate Remote Control Codes MUTING PREVIOUS MENU GUIDE TOP MENU SP A B SETUP RETURN RANDOM SUBTITLE PLAY MODE AUDIO REPEAT RC 608M TAPE AM...

Page 53: ...ponents Connected via 1 Make sure the Onkyo component is con nected with an cable and an analog audio cable RCA See page 31 for details 2 Enter the appropriate remote control code for the DVD or CD RE...

Page 54: ...MP MD CDR CABLE ON STANDBY DIMMER SLEEP 10 11 12 INPUT SELECTOR DVD HDD REMOTE MODE V1 V2 V3 CD TAPE TUNER DVD MULTI CH LISTENING MODE TV DISPLAY TESTTONE CH SEL SURROUND STEREO CINE FLTR LEVEL LEVEL...

Page 55: ...e digital audio output setting on the con nected device On some games consoles such as those that can play DVDs the default setting is off With some DVD Video discs you need to select an audio format...

Page 56: ...ignals When DTS program material ends and the DTS bit stream stops the AV receiver remains in DTS listen ing mode and the DTS indicator remains on This is to prevent noise when you use the pause fast...

Page 57: ...tening mode is selected recording is not possible because no video signals are output Select another listening mode The sound changes when I connect my head phones When a pair of headphones is connect...

Page 58: ...Hz 50 MHz Tuning Frequency Range North American 87 5 MHz 107 9 MHz Other 87 5 MHz 108 0 MHz Usable Sensitivity Stereo 17 2 dBf 2 V 75 IHF Mono 11 2 dBf 1 V 75 IHF Signal to Noise Ratio Stereo 70 dB IH...

Page 59: ...inet capacity 0 31 cubic feet 8 7 L Dimensions W H D 6 3 16 17 1 16 7 7 8 157 434 200 mm Weight 8 6 lbs 3 9 kg Drivers unit 5 inch 12 cm OMF Cone Woofer 2 1 inch 2 5 cm Balanced Dome Tweeter Terminal...

Page 60: ...6 82194 Groebenzell GERMANY Tel 49 8142 4401 0 Fax 49 8142 4401 555 http www eu onkyo com ONKYO EUROPE UK Office Suite 1 Gregories Court Gregories Road Beaconsfield Buckinghamshire HP9 1HQ UNITED KIN...

Page 61: ......

Page 62: ......

Page 63: ......

Page 64: ......

Page 65: ......

Page 66: ......

Page 67: ......

Page 68: ......

Page 69: ......

Page 70: ......

Page 71: ......

Page 72: ......

Page 73: ......

Page 74: ......

Page 75: ......

Page 76: ...ou to achieve optimum perfor mance and enjoyment Keep this manual for future reference Contents Important Safety Instructions 3 Precautions 4 Introduction 6 Controls Connectors 10 Before Using the DV...

Page 77: ...ing Playback 21 Selecting Discs 22 Starting Pausing Stopping Playback 22 Navigating Disc Menus 24 Selecting Titles Chapters by Number 25 Using the Disc Navigator 26 Memory Playback in the Disc Navigat...

Page 78: ...aratus does not operate normally by following the operating instructions Adjust only those controls that are covered by the operating instructions as an improper adjust ment of other controls may resu...

Page 79: ...i cation iden ti cation and the period of manufacture are indicated on the rear panel FCC INFORMATION FOR USER CAUTION The user changes or modi cations not expressly approved by the party responsible...

Page 80: ...e TV radio or VCR 8 Care Occasionally you should dust this unit all over with a soft cloth For stubborn stains use a soft cloth dampened with a weak solu tion of mild detergent and water Dry the unit...

Page 81: ...s include Chapter Title 1 Disc All Discs Track and Folder MP3 WMA Random playback options include Title 1 Disc All Discs and Folder MP3 WMA Supports 4 3 and 16 9 aspect ratio TVs Supports up to 8 soun...

Page 82: ...appear onscreen indicating that the feature is not supported by the current disc Similarly if a disc uses features that are not supported by the DV CP702 for example special interactive menu function...

Page 83: ...lay an incompatible le the message This for mat cannot be played appears on the display MP3 MP3 les must be MPEG1 Audio Layer 3 format 44 1 or 48 kHz xed bit rate MP3 les must have a mp3 or MP3 lename...

Page 84: ...Theater System The 5 1 channel surround format that uses less compression for faithful reproduction DVD R DVD recordable A type of DVD disc that can be recorded only once Can be used to make DVD Vide...

Page 85: ...button 36 This button is used with the Last Memory function I DIMMER button 29 This button is used to adjust the display brightness J DISPLAY button 37 This button is used to display information abou...

Page 86: ...icator 37 This indicator appears while the total time is being dis played 9 REMAIN indicator 37 This indicator appears while the remaining time is being displayed 0 Camera angle indicator 34 This indi...

Page 87: ...und decoder Dolby Digital DTS E COAXIAL AUDIO OUTPUT 18 This coaxial digital audio output can be connected to an coaxial digital audio input on a hi amp AV receiver or surround sound decoder Dolby Dig...

Page 88: ...s button is used to exit the onscreen setup menu and to restart menu playback H AUDIO button 35 This button is used to select foreign language soundtracks and audio formats e g Dolby Digital or DTS I...

Page 89: ...menus and the onscreen setup menus Y SETUP button 39 This button is used to open and close the onscreen setup menus Z SUBTITLE button 35 This button is used to select subtitles a Play button 22 This b...

Page 90: ...s in mind when installing the DV CP702 If another remote controller of the same type is used in the same room or the DV CP702 is installed close to equip ment that uses infrared rays the remote contro...

Page 91: ...t interference keep audio and video cables away from power cords and speaker cables Before Making Any Connections Analog audio Right red Left white Yellow Right red Left white Yellow Composite video W...

Page 92: ...te video input on your TV Notes Before making any connections turn off the DV CP702 and your TV and disconnect their power cords from the wall outlets Also refer to the connection information supplied...

Page 93: ...the digital input on a Dolby Digital or DTS decoder or an AV receiver with built in decoders This hookup example will also allow you to enjoy Dolby Pro Logic so long as your decoder or AV receiver sup...

Page 94: ...ent by using an cable An cable is supplied with all compatible Onkyo CD players DVD players and cassette recorders Notes Push the plugs in all the way to make a good connection Use only cables for con...

Page 95: ...ess the STANDBY ON button or the remote controller s ON button The DV CP702 comes on the display lights up and the STANDBY indicator goes off To turn off the DV CP702 press the STANDBY ON button or th...

Page 96: ...utton again The disc tray closes See page 22 for information on selecting and playing discs Tip If you press the Play button the disc tray will close and playback of the disc in the right bay will sta...

Page 97: ...s are labelled DISC 1 DISC 2 and so on On the display the number of the current disc has a circle around it What happens next depends on the type of disc you selected as follows DVD Video Typically a...

Page 98: ...Video disc or Video CD Your DV CP702 features a screen saver to protect your TV from the effects of burn in see page 43 With some DVD Video discs you may experience picture noise that is not normally...

Page 99: ...oller s number buttons to select tracks on a Video CD PBC menus can be hidden or displayed while playback is stopped by pressing the TOP MENU button Navigating Disc Menus 1 Load and select a DVD Video...

Page 100: ...LAST M MEMORY CHAIN MODE REPEAT A B RANDOM DISPLAY MENU SETUP TOP MENU RETURN AUDIO ANGLE SUBTITLE DISC 1 DISC 2 DISC 3 DISC 4 DISC 5 DISC 6 DISC SKIP DIMMER RC 542DV STEP SLOW CLEAR OPEN CLOSE PROGR...

Page 101: ...AST M MEMORY CHAIN MODE REPEAT A B RANDOM DISPLAY MENU SETUP TOP MENU RETURN AUDIO ANGLE SUBTITLE DISC 1 DISC 2 DISC 3 DISC 4 DISC 5 DISC 6 DISC SKIP DIMMER RC 542DV STEP SLOW CLEAR OPEN CLOSE PROGRES...

Page 102: ...laylist use the buttons to select it in the track column and then press the ENTER button To add a folder to the playlist you need to select the folder at the top of the track col umn ALL will be displ...

Page 103: ...MODE REPEAT A B RANDOM DISPLAY MENU SETUP TOP MENU RETURN AUDIO ANGLE SUBTITLE DISC 1 DISC 2 DISC 3 DISC 4 DISC 5 DISC 6 DISC SKIP DIMMER RC 542DV STEP SLOW CLEAR OPEN CLOSE PROGRESSIVE ENTER 10 0 1...

Page 104: ...sed press the STEP SLOW button Press the STEP SLOW button repeatedly to view subsequent frames Backward frame by frame While paused press the STEP SLOW button Press the STEP SLOW button repeatedly to...

Page 105: ...To turn a picture upside down use the Up Down buttons not while zoomed in To rotate a picture clockwise or counter clockwise use the Left Right but tons not while zoomed in To pause the slideshow pre...

Page 106: ...reen as shown 2 Use the number buttons to enter a time To enter for example 1 hour 25 minutes 30 seconds press the 1 2 5 3 and 0 buttons To enter for example 2 minutes 15 sec onds press the 2 1 and 5...

Page 107: ...play 2 Press the A B button again to set the B point i e the end of the sec tion you want to repeat Playback repeats between the A and B points and A B appears onscreen and R_AB appears on the display...

Page 108: ...itle Folder Chapter Track Current Total Current Total 001 6 DVD 01 02 03 Remote controller ENTER Disc Navigator Memory Play Setup Memory List No Disc Title Folder Chapter Track 003 Current Total Curre...

Page 109: ...t camera angles even though the camera indica tor is displayed With some DVD Video discs you can select camera angles from a menu Some DVD Video discs won t allow you to select different camera angles...

Page 110: ...s see page 17 Notes If your TV or projector doesn t support progressive scan ning and it s connected to the DV CP702 s component video outputs if you turn on the Progressive Scanning function you ll g...

Page 111: ...mory 1 During playback press the LAST M button The last memory point for the disc is stored the LAST indicator appears and LAST MEM appears on the display If the LAST M button is pressed again the las...

Page 112: ...elapsed track time remaining track time and total track time MP3 WMA disc Track name current track elapsed track time folder name current folder total number of tracks total number of folders 2 Press...

Page 113: ...r not the DV CP702 downmixes MPEG digital audio 41 Digital Out Turn on or off the digital audio outputs 41 Dynamic Range Control Dolby Digital only Set the Dynamic Range function 41 Language On Screen...

Page 114: ...ct this option to correct the problem Notes With some DVD Video discs this setting may have no effect See the disc s sleeve notes to see which picture for mat is used Using the Onscreen Setup Menus 1...

Page 115: ...it ll be NTSC format Your TV must support NTSC playback in order to watch NTSC format discs PAL Use this option if your TV doesn t support NTSC playback or the picture is distorted when watching NTSC...

Page 116: ...V CP702 s digital audio outputs MPEG Out With this setting you can con gure the DV CP702 to output MPEG digital audio as it is or downmix it to PCM If you re connecting the DV CP702 s digital audio ou...

Page 117: ...DVD Video discs you can select languages from a menu Subtitle With this setting you can select your preferred language for subtitles When you play a DVD Video disc with multiple language subtitles you...

Page 118: ...d on and a security code set if you want to turn off parental lock or change the parental lock level you ll be prompted to enter the security code Not all discs use parental lock See the disc s sleeve...

Page 119: ...LV Chinese ZH Malagasy MG Dutch NL Maori MI Portuguese PT Macedonian MK Swedish SV Malayalam ML Russian RU Mongolian MN Korean KO Moldavian MO Greek EL Marathi MR Afar AA Malay MS Abkhazian AB Maltese...

Page 120: ...d to your TV via aVCR or other video equipment and its copy protection system is affecting the picture Connect the DV CP702 directly to your TV page 17 Can t start playback No discs loaded Load some d...

Page 121: ...er closer to the DV CP702 page 15 The remote controller has a range of approximately 16 ft 5 meters A strong light source is interfering with the DV CP702 s remote sensor Make sure that the DV CP702 i...

Page 122: ...Operating conditions Temperature 5 to 35 C 41 F to 95 F Installation Install horizontally Video outputs COMPONENT VIDEO Y 1 0 V p p 75 1 negative sync RCA phono x3 PB PR 0 7 V p p 75 1 S VIDEO S Vide...

Page 123: ...7458 U S A Tel 201 785 2600 Fax 201 785 2650 http www onkyousa com ONKYO EUROPE ELECTRONICS GmbH Liegnitzerstrasse 6 82194 Groebenzell GERMANY Tel 49 8142 4401 0 Fax 49 8142 4401 555 http www onkyo ne...

Page 124: ......

Page 125: ......

Page 126: ......

Page 127: ......

Page 128: ......

Reviews: