


2:
8
Connecting your equipment
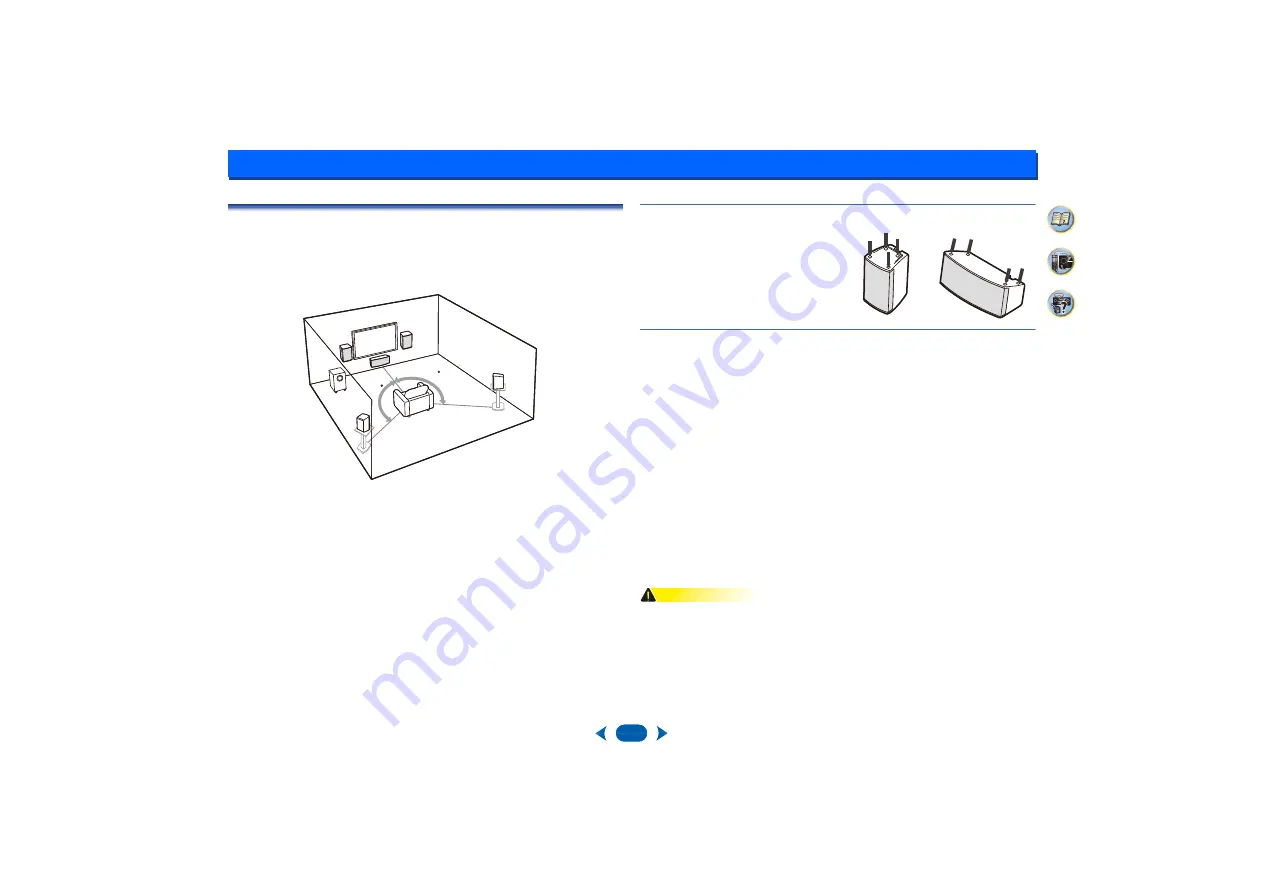
Placing the speakers
By connecting the left and right front speakers (
L
/
R
), the center speaker (
C
), the left and right
surround speakers (
SL
/
SR
), and the subwoofer (
SW
), a 5.1 ch surround system can be
enjoyed.
To achieve the best possible surround sound, install your speakers as shown below.
Subwoofer
•
Orient the subwoofer’s front face pointing toward the listening position.
•
When moving the subwoofer, avoid touching the bottom surface, since the speaker unit is
located there.
•
The subwoofer plays back the bass in monaural, making use of the fact that the human ear
is not very sensitive to the direction of low-pitched sound. Because of this, the subwoofer
can be installed almost anywhere. If it is installed too far away, however, the sound from
the other speakers may become unnatural.
The degree of bass effect can be adjusted by moving the unit farther from or closer to the
wall.
Front/Center/Surround speakers
•
Labels located on the rear of each speaker indicate whether they are designed for front or
surround use.
•
Optional speaker stands can be purchased to facilitate optimal mounting of the surround
speakers at or slightly above the listener’s ear height.
•
The surround effect will be diminished if the surround speakers are mounted at extreme
distances from the listener’s position.
Affixing Non-Skid Pads
Hints on the speaker placement
Where you put your speakers in the room has a big effect on the quality of the sound. The
following guidelines should help you to get the best sound from your system.
•
The subwoofer can be placed on the floor. Ideally, the other speakers should be at about
ear-level when you’re listening to them. Putting the speakers on the floor (except the
subwoofer), or mounting them very high on a wall is not recommended.
•
For the best stereo effect, place the front speakers 2 m to 3 m (6 ft. to 9 ft.) apart, at equal
distance from the TV.
•
If you’re going to place speakers around your CRT TV, place the speakers at a sufficient
distance from your CRT TV. Any other device liable to be influenced by magnetism (floppy
disk drive, cassette tape recorder, video tape player, etc.) should also be kept at a distance
from the subwoofer and other speakers.
•
If you’re using a center speaker, place the front speakers at a wider angle. If not, place
them at a narrower angle.
•
It is best to angle the speakers towards the listening position. The angle depends on the
size of the room. Use less of an angle for bigger rooms.
•
The optimal positioning for surround speakers is just above ear height. Make sure the
speakers don’t face each other. For DVD-Audio, the speakers should be more directly
behind the listener than for home theater playback.
•
Try not to place the surround speakers farther away from the listening position than the
front and center speakers. Doing so can weaken the surround sound effect.
CAUTION
•
Make sure that all speakers are securely installed. This not only improves sound quality,
but also reduces the risk of damage or injury resulting from speakers being knocked over
or falling in the event of external shocks such as earthquakes.
•
Install the center speaker below the TV so that the sound of the center channel is localized
at the TV screen.
•
Do not place the center speaker on top of the TV, the speaker may fall from the TV due to
external shocks such as earthquakes, endangering those nearby or damaging the speaker.
120
SL
L
SW
C
R
SR
120
5.1 channel surround system:
Apply the accessory non-skid pads to the bottom
surfaces of the front/center/surround speakers


