background image

16

Playing a multi-channel input source

The following describes how to play a multi-channel input
source. A multi channel input source refers to equipment with
5.1-channel output jacks (such as a DVD player). When
connected to the ED-205, the equipment outputs separate signals
to the 5 speaker channels (Left/Right front, Center, and Left/
Right Surround). The ED-205 then outputs the signal for the
subwoofer channel to its SUBWOOFER PRE OUT jack. In the
Multi-channel input mode, you cannot use the surround modes.
For how to connect a multi-channel input source, see page 7.
Before playing a multi-channel input source

• The ED-205 stores the output level you set for each speaker

connected to the MULTI CHANNEL INPUT jack. This stored
setting has no effect on the DOLBY PRO LOGIC output levels
you set using- the test tone.

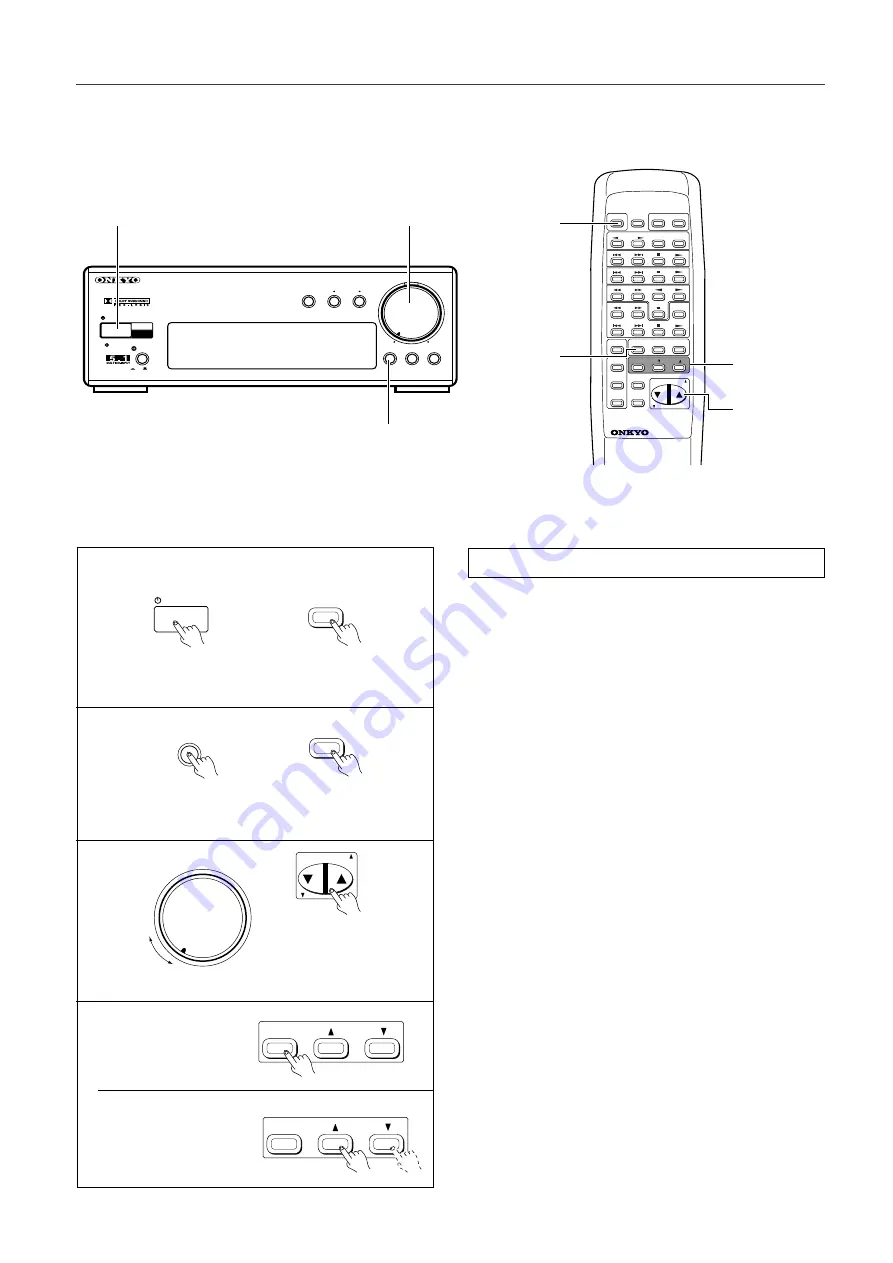
1. Press the POWER button.

The STANDBY indicator goes out and the display lights up.

2. Press the MULTI-CH INPUT button.

3. Play the input source connected to the MULTI CHANNEL

INPUT jacks.

4. Adjust the sound volume.

The sound volume for all speakers simultaneously changes.

Adjust the sound volume from the listening position using the
remote controller.

5. Adjust the output level of each speaker according to your

taste.

The output levels for the Center speaker (CENTER), Right
Surround speaker (R-SUR), Left Surround speaker (L-SUR),
and Subwoofer (SW) can be adjusted.

1

Select the speaker channel to adjust by using the CH
SEL button on the remote controller.

2

Adjust the output level using the LEVEL 

y

/

u

buttons.

The adjustment range for the Center, and Left/Right Surround
speakers is -12dB to +12dB. For the Subwoofer, it is -30 to
+12dB.

1

2

4

5

1

2

POWER

MULTI CH

STANDBY/ON

MULTI CH INPUT

VOLUME

LEVEL

CH SEL

LEVEL

CH SEL

(Remote controller)

(Front panel)

MASTER VOLUME

AV SURROUND PROCESSOR 

STANDBY/ON

STANDBY

EFFECT

MODE

MASTER VOLUME

MULTI CH INPUT LINE

VIDEO-1/2

ED-205

POWER

OFF

ON

1

4

2

TUNER

DVD

MD

TAPE

CD

MODE

MUTING

CENTER 

MODE

DELAY

TIME

TEST

TONE

REMOTE CONTROLLER

RC-394S

DISC

VIDEO

LINE

MULTI CH

EFFECT

VOLUME

FM

AM

PRESET

POWER

SLEEP

LINE-1

LINE-2

LEVEL

CH SEL

1

2

5

12

4

Playing a source

Summary of Contents for ED-205

Page 1: ...ng enjoyment from your new AV Surround Processor Please retain this manual for future reference Contents Before using Important Safeguards 2 Precautions 3 Features 4 Supplied accessories 4 Before usin...

Page 2: ...rsing it If there is still trouble the user should seek the services of a qualified electrician Under no circumstances should the user attempt to defeat the polarization of the plug 12 Power Cord Prot...

Page 3: ...taller s attention to Article 820 40 of the NEC ANSI NFPA 70 which provides guidelines for proper grounding and in particular specifies that the cable ground shall be connected to the grounding system...

Page 4: ...Logic and the double D symbol are trademarks of Dolby Laboratories Confidential Unpublished Works 1992 1997 Dolby Laboratories Inc All rights reserved Memory Preservation This unit does not require me...

Page 5: ...of the batteries supplied is about six months but this will vary depending on usage Using the remote controller Point the remote controller toward the remote control sensor Notes Place the unit away...

Page 6: ...ecorder s Video jacks to the ED 205 s VIDEO 2 jacks 4 Connecting a TV monitor Connect the TV monitor s Video input jack to the ED 205 s Video or S VIDEO MONITOR OUT jack Note This unit s S VIDEO IN OU...

Page 7: ...ck should be connected to the ED 205 s VIDEO 1 IN jack IN VIDEO 1 MONITOR OUT OUT IN VIDEO 2 IN VIDEO 1 IN OUT PROCESSOR FRONT SURROUND OUT IN VIDEO 2 SUB WOOFER R L SURROUND CENTER REMOTE CONTROL SUB...

Page 8: ...peaker terminals Speaker placement In this section only one example of possible speaker placement is shown Note however that ideal speaker placement varies depending on the size of the room and the wa...

Page 9: ...6 OHMS MIN SPEAKER 3 Subwoofer 1 Center speaker 2 Left Surround speaker 2 Right Surround speaker ED 205 Amplifier Right Front speaker Left Front speaker IN VIDEO 1 MONITOR OUT OUT IN VIDEO 2 IN VIDEO...

Page 10: ...the z symbol Doing so may result in the damage to the equipment Connecting only the z cables is not sufficient for operation of your system Connect the components also via audio connection cables Con...

Page 11: ...ETs Selects preset radio stations FM Selects FM broadcasts AM Selects AM broadcasts 5 DVD player operation buttons Point the remote controller toward the DVD player s remote control sensor q Jumps to...

Page 12: ...2 jacks 3 Play Dolby Surround encoded software and adjust the sound volume The sound volume for all speakers simultaneously changes 4 Press the MODE button to select DOLBY PRO LOGIC or DOLBY 3 STEREO...

Page 13: ...EST L When the Center Mode setting is PHANTOM Right Front TEST R Left Surround TEST LS Right Surround TEST RS Left Front TEST L When the Surround Mode setting is DOLBY 3 STEREO Center TEST C Right Fro...

Page 14: ...own each time the MODE a or s button is pressed Only the s button is available with the remote controller 4 Play a Dolby Pro Logic encoded source 5 Adjust the sound volume The sound volume for all spe...

Page 15: ...a or s button is pressed Only the s button is available with the remote controller 4 Play a Dolby Pro Logic surround source 5 Adjust the sound volume The sound volume for all speakers simultaneously...

Page 16: ...source connected to the MULTI CHANNEL INPUT jacks 4 Adjust the sound volume The sound volume for all speakers simultaneously changes Adjust the sound volume from the listening position using the remot...

Page 17: ...I CH INPUT See pages 14 to 16 Set the sound volume properly See pages 14 to 16 Press the MUTING button on the amplifier to cancel the Muting mode Check the connection again and connect the plugs and c...

Page 18: ...explained Front panel 1 STANDBY indicator 10 2 STANDBY ON button 10 12 14 16 Power ON Standby button 3 Remote control sensor 5 4 EFFECT button 15 Changes between Surround and Stereo modes 5 MODE butt...

Page 19: ...urround and Stereo modes 8 MODE button 12 14 15 Changes between all Surround modes 9 DELAY TIME button 13 0 CENTER MODE button 13 A SLEEP button 11 B LINE 1 LINE 2 buttons 11 C MULTI CH LINE VIDEO but...

Page 20: ...ion 65 W Power supply AC 230 V 50 Hz AC 120 V 60 Hz Dimensions W x H x D 205 x 76 x 350 mm Weight 3 7 kg Remote control unit RC 394S Control method Infrared rays Control range Approx 5 meters Batterie...

Reviews: