background image

13

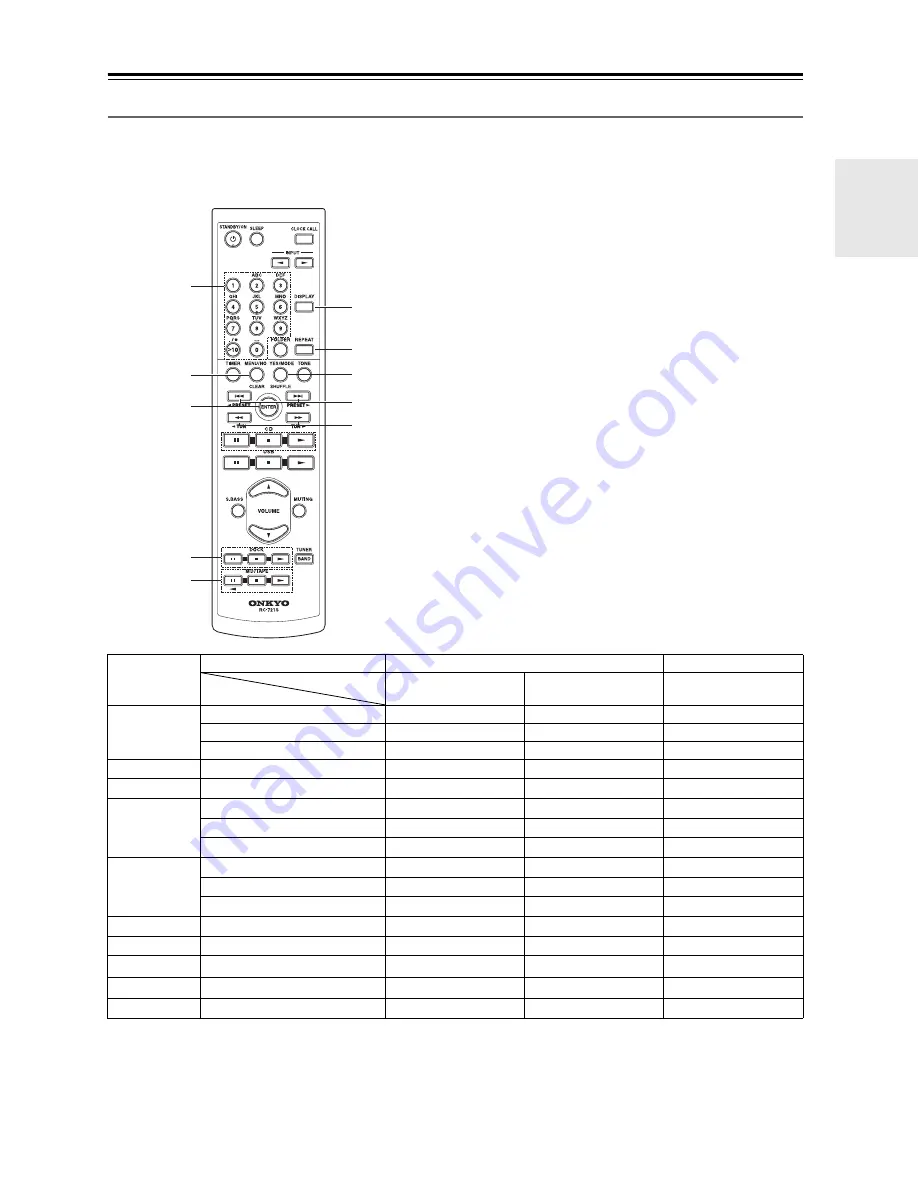
Getting to Know the CD receiver

—Continued

Controlling an Onkyo MD recorder, cassette deck, or RI Dock

Explanation of buttons for using the Onkyo MD recorder, cassette deck, or RI Dock, when connected to the 
MD/TAPE jack or DOCK IN jack of the CD receiver.

• See pages 20-22 for instructions on connecting the components.
• To control the MD recorder, the Input Display for the MD/TAPE jacks must be set to “MD” (see page 26).

Example: Shows the case of 

h

the [YES/MODE/SHUFFLE] button.

• When the cassette deck is connected to the MD/TAPE 

jack of the CD receiver and the input source is set to 
“TAPE”, it works as a DOLBY NR button.

• Refer to the instruction manual for each connected component for details. For column items with no notation: buttons 

will not function when pressed.

6

7
8
9
bk

4

1

2

5

3

Jack

MD/TAPE

DOCK

TAPE

MD

DOCK

a

1 ~ 9

1 ~ 9

0

10/0

>10

>10

b

MENU/NO/CLEAR

CLEAR

MODE

c

ENTER

ENTER

SELECT

d

DOCK 

1

1

DOCK 

2

2

DOCK 

3

3

e

MD/TAPE 

1

1

1

MD/TAPE 

2

2

2

MD/TAPE 

3

 (

t

)

t

3

f

DISPLAY

DISPLAY

BACKLIGHT

g

REPEAT

REV MODE

REPEAT

REPEAT

h

YES/MODE/SHUFFLE

DOLBY NR

MODE

SHUFFLE

*1

*1.

In “Cursor Mode” it works as a MENU button.

i

7

/

6

5

/

4

7

/

6

7

/

6

*2

*2.

In “Cursor Mode” it can be used for navigation menus.

j

5

/

4

5

/

4

5

/

4

Button

Input source

Summary of Contents for CR-535

Page 1: ...to obtain optimum performance and listening enjoyment from your new CD receiver Please retain this manual for future reference Contents Getting Started 2 Connections 16 Basic Operations 24 Playing a...

Page 2: ...ratus does not operate normally by following the operating instructions Adjust only those controls that are covered by the oper ating instructions as an improper adjustment of other controls may resul...

Page 3: ...e this unit for a long time it may not work properly the next time you turn it on so be sure to use it occasionally When you ve finished using this unit remove all discs and turn off the power 9 Insta...

Page 4: ...in accordance with the following code As the colours of the wires in the mains lead of this appa ratus may not correspond with the coloured markings identifying the terminals in your plug proceed as...

Page 5: ...for Sticks and Portable Audio Player WMA 3 MP3 Aluminium Volume Knob Gold Plated Banana Plug Compatible Transparency Speaker Posts Supplied Accessories Make sure you have the following accessories In...

Page 6: ...n the same room or the CD receiver is installed close to equipment that uses infrared rays the remote control ler may not work reliably Don t put anything such as a book on the remote con troller beca...

Page 7: ...Function 25 Using the Direct Function 25 Muting the Sound 25 Changing the Input Display 26 Playing a Disc Playing CDs 27 Using the Remote Controller 28 Displaying CD Information 28 Selecting Playing...

Page 8: ...music files MP3 WMA can be plugged in here and the music selected and played through the CD receiver h Disc tray 27 The CD is loaded here i INPUT button 24 26 41 43 Used to select the input source j...

Page 9: ...hts up when a timer has been programmed 1 2 3 4 Light up when a timer has been programmed Lights up when a timer has been programmed for recording k Tuning indicators AUTO Lights up when Auto Tuning i...

Page 10: ...omponent The CD receiver s remote controller can then be used to control that component To use u you must make an analog audio connection RCA between the CD receiver and the other component f FM ANTEN...

Page 11: ...nkyo RI Dock it works as a mode button f Previous Next 7 6 and e PRESET PRESET r buttons 28 43 Used to select the previous or next track or radio preset Can also be used with an Onkyo RI Dock With an...

Page 12: ...utton 33 Sets repeat playback Can also be used with an Onkyo RI Dock With an Onkyo cassette deck it works as a reverse mode button s TONE button 25 Used to adjust the bass and treble t YES MODE SHUFFL...

Page 13: ...to the MD TAPE jack of the CD receiver and the input source is set to TAPE it works as a DOLBY NR button Refer to the instruction manual for each connected component for details For column items with...

Page 14: ...2 Audio Layer 3 format with a sampling rate of between 8 kHz and 48 kHz and a bit rate of between 8 kbps and 320 kbps 128 kbps recommended Incompatible files cannot be played Constant bit rate MP3 fi...

Page 15: ...rside of a disc Always hold discs by the edge as shown Never attach adhesive tape or sticky labels to discs Cleaning Discs For best results keep your discs clean Fingerprints and dust can affect the s...

Page 16: ...is ready for use you ll need to tune into an FM radio station and adjust the position of the FM antenna to achieve the best possible reception 2 Use thumbtacks or something similar to fix the FM ante...

Page 17: ...st be grounded in accordance with local regulations to prevent electrical shock haz ards Using a TV FM Antenna Splitter It s best not to use the same antenna for both FM and TV reception as this can c...

Page 18: ...with an impedance of between 4 and 16 ohms Connecting a speaker with a lower impedance may damage the speaker Be careful not to short the positive and negative wires Doing so may damage the CD receiv...

Page 19: ...inputs and out puts typically labeled L Push plugs in all the way to make good connections loose connec tions can cause noise or malfunc tions To prevent interference keep audio cables away from powe...

Page 20: ...is is the default setting unless you ve changed it it can be left as it is see page 26 Some u capable components have two u jacks They re both the same so you can use either one The extra jack is for...

Page 21: ...APE jacks must be set to MD see page 26 Some u capable components have two u jacks They re both the same so you can use either one The extra jack is for connecting additional u capable components Note...

Page 22: ...ee the RI Dock s instruction manual for details Connecting the Power Cord Notes Before connecting the power cord connect all of your speakers and AV components Turning on the CD receiver may cause a m...

Page 23: ...nction automatically updates the clock daily at 2 A M 3 A M and 2 P M If for some reason the clock cannot be set automatically see Setting AccuClock to Use a Specific Station on page 48 and Setting th...

Page 24: ...it You can also use remote controller s VOLUME q w buttons You can select CD AM FM or a connected component TAPE DOCK USB as the input source To select the input source press the remote controller s I...

Page 25: ...l indicator flashes too To unmute the CD receiver press the MUTING button again Tips While the CD receiver is muted Turning the VOLUME control on the CD receiver or pressing the VOLUME q w buttons on...

Page 26: ...etter abbreviation as per the following table Changing the Input Display 1 Use the INPUT t 1 buttons to select TAPE 2 Press and hold the MENU NO button until Name Select appears on the display and the...

Page 27: ...n the CD receiver and open the disc tray 2 Place the CD on the tray with the label side facing up Place 8 cm CDs in the center of the tray 3 To start playback press the Play Pause 1 3 button The disc...

Page 28: ...page 29 Press to adjust the volume Press the VOLUME Up q button to turn up the volume Press the VOL UME Down w button to turn it down Press to start playback Pressing this button while the CD receive...

Page 29: ...selected press the YES MODE button to cancel it before pro ceeding Selecting Playing MP3 Files File 11 File 1 File 10 Folder 3 File 12 Root Folder 1 Folder 2 File 13 Folder 4 File 14 File 18 FOLDER M...

Page 30: ...ady in progress press ENTER to play the first MP3 file in the specified folder 3 Use the number buttons to enter the file number Playback starts If a folder contains more than 99 MP3 files double digi...

Page 31: ...t MP3 file Notes You can also use the CD receiver s DISPLAY button to display this information To display the disc name press the DISPLAY button while playback is stopped If a file or folder name cont...

Page 32: ...u press the Open Close 0 button to open the disc tray or turn off the CD receiver Memory Playback 1 Press the YES MODE button repeatedly until the MEMORY indi cator appears 2 Use the Previous and Next...

Page 33: ...e disc in random order repeatedly With an MP3 CD you can combine repeat playback with 1 folder playback to play all of the tracks in a specified folder repeatedly Repeat 1 playback can t be combined w...

Page 34: ...oesn t need to be changed SVD Supplementary Volume Descriptor supports long file and folder names and characters other than letters and numbers Some CD burning software refers to the Joliet format as...

Page 35: ...determines how the FOLDER button works File folder name Hide Number Option Disable Enable 01 Pops 01 Pops Pops 10 Rock 10 Rock Rock 16_Jazz 16_Jazz Jazz 21th Century 21th Century 21th Century 05 07 20...

Page 36: ...storage device has been partitioned only music files in the first partition can be played Each folder may contain up to 500 music files and folders may be nested up to eight levels deep USB hubs and U...

Page 37: ...the Previous 7 and Next 6 buttons to select a file Notes Do not connect the CD receiver s USB port to a USB port on your computer Music on your computer can not be played through the CD receiver in t...

Page 38: ...om playback is cancelled when the USB mass storage device is removed or the CD receiver is set to Standby Select the type of Repeat Playback When playing back USB mass storage device music files all f...

Page 39: ...Album name Name of the album if ID3 tag present While an MP3 file is playing MP3 will appear While a WMA file is playing WMA will appear Notes You can also use the CD receiver s DISPLAY button to disp...

Page 40: ...l be in mono 3 Use the Fast Reverse and Fast For ward 5 4 buttons to tune into a station In Auto tuning mode once a station is found tuning stops automatically Radio frequency can be changed in 0 05 M...

Page 41: ...em see page 43 Name them for easy identification see page 45 Copy them see page 46 Erase them see page 47 Presetting FM Stations Automatically Auto Preset 1 Press the BAND or INPUT t 1 buttons repeate...

Page 42: ...eset 1 will store an AM station when the AM band is selected and an FM station when the FM band is selected Stations can be stored to presets in any order For example you could store preset 5 first 1...

Page 43: ...t 1 buttons to select AM or FM The preset you selected the last time you listened to the radio will still be selected 2 Use the Previous and Next 7 6 buttons to select a preset Press the Previous 7 b...

Page 44: ...dio Text RT types of RDS data The RDS indicator appears on the display when the CD receiver is tuned to an FM station that supports RDS Notes If the signal from an RDS station is weak RDS data may be...

Page 45: ...e Note Not all of the symbols can be entered by using the number buttons Use the Previ ous and Next 7 or 6 buttons to select from the full range of symbols When you ve selected the charac ter you want...

Page 46: ...lect Pre setCopy 3 Press ENTER The number of the preset to be copied flashes 4 Use the Previous and Next 7 6 buttons to select the destination preset The number of the destination preset flashes MENU...

Page 47: ...reset s name is erased and Com plete appears on the display MENU NO YES MODE Erasing Presets 1 Select the preset you want to erase see page 43 2 Press the MENU NO button and then use the Previous and...

Page 48: ...he display 4 Use the Rewind and Fast Forward 5 4 buttons to tune into the FM station Tip If you press the YES MODE button instead of using the Rewind and Fast For ward 5 4 buttons the CD receiver will...

Page 49: ...ote that having the time displayed in Standby mode will consume a little more power Setting the Clock Manually 1 Press the TIMER button repeat edly until Clock appears 2 Press ENTER 3 Use the Previous...

Page 50: ...work on the specified range of days With this setting you could set up a morning alarm for Mon day to Friday Timer Examples The following examples highlight some of the ways in which you can use the...

Page 51: ...d to the MD TAPE jacks see pages 20 and 21 and the Input Display is set accordingly see page 26 TIMER STANDBY ON ENTER Number buttons or 3 Use the Previous and Next 7 6 buttons to select the source an...

Page 52: ...et Everyday WED THU SAT FRI 11 Use the Previous and Next 7 6 buttons to specify the Off time and then press ENTER 12 If you selected Play in step 2 use the Previous and Next 7 6 buttons to specify the...

Page 53: ...buttons to select Timer On or Timer Off After a few moments the previous dis play reappears TIMER ENTER MENU NO or Checking Timer Settings 1 Press the TIMER button repeat edly to select timer 1 2 3 o...

Page 54: ...sing the Sleep Timer Press the SLEEP button repeat edly to select the required sleep time With the SLEEP button you can set the sleep time from 90 to 10 minutes in 10 minute increments Use the Previou...

Page 55: ...ct polarity see page 18 Make sure all audio connecting plugs are pushed in all the way see page 19 The sound quality can be affected by strong magnetic fields such as that from a TV Try moving any suc...

Page 56: ...e page 40 Move the CD receiver away from a nearby TV or computer Cars or airplanes can cause noisy interference The radio signal will be weakened if it has to pass through a concrete wall before reach...

Page 57: ...pushed in all the way see page 19 No sound is heard from your turntable Make sure the turntable has a built in phono equalizer If the turntable doesn t have a phono equalizer built in you must provide...

Page 58: ...22 W 22 W 3 Front 20 W 20 W 4 Front 14 W 14 W 8 Front THD Total Harmonic Distortion 0 4 1 kHz 1 W Damping Factor 25 Front 1 kHz 8 Input Sensitivity and Impedance 150 mV 50 k DOCK IN MD TAPE IN Output...

Page 59: ...59 Memo...

Page 60: ...Fax 201 785 2650 http www us onkyo com ONKYO EUROPE ELECTRONICS GmbH Liegnitzerstrasse 6 82194 Groebenzell GERMANY Tel 49 8142 4401 0 Fax 49 8142 4401 555 http www eu onkyo com ONKYO EUROPE UK Office...

Reviews: