Onkyo CR-505DA Instruction Manual Download Page 37

37


Troubleshooting


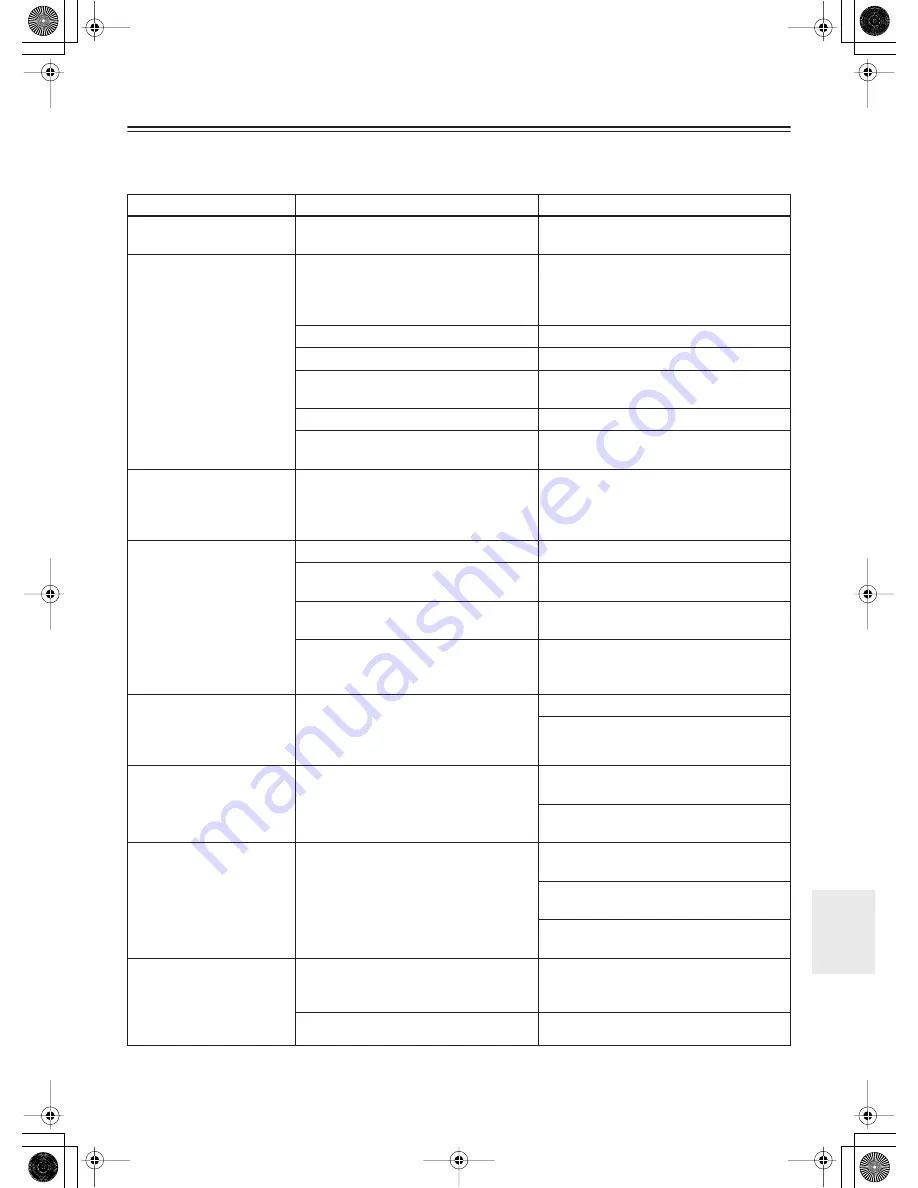
If you have any trouble using your CR-505DAB, check the following table for possible causes and remedies. If you still can’t 
resolve the issue yourself, please contact your Onkyo dealer.


Trouble

Possible Cause

Remedy


Can’t turn on the CR-
505DAB?


The power cord is not connected properly.

Connect the power cord properly to a suitable 
wall outlet (page 16).


There’s no sound coming 
from the speakers?


The speaker cables are not connected prop-
erly.

Check the speaker connections and make sure 
that none of the wires are touching each other, 
other connectors, or any metal parts 
(page 11).

The volume is set at minimum.

Turn up the volume (page 19).

The CR-505DAB is muted.

Unmute the CR-505DAB (page 31).

A pair of headphones is connected.

Turn down the volume, then disconnect the 
headphones (page 19).

The wrong input source is selected.

Check the input source setting (page 19).

A connecting cable may be damaged.

Check your connecting cables for signs of 
damage and replace as necessary.


Sound is coming from only 
one speaker?


The other speaker’s cable is not connected 
properly.

Check the speaker connections and make sure 
that none of the wires are touching each other, 
other connectors, or any metal parts 
(page 11).


The remote controller 
doesn’t work?


The batteries are used.

Replace with new batteries (page 7).

The batteries are installed incorrectly.

Check the batteries and correct as necessary 
(page 7).

You’re not pointing the remote controller at 
the CR-505DAB’s remote sensor.

Point the remote controller at the CR-
505DAB’s remote sensor (page 7).

A strong light source is interfering with the 
CR-505DAB’s remote sensor.

Make sure that the CR-505DAB is not sub-
jected to direct sunshine or inverter-type fluo-
rescent lights. Relocate if necessary.


AM reception is hindered 
by a buzzing noise, espe-
cially at night or with weak 
signals?


Interference caused by electrical equip-
ment, including fluorescent lights.

Relocate your AM antenna.

Install an outdoor AM antenna (page 13).


AM reception is hindered 
by a high-pitched noise?


Interference caused by your TV.

Move the AM loop antenna as far away as 
possible from your TV.

Move the CR-505DAB as far away as possi-
ble from your TV.


Reception is hindered by a 
crackling noise?


Interference is being caused by fluorescent 
lights being turned on or off, or by the igni-
tion systems of passing cars.

Install an outdoor antenna as far away as pos-
sible from nearby roads.

Move your antenna as far away as possible 
from fluorescent lights.

Adjust the position or direction of your out-
door antenna.


FM reception and stereo 
separation are poor even 
though the Tuning and 
“ST” (FM stereo) indica-
tors are shown.


Tall buildings, mountains, or hills are caus-
ing wave reflections that interfere with the 
main signal.

Try an FM antenna with better directionality.

The station’s signal is too strong.

Try an indoor FM antenna.

Summary of Contents for CR-505DA

Page 1: ...ns and turning on the power Following the instructions in this manual will enable you to obtain optimum performance and listening enjoyment from your new CD Receiver Please retain this manual for futu...

Page 2: ...aratus does not operate normally by following the operating instructions Adjust only those controls that are covered by the operating instructions as an improper adjustment of other controls may resul...

Page 3: ...ture Condensation Moisture condensation may damage this unit Read the following carefully When you take a glass containing a cold drink outside on a summer s day drops of water called condensation for...

Page 4: ...unit To prevent exposure to the laser beam do not try to open the enclosure DANGER VISIBLE AND INVISIBLE LASER RADIATION WHEN OPEN AND INTERLOCK FAILED OR DEFEATED DO NOT STARE INTO BEAM CAUTION THIS...

Page 5: ...de 18 Using the CR 505DAB 19 Selecting Sound Sources 19 Adjusting the Volume 19 Using Headphones 19 Getting Started Playing CDs 20 Playing CDs 20 Selecting Tracks by Number 20 Displaying Information 2...

Page 6: ...esets for DAB 40 Presets for AM and FM Automatic FM Scan Tuning RDS CT PS RT Others Aluminum Volume Knob Front Panel Compatible Remote Control 5 Mode Timer Timer 1 2 3 4 Sleep Supplied Accessories Che...

Page 7: ...trol sensor as shown below Notes The remote controller may not work reliably if the CR 505DAB is subjected to bright light such as direct sunlight or inverter type fluorescent lights Keep this in mind...

Page 8: ...CD DAB FM AM TAPE MD or LINE 8 MENU button 22 30 Displays the Tuner menu Selects the play mode for CD or MP3 9 DIRECT button 31 Used to select Tone Direct On or Tone Direct Off 0 BASS control 31 Adju...

Page 9: ...PTICAL DIGITAL OUT 14 15 This connector can be used to connect a Mini Disc recorder or other component with digital input 6 SUBWOOFER PRE OUT 11 This RCA phono connector can be used to connect an acti...

Page 10: ...ctor buttons Used to select sound sources I MUTING button Used to mute the CR 505DAB J Previous Next buttons PRESET buttons Used to select the previous or next track when playing CDs or to select pres...

Page 11: ...y damage the CD Receiver Don t connect more than one cable to each speaker terminal Doing so may damage the CD Receiver If you want to connect a single speaker instead of a pair connect it to either t...

Page 12: ...tenna is for indoor use only 1 Assemble the AM loop antenna inserting the tabs into the base as shown 2 Connect both wires of the AM loop antenna to the AM push terminals as shown The antenna s wires...

Page 13: ...use interference problems If cir cumstances demand it use a TV FM antenna splitter as shown If good reception cannot be achieved using the suppliedAM loop antenna an outdoor AM antenna can be used in...

Page 14: ...ly labeled L Push plugs in all the way to make good connections loose connections can cause noise or malfunctions To prevent interference keep audio cables away from power cords and speaker cables Bef...

Page 15: ...ia see Timers on page 32 Sleep Timer When you set the CR 505DAB s sleep timer the sleep tim ers on component connected via are also set so all components switch off after the specified period To use y...

Page 16: ...the CLOCK CALL button to check if the clock has been set correctly If the clock has not been set correctly see Setting the Clock Manually on page 18 The ACCUCLOCK function automatically calibrates th...

Page 17: ...station that supports RDS 7 Press the ENTER button While the clock is being set Clock Setting appears on the display It may take a few minutes to set the clock When the clock has been set Adjusted ap...

Page 18: ...CLOCK CALL button The date and time appear on the display Press the CLOCK CALL button again to return to the previous display You can set the CR 505DAB so that the time is displayed while the CR 505D...

Page 19: ...ontrol or the remote controller s VOL UME buttons Turn the VOLUME control clockwise to increase the volume counterclockwise to decrease it You can connect a pair of stereo headphones to the CR 505DAB...

Page 20: ...xt track during playback On the remote controller Press the button to select the next track or the button to select the previous track If you press the button during playback or while play back is pau...

Page 21: ...pears Remaining disc time The amount of time remaining for the entire disc T indicator appears MP3 Disc Elapsed track time The length of time that the current track has been playing default display Tr...

Page 22: ...ss the remote control ler s MODE button repeatedly to display D Rdm indicator 2 Press the Play button to start random playback All tracks are played in random order 3 To cancel random playback stop pl...

Page 23: ...utomatically when all the tracks in the program have been played Note When carrying out operations on the CR 505DAB press the MENU button repeatedly to turn on the Mem indi cator turn the control to s...

Page 24: ...he Auto Tuning starts and scans the Band III frequen cies The number of scanned components are shown dur ing scanning Notes You can also control this function using the MODE PRESET and ENTER buttons o...

Page 25: ...ent Name Sorts the components for each ensemble by component name PTY Sorts components by program type Alphabet Sorts component names in alphabetical order 1 Press the MENU button 2 Turn the control t...

Page 26: ...ess the MENU button 2 Turn the control to select Search Mode and push the control 3 Turn the control to select Preset and push the control 4 Turn the control to select a preset You can delete unwanted...

Page 27: ...being broadcast by the station 2 Time Displays the date and time obtained from the current com ponent 3 Bit Rate mono stereo Displays the current station mode stereo or mono and the bit rate at which...

Page 28: ...uning into weak FM stations If a station has poor signal strength you may not be able to tune into that station properly or reception may be noisy In this case switch the FM Mode to Mono then tune the...

Page 29: ...set Write and then press the ENTER button The preset number flashes 5 While the preset number is flashing use the buttons to select a preset number from 1 to 40 You cannot choose any preset number tha...

Page 30: ...to copy 2 Press the MENU button and turn the control until Preset Edit appears on the display 3 Push the control 4 Turn the control until Preset Copy appears on the display 5 Push the control 6 While...

Page 31: ...e 1 Press the DIRECT button to select Tone Direct Off 2 Use the BASS or TREBLE control on the CR 505DAB to adjust the bass or tre ble In Direct mode the bass and treble tone circuits are bypassed crea...

Page 32: ...settings of two timers overlap the earlier timer has priority Timer 1 9 00 10 00 Timer 2 8 00 10 00 This timer has priority Notes The timers work only if the CR 505DAB is in Standby mode If the CR 50...

Page 33: ...to Standby mode If you use any connected cassette tape deck or MD recorder as a recording device you must also set the device to standby mode Notes You can cancel the timer setting procedure at any ti...

Page 34: ...the cur rently displayed setting and then press ENTER to move on to the next setting With the sleep timer you can set the CR 505DAB so that it automatically turns off after a specified period 1 Press...

Page 35: ...0 kbps 128 kbps or 192 kbps recommended Incompatible files cannot be played Fixed bit rate MP3 files are recommended however vari able bit rate VBR MP3 files between 8 kbps and 320 kbps are supported...

Page 36: ...stubborn dust or dirt wipe the disc with a damp soft cloth and then dry it with a dry cloth Never use solvent based cleaning fluids such as thinner or benzene commercially available cleaners or antist...

Page 37: ...are installed incorrectly Check the batteries and correct as necessary page 7 You re not pointing the remote controller at the CR 505DAB s remote sensor Point the remote controller at the CR 505DAB s...

Page 38: ...B somewhere free of vibration The disc is dirty Remove the disc and clean it page 36 The disc is very scratched Buy a new disc Noise is generated DTS CD is being replayed Do not replay DTS CD which is...

Page 39: ...G button to cancel the Mute func tion Press it again to mute the CR 505DAB For timed playback the volume is deter mined by the VOLUME control Set the volume to a suitable level page 19 doesn t work Th...

Page 40: ...evel and Impedance 200 mV 2 2 k REC OUT Frequency Response 10 Hz 50 kHz 3 dB 3 dB line Tone Control 9 dB 8 2 dB 100 Hz BASS 11 dB 9 dB 10kHz TREBLE S N Ratio 97 dB LINE IHF A Speaker Impedance 4 16 FM...

Reviews: